简介
Swarm是一种去中心化的数据存储和分发技术,可以为下一代不受审查审查的,不可阻挡的无服务器应用程序提供动力。它是最初由以太坊加密货币设想的基于区块链的智能合约的补充,并在Dapp构建难题中提供了大容量存储部分。Swarm是世界计算机的硬盘驱动器。
Bee是Swarm网络的客户端程序
Bee 安装
测试系统 Ubuntu 18.04
安装过程
- (推荐)为Bee设置一个外部签名者(即安装bee-clef)
- 安装Bee应用程序包
- 用gETH和gBZZ为您的节点提供资金
安装Bee clef软件包
https://docs.ethswarm.org/docs/installation/bee-clef/
https://github.com/ethersphere/bee-clef/releases
wget https://github.com/ethersphere/bee-clef/releases/download/v0.4.10/bee-clef_0.4.10_amd64.deb
sudo dpkg -i bee-clef_0.4.10_amd64.deb
配置Bee-clef
cd /etc/bee-clef/
在正常/默认软件包安装下,开始使用bee-clef不需要进行任何配置更改。
检查Bee-clef是否安装正确
一旦安装了Clef,它将开始作为服务运行。
要检查Clef是否运行正常,我们可以使用systemctl
systemctl status bee-clef
surou@bcskill:/etc/bee-clef$ systemctl status bee-clef
● bee-clef.service - Bee Clef
   Loaded: loaded (/lib/systemd/system/bee-clef.service; enabled; vendor preset: enabled)
   Active: active (running) since Mon 2021-05-10 10:34:00 CST; 4min 8s ago
     Docs: https://docs.ethswarm.org
 Main PID: 22337 (bash)
    Tasks: 12 (limit: 4915)
   CGroup: /system.slice/bee-clef.service
           ├─22337 bash /usr/bin/bee-clef-service start
           ├─22364 clef --stdio-ui --keystore /var/lib/bee-clef/keystore --configdir /var/lib/bee-clef --chai
           └─22365 tee /var/lib/bee-clef/stdout
查看服务日志
sudo journalctl -f -u bee-clef.service
Bee-clef第一次启动时,您应该看到与以下内容非常相似的内容:
-- Logs begin at Thu 2021-03-18 14:51:48 CST. --
May 10 10:34:00 web204_234 bee-clef-service[22337]: Clef is distributed in the hope that it will be useful, but WITHOUT ANY WARRANTY;
May 10 10:34:00 web204_234 bee-clef-service[22337]: without even the implied warranty of MERCHANTABILITY or FITNESS FOR A PARTICULAR
May 10 10:34:00 web204_234 bee-clef-service[22337]: PURPOSE. See the GNU General Public License for more details.
May 10 10:34:00 web204_234 bee-clef-service[22337]: INFO [05-10|10:34:00.773] Using stdin/stdout as UI-channel
May 10 10:34:00 web204_234 bee-clef-service[22337]: INFO [05-10|10:34:00.919] Loaded 4byte database                    embeds=146841 locals=4 local=/etc/bee-clef/4byte.json
May 10 10:34:00 web204_234 bee-clef-service[22337]: {"jsonrpc":"2.0","id":1,"method":"ui_onInputRequired","params":[{"title":"Master Password","prompt":"Please enter the password to decrypt the master seed","isPassword":true}]}
May 10 10:34:01 web204_234 bee-clef-service[22337]: INFO [05-10|10:34:01.622] Rule engine configured                   file=/etc/bee-clef/rules.js
May 10 10:34:01 web204_234 bee-clef-service[22337]: INFO [05-10|10:34:01.622] Starting signer                          chainid=5 keystore=/var/lib/bee-clef/keystore light-kdf=true advanced=false
May 10 10:34:01 web204_234 bee-clef-service[22337]: INFO [05-10|10:34:01.623] IPC endpoint opened                      url=/var/lib/bee-clef/clef.ipc
May 10 10:34:01 web204_234 bee-clef-service[22337]: {"jsonrpc":"2.0","method":"ui_onSignerStartup","params":[{"info":{"extapi_http":"n/a","extapi_ipc":"/var/lib/bee-clef/clef.ipc","extapi_version":"6.1.0","intapi_version":"7.0.1"}}]}
可以安全地忽略此行,无需执行任何操作:
{"jsonrpc":"2.0","method":"ui_onSignerStartup","params":[{"info":{"extapi_http":"n/a","extapi_ipc":"/var/lib/bee-clef/clef.ipc","extapi_version":"6.1.0","intapi_version":"7.0.1"}}]}
一旦bee开始与bee-clef您进行交互,您应该开始看到日志消息,对于定期活动和连接的节点,它们将每隔几秒钟出现一次:
Feb 24 22:29:15 comp-name bee-clef-service[1118]: INFO [02-24|22:29:15.118] Op approved
Feb 24 22:30:17 comp-name bee-clef-service[1118]: INFO [02-24|22:30:17.371] Op approved
Feb 24 22:30:19 comp-name bee-clef-service[1118]: INFO [02-24|22:30:19.344] Op approved
...
数据位置
关键材料和其他数据存储在 /var/lib/bee-clef/
蜜蜂可以通过多种方式与养蜂人交流。如果通过软件包安装,则默认方式将使用进程间通信(IPC)文件。这是Bee-clef在启动时创建的特殊文件,Bee将使用该文件来回发送请求。Bee-clef服务运行时,您会注意到/var/lib/bee-clef/clef.ipc已创建一个文件。
bee节点地址私钥
文件默认创建在
keystore: /var/lib/bee-clef/keystore/
password: /var/lib/bee-clef/password
直接导入MetaMask即可
/var/lib/bee-clef# cat keystore/UTC--2021-05-10T02-33-58.763177852Z--10210fa0 6b4924af7ef946136295e9b209e1f
{"address":"10210572d6b4924af7ef946136295e9b209e1fa0","crypto":{"cipher":"aes-128-ctr","ciphertext":"9da4ef8e6154cb12524f7ffad36faf0d2c3665b537a4d11b3a4b7bb31e7028c0","cipherparams":{"iv":"29229b07608492ff369d4f4547c074bc"},"kdf":"scrypt","kdfparams":{"dklen":32,"n":4096,"p":6,"r":8,"salt":"96c023aef9e8743fe404b3d1ccbc06b8e31fe0d0e56a4c35a422d17bd505faf3"},"mac":"fb6c344beb0124a0dada03ee454e6f5564604998100f44079b8157dbcf66abc8"},"id":"b92410f4-b583-4ef5-a3d8-9bf6b5f322bf","version":3
手动安装
要手动安装Clef,请首先从以太坊的Geth&Tools下载页面中检索相关的Clef二进制文件,或直接从源代码进行构建。
由于Bee需要Clef自动签署许多交易,因此我们必须将Clef作为具有宽松权限和规则集的服务运行。为确保Clef仅签署来自Bee的交易,我们必须clef.ipc通过创建Bee用户并设置权限来保护文件,以便该用户只能使用ipc套接字。
另外,Clef需要Bee的支票簿交互的交易签名。
可以在Bee-clef存储库中找到自动执行初始化后权限更改(包括Clef配置)的Shell脚本clef-service,以及4byte.json事务签名文件和rules.js文件。
最后,一旦Clef运行,只需将Bee节点配置为启用Clef使用,--clef-signer-enable然后使用将Bee指向正确的ipc套接字即可--clef-signer-endpoint。
安装Bee
wget https://github.com/ethersphere/bee/releases/download/v0.5.3/bee_0.5.3_amd64.deb
sudo dpkg -i bee_0.5.3_amd64.deb
SWAP区块链端点
您的Bee节点必须有权访问以太坊区块链,以便它可以交互并部署您的支票簿合同。您可以运行 自己的Goerli节点,也可以使用rpc.slock.it/goerli 或 Infura之类的提供程序。
默认情况下,Bee希望在本地有Goerli节点http://localhost:8545
要改用提供程序,只需--swap-endpoint在您的配置文件中更改即可。
切换登录用户
由于程序目录的权限账户默认初始化为bee
surou@bcskill:/var/lib$ ll
total 176
drwxr-x---  4 bee       bee       4096 May 10 11:58 bee/
drwxr-x---  4 bee-clef  bee-clef  4096 May 10 10:34 bee-clef/
所以需要切换下登陆账户
su bee
修改swap-endpoint配置
sudo vi /etc/bee/bee.yaml
sudo systemctl restart bee
...
swap-endpoint: https://rpc.slock.it/goerli
...
查看日志
sudo journalctl --lines=100 --follow --unit bee
May 10 14:24:12 web204_234 bee[30421]: Error: chequebook init: insufficient BZZ for initial deposit
May 10 14:24:12 web204_234 systemd[1]: bee.service: Main process exited, code=exited, status=1/FAILURE
May 10 14:24:12 web204_234 systemd[1]: bee.service: Failed with result 'exit-code'.
May 10 14:24:17 web204_234 systemd[1]: bee.service: Service hold-off time over, scheduling restart.
May 10 14:24:17 web204_234 systemd[1]: bee.service: Scheduled restart job, restart counter is at 1.
May 10 14:24:17 web204_234 systemd[1]: Stopped Bee - Ethereum Swarm node.
May 10 14:24:17 web204_234 systemd[1]: Started Bee - Ethereum Swarm node.
May 10 14:24:17 web204_234 bee[30506]: Welcome to the Swarm.... Bzzz Bzzzz Bzzzz
May 10 14:24:17 web204_234 bee[30506]:                 \     /
May 10 14:24:17 web204_234 bee[30506]:             \    o ^ o    /
May 10 14:24:17 web204_234 bee[30506]:               \ (     ) /
May 10 14:24:17 web204_234 bee[30506]:    ____________(%%%%%%%)____________
May 10 14:24:17 web204_234 bee[30506]:   (     /   /  )%%%%%%%(  \   \     )
May 10 14:24:17 web204_234 bee[30506]:   (___/___/__/           \__\___\___)
May 10 14:24:17 web204_234 bee[30506]:      (     /  /(%%%%%%%)\  \     )
May 10 14:24:17 web204_234 bee[30506]:       (__/___/ (%%%%%%%) \___\__)
May 10 14:24:17 web204_234 bee[30506]:               /(       )\
May 10 14:24:17 web204_234 bee[30506]:             /   (%%%%%)   \
May 10 14:24:17 web204_234 bee[30506]:                  (%%%)
May 10 14:24:17 web204_234 bee[30506]:                    !
May 10 14:27:45 web204_234 bee[30602]: time="2021-05-10T14:27:45+08:00" level=info msg="version: 0.5.3-acbd0e2"
May 10 14:27:46 web204_234 bee[30602]: time="2021-05-10T14:27:46+08:00" level=info msg="using swarm network address through clef: fa9372fcd90e186a6a5e2d14864539df35e2c5e495ba6a75dd626fd5a738319e"
May 10 14:27:46 web204_234 bee[30602]: time="2021-05-10T14:27:46+08:00" level=info msg="swarm public key 038f72455a66a713be2e684a07f4f0444a8de458d0716151a5cfcd56aee1c92020"
May 10 14:27:46 web204_234 bee[30602]: time="2021-05-10T14:27:46+08:00" level=info msg="pss public key 02faa1c0f8fcdcbc1d816c4abf042b39ecc6b1ad533e3e7744b6d054a2b9bf794c"
May 10 14:27:46 web204_234 bee[30602]: time="2021-05-10T14:27:46+08:00" level=info msg="using ethereum address 10210572d6b4924af7ef946136295e9b209e1fa0"
May 10 14:27:46 web204_234 bee[30602]: time="2021-05-10T14:27:46+08:00" level=info msg="debug api address: 127.0.0.1:1635"
May 10 14:27:48 web204_234 bee[30602]: time="2021-05-10T14:27:48+08:00" level=info msg="using default factory address for chain id 5: f0277caffea72734853b834afc9892461ea18474"
May 10 14:27:49 web204_234 bee[30602]: time="2021-05-10T14:27:49+08:00" level=info msg="no chequebook found, deploying new one."
May 10 14:27:50 web204_234 bee[30602]: time="2021-05-10T14:27:50+08:00" level=warning msg="cannot continue until there is sufficient ETH (for Gas) and at least 10 BZZ available on 10210572d6b4924af7ef946136295e9b209e1fa0"
May 10 14:27:50 web204_234 bee[30602]: time="2021-05-10T14:27:50+08:00" level=warning msg="get your Goerli ETH and Goerli BZZ now via the bzzaar at https://bzz.ethswarm.org/?transaction=buy&amount=10&slippage=30&receiver=0x10210572d6b4924af7ef946136295e9b209e1fa0"
如果出现Error: open /var/lib/bee/statestore/LOCK: permission denied
则进入/var/lib/bee,确认下statestore的当前权限组是不是bee
如果不是则修改下
sudo chown bee.bee statestore
sudo systemctl restart bee
与Bee交互测试
curl localhost:1633
激活节点
启用了SWAP的Bee节点需要gETH和gBZZ才能开始操作。
cannot continue until there is sufficient ETH (for Gas) and at least 10 BZZ available on 10210572d6b4924af7ef946136295e9b209e1fa0
当前版本的Swarm激励措施正在以太坊Goerli测试网上运行。要获取免费的gBZZ令牌,请访问Bzzaar,然后执行以下步骤!
1. 查看Bee节点地址
sudo bee-get-addr
Please make sure there is sufficient ETH and BZZ available on the node's Ethereum address: 10210572d6b4924af7ef946136295e9b209e1fa0.

You can get both Goerli ETH and Goerli BZZ via the Bzzaar at https://bzz.ethswarm.org/?transaction=buy&amount=10&slippage=30&receiver=0x10210572d6b4924af7ef946136295e9b209e1fa0
或者通过API获取
curl -s localhost:1635/addresses | jq .ethereum
得到0x10210572d6b4924af7ef946136295e9b209e1fa0
确认下与前面Bee-clef创建的keystore中的地址一致
2. 获取gBZZ
通过上面日志可以获取到
https://bzz.ethswarm.org/?transaction=buy&amount=10&slippage=30&receiver=0x10210572d6b4924af7ef946136295e9b209e1fa0
3. 打开此连接,然后链接Metamask扩展
4. 点击下面的GET G-ETH
5. 等待Goerli ETH到达您的钱包
官方将向您连接的钱包和Bee的钱包中发送少量gETH(gETH 就是 goerli的 系统测试代币)!
这可能需要几分钟,请检查Etherscan上的水龙头地址,然后查找到您的地址的交易。
交易完成后,您可能需要重新连接钱包以查看余额增加。
也可以访问https://faucet.ethswarm.org/水龙头获取
如果上面的都不举,就用 https://faucet.goerli.mudit.blog/
还有 https://gitter.im/goerli/testnet?at=5f7f1d756e0eb84469728b8b
6. 兑换
一旦有了余额,在该gBZZ字段中至少输入10 ,您甚至可能有足够的gETH来购买更多!这是另一项区块链交易,只需几分钟即可查看Metamask,以查看交易进展如何。
7. 兑换完成
完成交易后,您的Bee节点应该是一些新鲜出炉的gBZZ的骄傲拥有者!
8. 检查节点
检查Bee节点,它现在应该开始部署您的支票簿合同。如果您的节点已停止轮询更新,则现在可能需要重新启动它。
一旦您的Bee节点完全加载了gBZZ,我们现在就可以观看日志,并观看Bee自动部署支票簿并进行初始存入的情况。
sudo journalctl --lines=100 --follow --unit bee
May 10 16:39:06 web204_234 bee[1654]: time="2021-05-10T16:39:06+08:00" level=info msg="attempting to connect to peer e4006955ac467eb48dbda60b9564f0a71a4af7cd558e4af8d58041ce2bf6b02b"
May 10 16:39:11 web204_234 bee[1654]: time="2021-05-10T16:39:11+08:00" level=warning msg="peer not reachable when attempting to connect"
May 10 16:39:11 web204_234 bee[1654]: time="2021-05-10T16:39:11+08:00" level=info msg="attempting to connect to peer ec085740961bf2248334c03e5fe4a4b65e498d6d045839e02eaf32e408f13954"
May 10 16:39:13 web204_234 bee[1654]: time="2021-05-10T16:39:13+08:00" level=warning msg="peer not reachable when attempting to connect"
May 10 16:39:13 web204_234 bee[1654]: time="2021-05-10T16:39:13+08:00" level=info msg="attempting to connect to peer f025b3ef8b07263b1b4852601d402db0a05e0e91102e2ac57e46cce36496208f"
May 10 16:39:18 web204_234 bee[1654]: time="2021-05-10T16:39:18+08:00" level=warning msg="peer not reachable when attempting to connect"
May 10 16:39:18 web204_234 bee[1654]: time="2021-05-10T16:39:18+08:00" level=info msg="attempting to connect to peer f20014da660cdda4c611535d5698414c428fe5d72c8d00294f83a98dfbc3d73c"
May 10 16:39:20 web204_234 bee[1654]: time="2021-05-10T16:39:20+08:00" level=warning msg="peer not reachable when attempting to connect"
May 10 16:39:20 web204_234 bee[1654]: time="2021-05-10T16:39:20+08:00" level=info msg="attempting to connect to peer f405e443f4c686f1434ef47c17943343bbfba8348f0f70a62e948eae6775480b"
May 10 16:39:22 web204_234 bee[1654]: time="2021-05-10T16:39:22+08:00" level=info msg="greeting \"Hello from ldeffenb's DAppNode!\" from peer: f405e443f4c686f1434ef47c17943343bbfba8348f0f70a62e948eae6775480b"
May 10 16:39:22 web204_234 bee[1654]: time="2021-05-10T16:39:22+08:00" level=warning msg="peer not reachable when attempting to connect"
May 10 16:39:22 web204_234 bee[1654]: time="2021-05-10T16:39:22+08:00" level=info msg="attempting to connect to peer f622fd3941ce417f99211f44d2acb0b62d7953a1da0b1d5eb21897a96d37b4b3"
May 10 16:39:27 web204_234 bee[1654]: time="2021-05-10T16:39:27+08:00" level=warning msg="peer not reachable when attempting to connect"
May 10 16:39:27 web204_234 bee[1654]: time="2021-05-10T16:39:27+08:00" level=info msg="attempting to connect to peer fc0ccee5d2b893a634fc443818d090d4a89df4ac9502ee4d140df4035318ef5d"
升级Bee
停止服务
sudo systemctl stop bee
安装最新包,
重新启动服务
sudo systemctl start bee
卸载Bee
sudo apt-get remove bee
sudo apt-get remove bee-clef
数据位置
Bee-clef
配置文件存储在 /etc/bee-clef/
关键材料和其他数据存储在 /var/lib/bee-clef/
Bee
配置文件存储在 /etc/bee/
状态,块和其他数据存储在 /var/lib/bee/
使用节点
该调试API为您提供能够与您的蜜蜂节点进行交互,以获取有关您的节点的状态的详细信息,其中一个特权环境。
切勿将您的Debug API暴露在公共互联网上,请确保使用防火墙或绑定到localhost,如下面的示例所示。
要使用Debug API,我们必须先配置Bee使其启用,因为默认情况下它是禁用的。
bee start --debug-api-enable --debug-api-addr=localhost:1635
检查连接
curl -s http://localhost:1635/peers | jq '.peers | length'
检查网络拓扑
curl -X GET http://localhost:1635/topology | jq
API和调试API
https://docs.ethswarm.org/docs/api-reference/api-reference/
上传和下载文件
Bee提供了一种方便的方式将您的数据上传到Swarm。一旦您的数据被上传,它将被遍布全球的p2p节点网络分发和存储,并可以从Swarm的Web网关中获取。
快速上传
Bee节点运行后,将启用HTTP API与您进行交互。命令行实用程序curl是与Bee节点的API交互的好方法。
首先,让我们检查一下API是否按预期运行...
curl http://localhost:1633
返回
Ethereum Swarm Bee
运行后,可以通过files向Bee API的端点发出HTTP POST请求来上传文件。
curl -F file=@bee.jpg http://localhost:1633/files
我们还可以在Content-Type标头中传递适当的mime类型,并在name查询参数中传递文件名,以便Web浏览器和其他应用程序可以正确处理该文件。
curl --data-binary @bee.jpg -H "Content-Type: video/jpg" "http://localhost:1633/files?name=bee.jpg"
返回
{"reference":"042d4fe94b946e2cb51196a8c136b8cc335156525bf1ad7e86356c2402291dd4"}
在Swarm中,每条数据都有一个唯一的地址,该地址是一个唯一且可复制的加密哈希摘要。如果您上载相同的文件两次,您将始终收到相同的哈希值。这使得在Swarm中处理数据变得超级安全!
如果您要上传大文件,则在处理上传到网络中时,跟踪上传状态非常有用。转至“高级用法”部分,以了解如何跟踪您的上传状态。
文件与网络完全同步后,您将可以关闭计算机,其他节点将接管您的数据工作!
下载文件
将文件上传到Swarm后,可以使用简单的HTTP GET请求对其进行检索。
将哈希的最后一部分替换为对您自己的数据的引用。
curl -OJ http://localhost:1633/files/042d4fe94b946e2cb51196a8c136b8cc335156525bf1ad7e86356c2402291dd4
您甚至可以简单地导航到浏览器中的URL
http://localhost:1633/files/042d4fe94b946e2cb51196a8c136b8cc335156525bf1ad7e86356c2402291dd4
公共网关
要与尚未运行Bee节点的人共享文件,只需将链接中的主机更改为我们的公共网关之一。将链接发送给您的朋友,他们也可以下载文件!
https://gateway.ethswarm.org/files/042d4fe94b946e2cb51196a8c136b8cc335156525bf1ad7e86356c2402291dd4
上载目录
https://docs.ethswarm.org/docs/getting-started/upload-a-directory
可以使用Bee一次上传整个目录结构。
在Swarm上托管您的网站
https://docs.ethswarm.org/docs/getting-started/host-your-website-using-ens
加密存储
https://docs.ethswarm.org/docs/getting-started/store-with-encryption
高级用法
PSS消息传递
https://docs.ethswarm.org/docs/advanced/pss
跟踪上传状态
https://docs.ethswarm.org/docs/advanced/tags
坚持不懈
每个Bee节点均配置为在计算机硬盘驱动器上保留一定数量的内存,以在Swarm网络中其他节点的职责范围内存储和提供服务。一旦分配的空间已满,每个Bee节点将删除较旧的块,以便为较新的块腾出空间,因为它们是由网络上载的。
每次访问块时,它都会移回到删除队列的末尾,以便定期访问的内容在网络中保持活动状态,并且不会被节点的垃圾回收例程删除。
SWAP带宽核算
Swarm的基础是一组会计协议,这些协议已在5年的研发过程中开发并原型化。您的Beta Bee节点包含功能,使其能够跟踪与所有对等节点的带宽交换,使用生活在与EVM兼容的区块链上的智能合约来进行签发和缓存检查。目前,我们正在使用Goerli测试网进行测试。我们希望您能参与其中,帮助我们尝试这些激励措施,甚至可以赚取一些gBZZ!
https://docs.ethswarm.org/docs/advanced/swap
管理未兑现支票
https://docs.ethswarm.org/docs/advanced/swap#managing-uncashed-cheques
下载脚本
wget -O cashout.sh https://gist.githubusercontent.com/ralph-pichler/3b5ccd7a5c5cd0500e6428752b37e975/raw/b40510f1172b96c21d6d20558ca1e70d26d625c4/cashout.sh
chmod +x cashout.sh
./cashout.sh
如果运行./cashout.sh不返回任何内容,则您当前没有未兑现的支票。
兑现所有价值超过5 BZZ的支票
./cashout.sh cashout-all 5
启动测试网络
https://docs.ethswarm.org/docs/advanced/starting-a-test-network
大型节点运营商
https://docs.ethswarm.org/docs/advanced/large-node-operators
附加
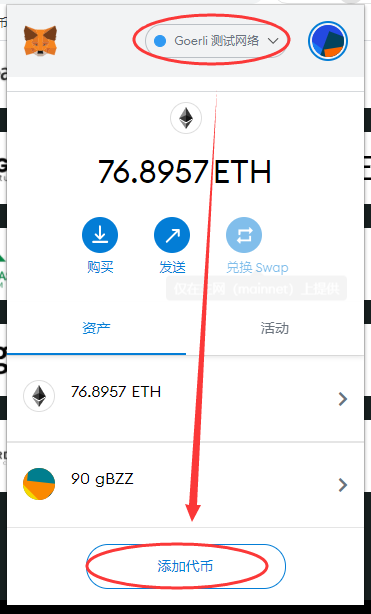
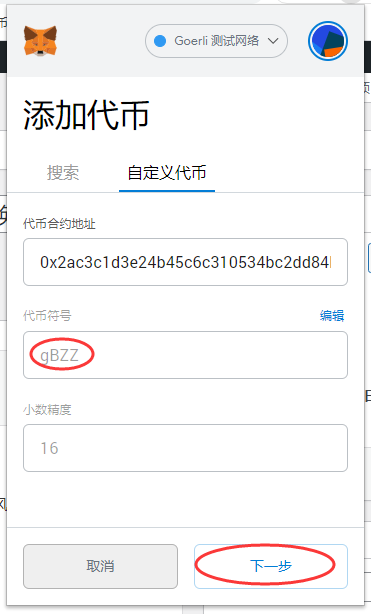
显示BZZ
钱包添加合约地址:0x2ac3c1d3e24b45c6c310534bc2dd84b5ed576335


查看支票薄账户余额
curl localhost:1635/chequebook/balance | jq
{
  "totalBalance": 1e+17,
  "availableBalance": 1e+17
}
查看每个peer的余额
curl localhost:1635/balances | jq
{
  "balances": [
    {
      "peer": "fa7bdf0fec5c6a684d210b8b92a6dbe96014fa5bfe5b403037c6305d2cf5925e",
      "balance": 14000000000
    },
    ...
查看支票接收和发送数量
curl localhost:1635/settlements | jq
{
  "totalreceived": 9000000000,
  "totalsent": 0,
  "settlements": [
    {
      "peer": "e001cc63c87efde4092da8253787dae82590e6d2274716cbab6025c49a815b0f",
      "received": 9000000000,
      "sent": 0
    }
  ]
}
查看支票薄详情
curl localhost:1635/chequebook/cheque | jq
{
  "lastcheques": [
    {
      "peer": "e001cc63c87efde4092da8253787dae82590e6d2274716cbab6025c49a815b0f",
      "lastreceived": {
        "beneficiary": "0x10210572d6b4924Af7Ef946136295e9b209E1FA0",
        "chequebook": "0x01DC64508363ab83f0EC4DC34263ee804a5A38BF",
        "payout": 9000000000
      },
      "lastsent": null
    }
  ]
}
兑现(POST请求)
curl -XPOST http://localhost:1635/chequebook/cashout/e001cc63c87efde4092da8253787dae82590e6d2274716cbab6025c49a815b0f
{"transactionHash":"0xcd1f95980475213dabaab2c3934006b8810872cf460a656cd4b742f446655529"}
查看兑现状态(GET请求)
curl http://localhost:1635/chequebook/cashout/e001cc63c87efde4092da8253787dae82590e6d2274716cbab6025c49a815b0f | jq
{
  "peer": "e001cc63c87efde4092da8253787dae82590e6d2274716cbab6025c49a815b0f",
  "chequebook": "0x01dc64508363ab83f0ec4dc34263ee804a5a38bf",
  "cumulativePayout": 9000000000,
  "beneficiary": "0x10210572d6b4924af7ef946136295e9b209e1fa0",
  "transactionHash": "0xcd1f95980475213dabaab2c3934006b8810872cf460a656cd4b742f446655529",
  "result": {
    "recipient": "0x68f7ea9f3fae55e3e55fee0f0761b7df570fd212",
    "lastPayout": 9000000000,
    "bounced": false
  }
}
将token从合约提现到个人账户
curl -XPOST http://localhost:1635/chequebook/withdraw\?amount\=9000000000 | jq
{
  "transactionHash": "0x4e15f9b685af8ce20192102491f971279cd5c32ee229e97f45eaba874f18478e"
}
参考
https://docs.ethswarm.org/docs/
https://docs.ethswarm.org/api/
https://medium.com/ethereum-swarm/swarm-is-airdropping-1-000-000-bzz-bd3b706918d3
https://medium.com/ethereum-swarm/how-to-run-bee-on-a-dappnode-raspberry-pi-7b4993ff7583
https://blog.csdn.net/kk3909/article/details/116236431

