1. ETH1.0和2.0的对比
1.1 共识机制
共识改进
- 节能,比pow消耗更少能源
- 低门槛,硬件相对较低
- 降低中心化,pos更易节点参与
- 增加攻击成本,违规惩罚
1.2 节点组成
- eth1.0:一个执行客户端组成完整以太坊节点
- eth2.0:执行客户端 + 共识客户端
2. ETH 2.0 方案组成
2.1 节点架构
-
执行层->P2P1
- 维护交易池,交易处理,gossip广播
- 状态管理
- 创建执行负载
- 用户网关->提供对外RPC
-
共识层->P2P2
- 共享广播块和证明
- 运行分叉选择算法
- 跟踪链的头部
- 管理信标状态(包含共识和执行信息)
- 跟踪 RANDAO 中累积的随机性
- 跟踪justification和finalization
- 验证器

2.2 执行与共识层通信
共识和执行层之间通过“Engine-API”的API发送指令。
共享一个 ENR(以太坊节点记录),其中包含(eth1 密钥和 eth2 密钥)。
层内广播协议:gossip
共识层非区块生产者:
共识层-->接收区块->预先验证块(有效sender)->区块中的交易->执行层->执行交易并验证块头中的状态(哈希匹配)->共识层->添加本地链头部->创建证明->广播证明
共识层为区块生产者时:
共识层->收到通知(下一个区块当选生产者)->调用执行层(create block)->交易内存池->打包区块->执行交易生成区块哈希<-共识层抓取交易和区块哈希->添加到信标块->广播区块
3. 环境测试
3.1 测试方案选配
根据客户端多样性分布
https://clientdiversity.org/
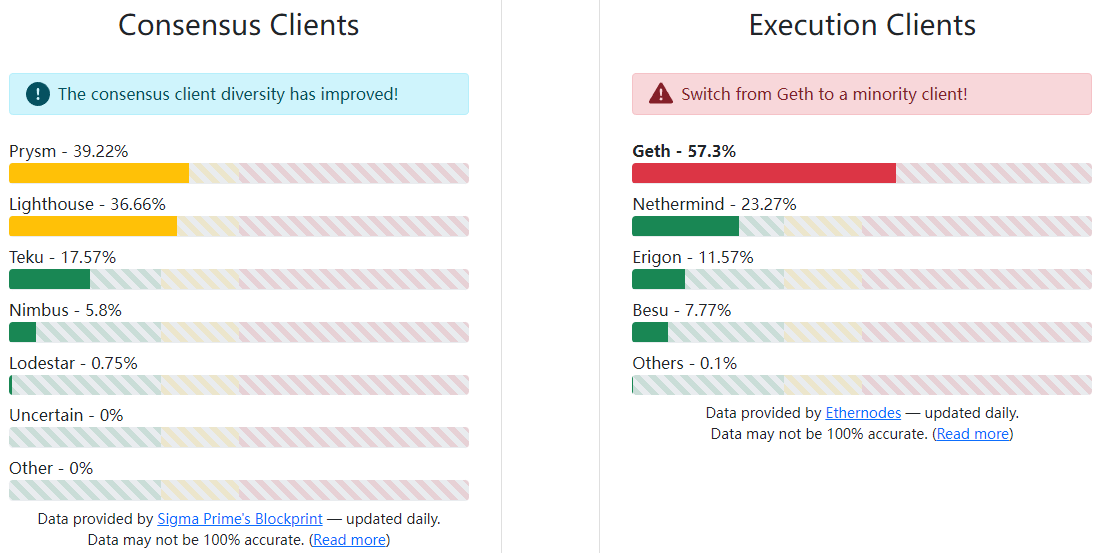
测试方案:Prysm棱镜 + Geth
部署参考文档(prylabs)
3.2 测试环境
- 系统: Ubuntu 20.04
- CPU:4+ 核 @ 2.8+ GHz
- 内存:16GB+
- 存储:2TB+ SSD
- 网络:8 MBit/秒
- 测试网络: Goerli-Prater
- 执行客户端: Geth 1.11.3
- EN-BN 连接: HTTP-JWT
eth2.0测试网
- Sepolia
- 封闭验证器集
- 验证者集受到限制,主要由客户和测试团队监督
- 较小的区块链状态和历史
- 同步速度快,需要更少的存储承诺
- Goerli
- 开放验证者集
- 携带大状态并需要高存储承诺
- 需要更长的时间才能与网络的当前状态同步
如果测试合约选Sepolia, 如果想测试参与节点治理选Goerli
3.3 测试环境部署
设置工作目录
export workdir=/mnt/d/eth2.0/ethereum
3.3.1 安装 Prysm
cd $workdir
mkdir consensus
mkdir execution
cd consensus
mkdir prysm && cd prysm
curl https://raw.githubusercontent.com/prysmaticlabs/prysm/master/prysm.sh --output prysm.sh && chmod +x prysm.sh
3.3.2 生成 JWT Secret
./prysm.sh beacon-chain generate-auth-secret
3.3.3 下载和运行执行客户端
下载
cd $workdir/execution
wget https://gethstore.blob.core.windows.net/builds/geth-linux-amd64-1.11.3-5ed08c47.tar.gz
tar -zxvf ./geth-linux-amd64-1.11.3-5ed08c47.tar.gz
mv ./geth-linux-amd64-1.11.3-5ed08c47/geth ./
rm ./geth-linux-amd64-1.11.3-5ed08c47.tar.gz
rm -rf ./geth-linux-amd64-1.11.3-5ed08c47
运行
nohup ./geth --goerli --http --http.api eth,net,engine,admin --authrpc.jwtsecret $workdir/consensus/prysm/jwt.hex 2>> ./geth.log &
3.3.4 Prysm 运行信标节点
cd $workdir/consensus/prysm/

nohup ./prysm.sh beacon-chain --execution-endpoint=http://localhost:8551 --prater --jwt-secret=./jwt.hex --suggested-fee-recipient=0x10210572d6b4924Af7Ef946136295e9b209E1FA0 --accept-terms-of-use --checkpoint-sync-url=https://sync-goerli.beaconcha.in --genesis-beacon-api-url=https://sync-goerli.beaconcha.in 2>> ./prysm.log &
- --suggested-fee-recipient 矿工交易费接收地址
- 设置初始化配置
- 可以使用genesis文件进行初始化
- 为了加速启动,可以使用现有的信标链检查点同步端点
- --checkpoint-sync-url
- --genesis-beacon-api-url
3.3.5 Prysm 运行验证器
cd $workdir/
git clone -b master --single-branch https://github.com/ethereum/staking-deposit-cli.git
cd staking-deposit-cli/
./deposit.sh new-mnemonic
按照提示,依次输入参数
Please choose your language ['1. العربية', '2. ελληνικά', '3. English', '4. Français', '5. Bahasa melayu', '6. Italiano', '7. 日本語', '8. 한국어', '9. Português do Brasil', '10. român', '11. Türkçe', '12. 简
体中文']:  [English]: 12
请选择您的助记符语言 ['1. 简体中文', '2. 繁體中文', '3. čeština', '4. English', '5. Italiano', '6. 한국어', '7. Português', '8. Español']:  [简体中文]: 4
请选择您想要运行多少验证者: 1
请选择(主网或测试网)网络名/链名 ['mainnet', 'ropsten', 'goerli', 'sepolia', 'zhejiang']:  [mainnet]: goerli
用来保护您密钥库的密码。您在设置您的 Ethereum PoS 验证者时需要重新输入密码以便解密它们。:
重复输入以确认:
最后生成助记词,保存并输入确认
cool disorder brand vast jaguar sponsor bamboo ...
您的密钥可以在这里找到: /mnt/d/eth2.0/ethereum/staking-deposit-cli/validator_keys
执行完将生成
- 新的助记词
validator_keys文件夹
- deposit_data-*.json // 上传到以太坊启动板的存款数据
- keystore-m_*.json // 公钥和加密的私钥
复制validator_keys到consensus文件夹中
cp -r $workdir/staking-deposit-cli/validator_keys $workdir/consensus
导入密钥库
cd $workdir/consensus/prysm
./prysm.sh validator accounts import --keys-dir=$workdir/consensus/validator_keys --prater
出现以下提示代表成功
INFO accounts: Successfully created new wallet wallet-path=/home/surou/.eth2validators/prysm-wallet-v2
Successfully imported 1 accounts, view all of them by running `accounts list`
导入后钱包位置:$HOME/.eth2validators/prysm-wallet-v2
上传存款数据
转到Goerli-Prater Launchpad 的存款数据上传页面,将上面的deposit_data-*.json 上传,会提示您连接钱包。
此时会存入 32 GETH Prater 测试网的存款合约。
避免重复抵押
提交dapp已经做了的判断
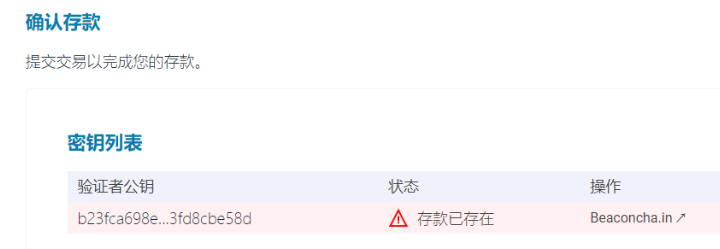
查看发起的抵押交易
goerli.etherscan.io
查看链上合约
goerli.etherscan.io
function deposit(
bytes calldata pubkey,
bytes calldata withdrawal_credentials,
bytes calldata signature,
bytes32 deposit_data_root
) override external payable {
require(pubkey.length == 48, "DepositContract: invalid pubkey length");
require(withdrawal_credentials.length == 32, "DepositContract: invalid withdrawal_credentials length");
require(signature.length == 96, "DepositContract: invalid signature length");
require(msg.value >= 1 ether, "DepositContract: deposit value too low");
require(msg.value % GWEI == 0, "DepositContract: deposit value not multiple of gwei");
uint deposit_amount = msg.value / GWEI;
require(deposit_amount <= type(uint64).max, "DepositContract: deposit value too high");
bytes memory amount = to_little_endian_64(uint64(deposit_amount));
emit DepositEvent(
pubkey,
withdrawal_credentials,
amount,
signature,
to_little_endian_64(uint64(deposit_count))
);
bytes32 pubkey_root = sha256(abi.encodePacked(pubkey, bytes16(0)));
bytes32 signature_root = sha256(abi.encodePacked(
sha256(abi.encodePacked(signature[:64])),
sha256(abi.encodePacked(signature[64:], bytes32(0)))
));
bytes32 node = sha256(abi.encodePacked(
sha256(abi.encodePacked(pubkey_root, withdrawal_credentials)),
sha256(abi.encodePacked(amount, bytes24(0), signature_root))
));
require(node == deposit_data_root, "DepositContract: reconstructed DepositData does not match supplied deposit_data_root");
require(deposit_count < MAX_DEPOSIT_COUNT, "DepositContract: merkle tree full");
deposit_count += 1;
uint size = deposit_count;
for (uint height = 0; height < DEPOSIT_CONTRACT_TREE_DEPTH; height++) {
if ((size & 1) == 1) {
branch[height] = node;
return;
}
node = sha256(abi.encodePacked(branch[height], node));
size /= 2;
}
assert(false);
}
合约内没有限定质押地址,可以代为质押
交易参数如下
0   pubkey  bytes   0xb23fca698e5b57c2dd09f16e10b97d532a18b574a46e6539bd9d83e79c5922230bc8990def676e3e78534a3fd8cbe58d
1   withdrawal_credentials  bytes   0x004734640dd34942fc621f643910f86e52b4e5f03db42d9cf6e14863b1148529
2   signature   bytes   0xb46ac23ab45b798331d706b91a635f59b00019cff96462493fae91877dc18d2c6d30e2684197547cd48c079ad94265ff07f36ab48b61b94ef90e3e7e3eeaf96d52dbb012690113c4fe3bc42274a9eb72d82dbdcbea8aa08e2e00e88978c0de3e
3   deposit_data_root   bytes32 0x0c4b49597ef312f110596b87e333e4c76ef8381216dd52ca63f2c84ea2c152d8
信标链处理您的存款大约需要 16-24 小时。 一旦存入金额总计达到 32 ETH,该验证器就有资格被激活。
查看已抵押信息
beaconcha.in
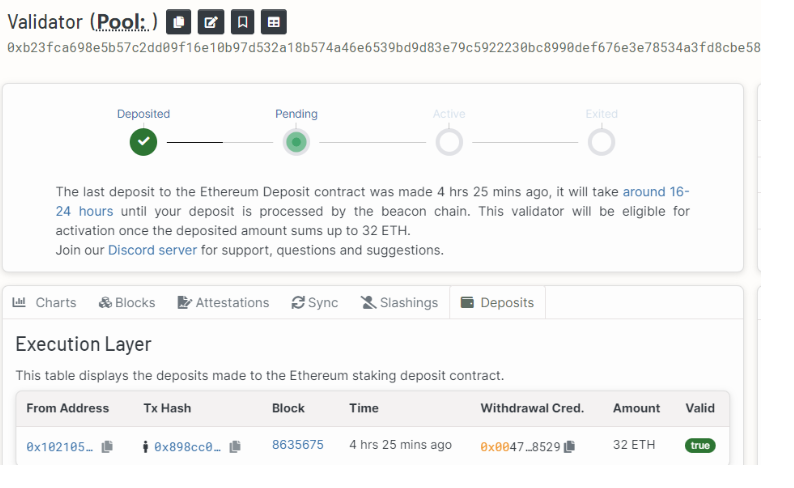
当前测试抵押节点信息
beaconscan.com
质押生效后才能看到信息
运行验证器
nohup ./prysm.sh validator --wallet-dir=$HOME/.eth2validators/prysm-wallet-v2 --wallet-password-file ./password --prater 2>> ./validator.log &
检查节点和验证器状态
节点日志
追块过程中
INFO [03-11|16:46:14.726] Syncing: chain download in progress      synced=44.90% ...
INFO [03-11|16:46:15.318] Forkchoice requested sync to new head    number=8,633,606 hash=522f76..69cb70 finalized=8,633,551
INFO [03-11|16:46:15.859] Syncing: state download in progress      synced=10.27% s
[2023-03-11 16:47:40] INFO blockchain: Called new payload with optimistic block payloadBlockHash=0xb7864552d082 slot=5166177
[2023-03-11 16:48:55] INFO validator: Waiting for beacon node to sync to latest chain head
追齐高度后
生效之前
validator日志显示
INFO validator: Waiting for deposit to be observed by beacon node pubKey=0xb23fca698e5b status=UNKNOWN_STATUS
prysm日志显示
WARN rpc/validator: Not connected to ETH1. Cannot determine validator ETH1 deposit block number
生效之后
// 待补充
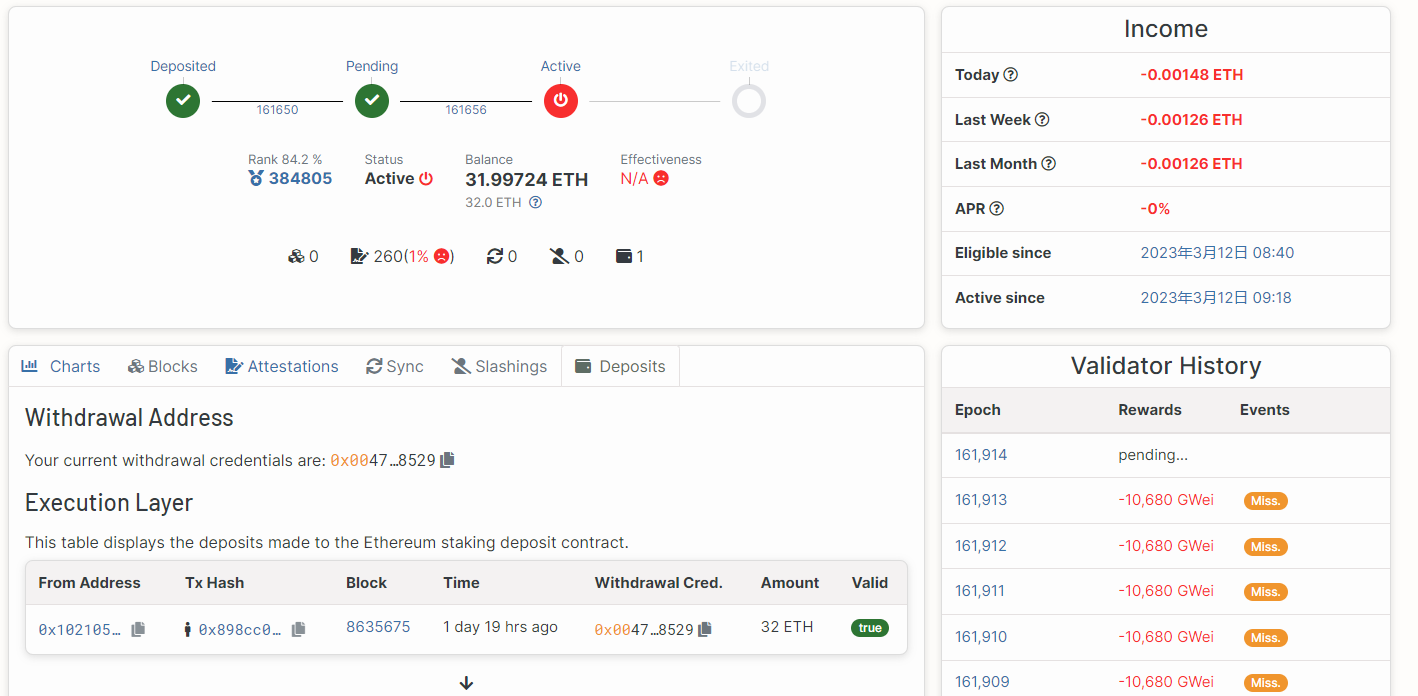
怠工惩罚
如果当前节点质押生效后,未能及时提议区块和证明,将被惩罚 -10680 GWei/epoch
4. 附加配置
开放必要端口
| 执行客户端 |
默认端口 |
共识客户端 |
默认端口 |
| Geth |
30303 TCP/UDP |
Teku |
9000 TCP/UDP |
| Besu |
30303 TCP/UDP |
Lighthouse |
9000 TCP/UDP |
| Erigon |
30303 TCP/UDP |
Nimbus |
9000 TCP/UDP |
| Nethermind |
30303 TCP/UDP |
Prysm |
13000 TCP, 12000 UDP |
配置时间同步
timedatectl
sudo timedatectl set-ntp on
5. 在线文档
节点设置
费用收件人
Lighthouse | Nimbus | Prysm | Teku
Discord
JWT认证
最新公告
Goerli-Prater、Mainnet
监控
Lighthouse | Nimbus | Prysm | Teku
安全最佳实践
https://docs.prylabs.network/docs/security-best-practices
Prysm社区
邮件列表、Prysm Discord 服务器、r/ethstaker和EthStaker Discord 服务器
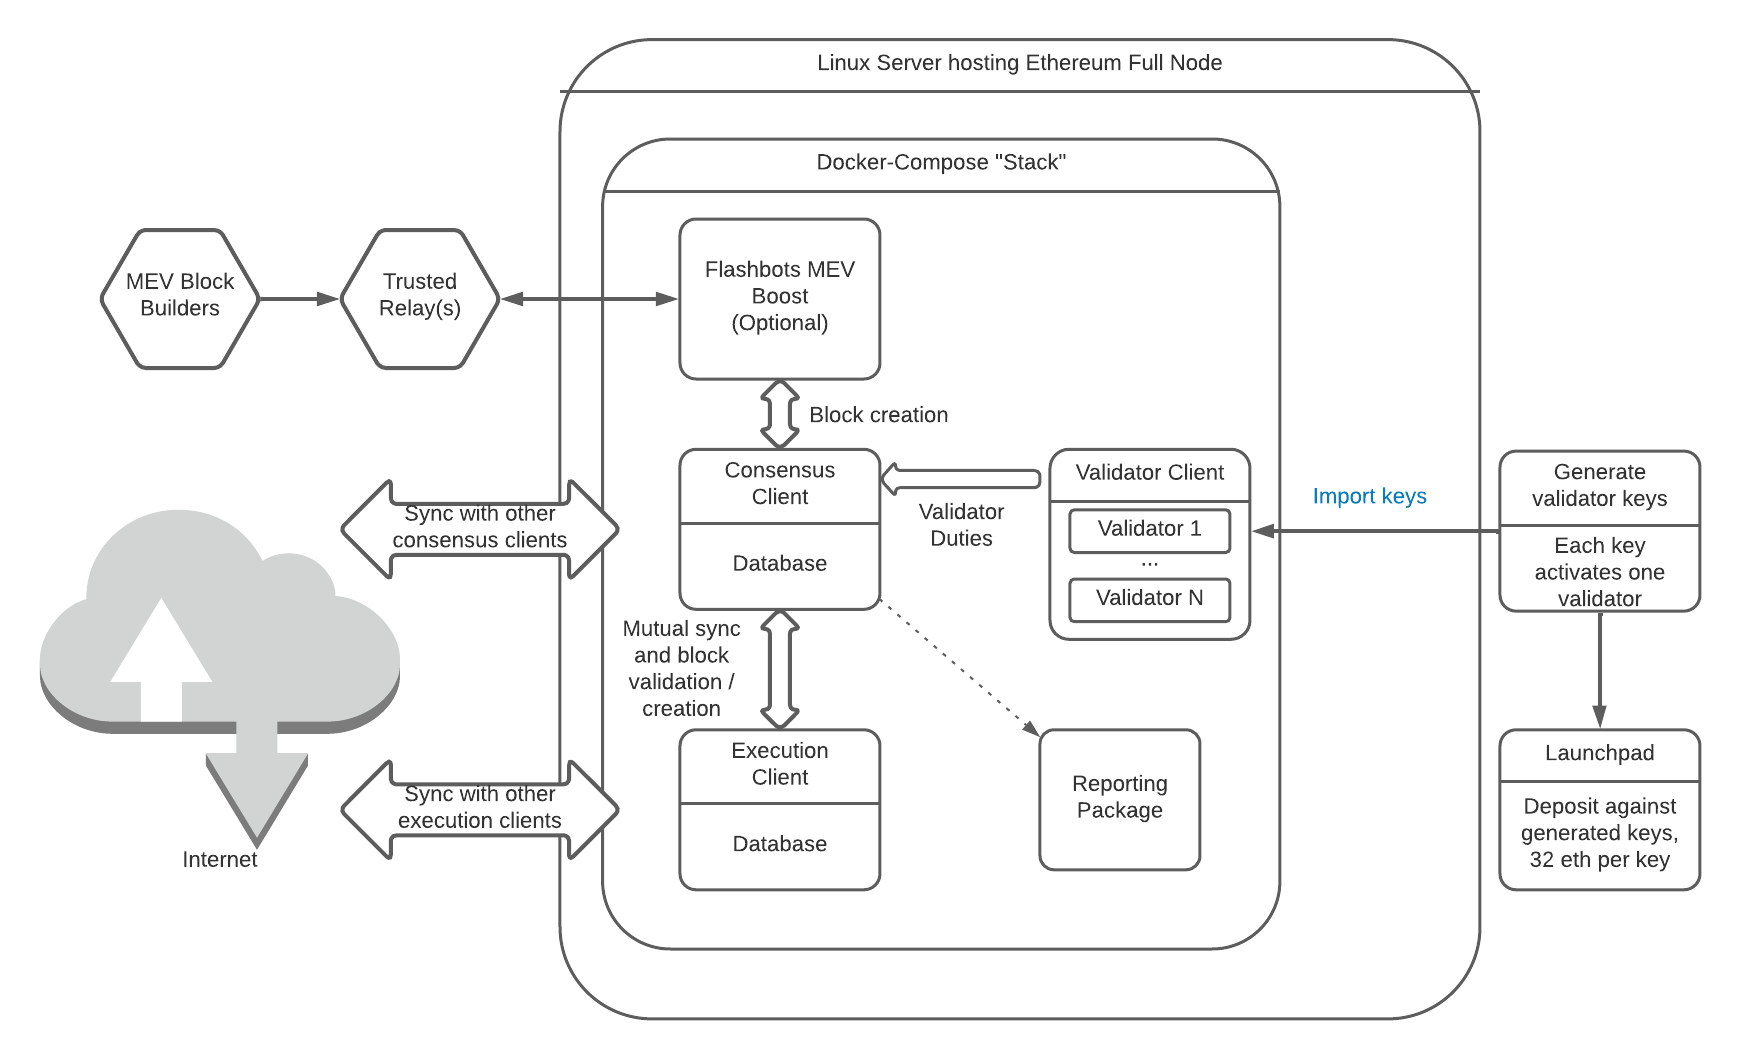
6. 节点运行架构
公共检查点
https://notes.ethereum.org/@launchpad/checkpoint-sync
节点统计
https://www.ethernodes.org/
节点质押
goerli: https://goerli.launchpad.ethereum.org/zh
mainnet: https://launchpad.ethereum.org/zh
生产服务器配置
最低要求
- 2 核以上的 CPU
- 8 GB 内存
- 700GB 可用磁盘空间
- 10+ MBit/s 带宽
推荐规格
- 具有 4 个以上内核的快速 CPU
- 16 GB+ 内存
- 1+TB 的快速 SSD
- 25+ MBit/s 带宽
测试网
即插即用解决方案
https://docs.dappnode.io/user/quick-start/first-steps/
https://github.com/NiceNode/nice-node
https://eth-docker.net/
https://docs.sedge.nethermind.io/docs/intro
