您正在查看: Solana-优秀转载 分类下的文章

Solana基础 - Anchor 中的 Init if needed 与重初始化攻击

本篇文章详细介绍了Anchor框架的init_if_needed宏,提供了一种在一次事务中初始化账户并写入数据的方法。文中阐述了该宏的便利性与可能引发的重初始化攻击风险,特别是在账户状态和lamport余额的处理上。同时,通过示例代码和测试用例,深入分析了如何安全地使用这些功能,以避免潜在的错误和安全隐患。

在之前的教程中,我们必须在单独的交易中初始化一个账户,然后才能对其写入数据。我们可能希望能够在一个交易中初始化一个账户并对其写入数据,以简化用户的操作。

Anchor 提供了一个方便的宏 init_if_needed,顾名思义,如果账户不存在,则会初始化该账户。

下面的示例计数器不需要单独的初始化交易,它会立即开始将“1”添加到 counter 存储中。

Rust:

use anchor_lang::prelude::*;
use std::mem::size_of;

declare_id!("9DbiqCqtqgP3NYufxBakbeRd7JyNpNYbsm6Jqrn8Z2Hn");

#[program]
pub mod init_if_needed {
    use super::*;

    pub fn increment(ctx: Context<Initialize>) -> Result<()> {
        let current_counter = ctx.accounts.my_pda.counter;
        ctx.accounts.my_pda.counter = current_counter + 1;
        Ok(())
    }
}

#[derive(Accounts)]
pub struct Initialize<'info> {
    #[account(
        init_if_needed,
        payer = signer,
        space = size_of::<MyPDA>() + 8,
        seeds = [],
        bump
    )]
    pub my_pda: Account<'info, MyPDA>,

    #[account(mut)]
    pub signer: Signer<'info>,
    pub system_program: Program<'info, System>,
}

#[account]
pub struct MyPDA {
    pub counter: u64,
}

Typescript:

import * as anchor from "@coral-xyz/anchor";
import { Program } from "@coral-xyz/anchor";
import { InitIfNeeded } from "../target/types/init_if_needed";

describe("init_if_needed", () => {
  // 配置客户端以使用本地集群。
  anchor.setProvider(anchor.AnchorProvider.env());

  const program = anchor.workspace.InitIfNeeded as Program<InitIfNeeded>;

  it("已初始化!", async () => {
    const [myPda, _bump] = anchor.web3.PublicKey.findProgramAddressSync([], program.programId);
    await program.methods.increment().accounts({myPda: myPda}).rpc();
    await program.methods.increment().accounts({myPda: myPda}).rpc();
    await program.methods.increment().accounts({myPda: myPda}).rpc();

    let result = await program.account.myPda.fetch(myPda);
    console.log(`counter是 ${result.counter}`);
  });
});

当我们尝试使用 anchor build 构建这个程序时,将会遇到以下错误:

错误: init_if_needed

为了消除错误 init_if_needed requires that anchor-lang be imported with the init-if-needed cargo feature enabled,我们可以打开 programs/<anchor_project_name> 中的 Cargo.toml 文件并添加以下行:

[dependencies]
anchor-lang = { version = "0.29.0", features = ["init-if-needed"] }

但在我们只是移除错误之前,我们应该了解什么是重新初始化攻击及其如何发生。

在 Anchor 程序中,账户不能被重初始化(默认)

如果我们尝试初始化一个已经初始化的账户,交易将会失败。

Anchor 如何知道一个账户已经初始化?

从 Anchor 的角度来看,如果该账户的 lamport 余额为零 或者该账户由系统程序拥有,那么它就是未初始化的。

由系统程序拥有或具有零 lamport 余额的账户可以再次初始化。

为了说明这一点,我们有一个具有典型 initialize 函数的 Solana 程序(它使用的是 init,而不是 init_if_needed)。它还具有 drain_lamports 函数和 give_to_system_program 函数,这两个函数的作用如其名所示:

use anchor_lang::prelude::*;
use std::mem::size_of;
use anchor_lang::system_program;

declare_id!("FC467mPCCKXG97ut1WdLLi55vuAcyCW8AD1vid27bZfn");

#[program]
pub mod reinit_attack {
    use super::*;

    pub fn initialize(ctx: Context<Initialize>) -> Result<()> {
        Ok(())
    }

    pub fn drain_lamports(ctx: Context<DrainLamports>) -> Result<()> {
        let lamports = ctx.accounts.my_pda.to_account_info().lamports();
        ctx.accounts.my_pda.sub_lamports(lamports)?;
        ctx.accounts.signer.add_lamports(lamports)?;
        Ok(())
    }

    pub fn give_to_system_program(ctx: Context<GiveToSystemProgram>) -> Result<()> {
        let account_info = &mut ctx.accounts.my_pda.to_account_info();
        // assign 方法更改拥有者
        account_info.assign(&system_program::ID);
        account_info.realloc(0, false)?;
        Ok(())
    }
}

#[derive(Accounts)]
pub struct DrainLamports<'info> {
    #[account(mut)]
    pub my_pda: Account<'info, MyPDA>,
    #[account(mut)]
    pub signer: Signer<'info>,
}

#[derive(Accounts)]
pub struct Initialize<'info> {
    #[account(init, payer = signer, space = 8, seeds = [], bump)]
    pub my_pda: Account<'info, MyPDA>,

    #[account(mut)]
    pub signer: Signer<'info>,

    pub system_program: Program<'info, System>,
}

#[derive(Accounts)]
pub struct GiveToSystemProgram<'info> {
    #[account(mut)]
    pub my_pda: Account<'info, MyPDA>,
}

#[account]
pub struct MyPDA {}

现在考虑以下单元测试:

import * as anchor from "@coral-xyz/anchor";
import { Program } from "@coral-xyz/anchor";
import { ReinitAttack } from "../target/types/reinit_attack";

describe("程序", () => {
  anchor.setProvider(anchor.AnchorProvider.env());

  const program = anchor.workspace.ReinitAttack as Program<ReinitAttack>;

  it("在转交给系统程序或排空 lamports 后初始化", async () => {
    const [myPda, _bump] = anchor.web3.PublicKey.findProgramAddressSync([], program.programId);

    await program.methods.initialize().accounts({myPda: myPda}).rpc();

    await program.methods.giveToSystemProgram().accounts({myPda: myPda}).rpc();

    await program.methods.initialize().accounts({myPda: myPda}).rpc();
    console.log("账户在转交给系统程序后已初始化!")

    await program.methods.drainLamports().accounts({myPda: myPda}).rpc();

    await program.methods.initialize().accounts({myPda: myPda}).rpc();
    console.log("账户在排空 lamports 后已初始化!")
  });
});

顺序如下:

  1. 我们初始化了 PDA
  2. 我们将 PDA 的所有权转移给系统程序
  3. 我们再次调用初始化,它成功了
  4. 我们从 my_pda 账户中排空 lamports
  5. 由于零 lamport 余额,Solana 运行时将该账户视为不存在,因为它将被安排删除,因为它不再符合租金豁免条件。
  6. 我们再次调用初始化,它成功了。我们在遵循此顺序后成功重新初始化了账户。

再说一遍,Solana 没有“初始化”标记或其他东西。如果所有者是系统程序或者 lamport 余额为零,Anchor 将允许初始化交易成功。

为什么在我们的例子中重新初始化可能是一个问题

将所有权转移给系统程序需要擦除账户中的数据。移除所有 lamports “表明” 你不希望账户继续存在。

你的意图是通过其中任何一种方式重启计数器或结束计数器的生命周期吗?如果你的应用程序从不期望计数器被重置,这可能会导致错误。

Anchor 希望你认真思考你的意图,这就是为什么它使你在 Cargo.toml 中启用功能标志额外增加了步骤。

如果你接受计数器在某个时刻被重置并向上计数,重新初始化就不是问题。但如果在任何情况下计数器都不应该重置为零,那么你最好单独实现 initialization 函数,并添加一个保护措施,以确保它一生中只能调用一次(例如,在一个单独的账户中存储一个布尔标记)。

当然,你的程序不一定具有将账户转移给系统程序或从账户中提取 lamports 的机制。但 Anchor 无法知道这一点,因此它总是会发出关于 init_if_needed 的警告,因为它无法确定该账户是否能够返回到可初始化状态。

拥有两条初始化路径可能导致越界错误或其他意外行为

在我们的计数器示例中,使用 init_if_needed,计数器从未等于零,因为第一次初始化交易也将值从零递增到一。

如果我们_也_有一个普通的初始化函数,它不会递增计数器,那么计数器将被初始化,并且值为零。如果一些业务逻辑永远不希望看到计数器的值为零,那么可能会发生意外行为。

在以太坊中,从未“触摸”的变量的存储值默认值为零。在 Solana 中,未初始化的账户不存在,无法读取。

“初始化”在 Anchor 中并不总是意味着“init”

有点令人困惑,有些人使用“initialize”一词在一般层面上表示“第一次将数据写入账户”,而不仅仅是 Anchor 的 init 宏。

如果我们查看 Soldev 的示例程序,我们看到没有使用 init 宏:

use anchor_lang::prelude::*;
use borsh::{BorshDeserialize, BorshSerialize};

declare_id!("Fg6PaFpoGXkYsidMpWTK6W2BeZ7FEfcYkg476zPFsLnS");

#[program]
pub mod initialization_insecure {
    use super::*;

    pub fn initialize(ctx: Context<Initialize>) -> Result<()> {
        let mut user = User::try_from_slice(&ctx.accounts.user.data.borrow()).unwrap();
        user.authority = ctx.accounts.authority.key();
        user.serialize(&mut *ctx.accounts.user.data.borrow_mut())?;
        Ok(())
    }
}

#[derive(Accounts)]
pub struct Initialize<'info> {
    #[account(mut)]
    user: AccountInfo<'info>,
    #[account(mut)]
    authority: Signer<'info>,
}

#[derive(BorshSerialize, BorshDeserialize)]
pub struct User {
    authority: Pubkey,
}

代码在第11行直接读取账户,然后设置字段。程序随意覆盖数据,无论是第一次写入还是第二次(或第三次)写入。

相反,“initialize”在这里的命名法是“第一次写入账户”。

这里的“重新初始化攻击”与 Anchor 框架所警告的攻击不同。具体而言,“initialize”可以多次调用。Anchor 的 init 宏检查 lamport 余额是否非零以及程序是否已经拥有该账户,这将防止多次调用 initialize。init 宏可以看到账户已经有 lamports 或已由程序拥有。然而,上述代码没有此类检查。

值得阅读他们的教程,以了解这种重新初始化攻击的变种。

请注意,这里使用的是较旧版本的 Anchor。AccountInfoUncheckedAccount 的另一种说法,因此你需要在其上方添加 /// Check: 注释。

擦除账户鉴别符不会让账户重新初始化

一个账户是否已初始化与其内部数据(或缺失数据)无关。

要在不转移的情况下擦除账户中的数据:

use anchor_lang::prelude::*;
use std::mem::size_of;
use anchor_lang::system_program;

declare_id!("FC467mPCCKXG97ut1WdLLi55vuAcyCW8AD1vid27bZfn");

#[program]
pub mod reinit_attack {
    use super::*;

    pub fn initialize(ctx: Context<Initialize>) -> Result<()> {
        Ok(())
    }

    pub fn erase(ctx: Context<Erase>) -> Result<()> {
        ctx.accounts.my_pda.realloc(0, false)?;
        Ok(())
    }
}

#[derive(Accounts)]
pub struct Erase<'info> {
    /// CHECK: 我们将要擦除账户
    #[account(mut)]
    pub my_pda: UncheckedAccount<'info>,
}

#[derive(Accounts)]
pub struct Initialize<'info> {
    #[account(init, payer = signer, space = 8, seeds = [], bump)]
    pub my_pda: Account<'info, MyPDA>,

    #[account(mut)]
    pub signer: Signer<'info>,

    pub system_program: Program<'info, System>,
}

#[account]
pub struct MyPDA {}

重要的是,我们使用 UncheckedAccount 擦除数据,而 .realloc(0, false) 不是常规 Account 中可用的方法。

该操作将擦除账户鉴别符,因此不再通过 Account 可读取。

练习:初始化账户,调用 erase 然后尝试再次初始化账户。它将失败,因为即使账户没有数据,仍然由程序拥有且 lamport 余额非零。

摘要

init_if_needed 宏可以方便地避免与新存储账户交互时需要两个交易。Anchor 框架默认阻止它,以迫使我们思考以下可能的不良情况:

  • 如果有方法将 lamport 余额减少至零或将所有权转移给系统程序,则可以重新初始化账户。根据业务需求,这可能是一个问题,也可能不是。
  • 如果程序同时具有 init 宏和 init_if_needed 宏,则开发人员必须确保拥有两个代码路径不会导致状态意外。
  • 即使账户中的数据完全被擦除,账户仍然处于初始化状态。
  • 如果程序具有“盲目”写入账户的函数,则该账户中的数据可能被覆盖。这通常需要通过 AccountInfo 或其别名 UncheckedAccount 加载账户。

转载:https://learnblockchain.cn/article/11410

Solana基础 - 理解 Solana 中的账户所有权:从PDA中转移SOL

文章详细介绍了Solana区块链中的账户所有权机制,包括系统程序、BPFLoader和程序对不同类型的账户(如PDA和keypair账户)的所有权及其操作权限,并通过Rust和Typescript代码示例进行了演示。

在 Solana 中,账户的拥有者能够减少 SOL 余额、向账户写入数据以及更改拥有者。

以下是 Solana 中账户所有权的总结:

  1. system program 拥有未分配给程序(初始化)的钱包和密钥对账户。
  2. BPFLoader 拥有程序。
  3. 程序拥有 Solana PDAs。如果将所有权转移给程序,程序也可以拥有密钥对账户(这在初始化过程中发生)。

我们现在来考察这些事实的影响。

系统程序拥有密钥对账户

为了说明这一点,让我们使用 Solana CLI 查看我们的 Solana 钱包地址并检查其元数据:

Solana 元数据:拥有者

请注意,拥有者不是我们的地址,而是地址为 111...111 的账户。这是系统程序,也就是我们在之前的教程中看到的转移 SOL 的同一个系统程序。

只有账户的拥有者才能修改其中的数据

这包括减少 lamport 数值(如后面所述,你不需要是拥有者才能增加其他账户的 lamport 数值)。

尽管从某种形而上学的意义上讲,你“拥有”你的钱包,但你不能直接向其中写入数据或减少 lamport 余额,因为从 Solana 运行时的角度来看,你不是拥有者。

你能够在钱包中花费 SOL 的原因是因为你拥有生成地址或公钥的私钥。当 system program 识别到你为公钥生成了有效的签名时,它会将你在账户中花费 lamports 的请求视为合法,然后根据你的指示进行支出。

然而,系统程序并不提供签名者直接向账户写入数据的机制。

上述示例中显示的账户是一个密钥对账户,或者我们可以认为是一个“常规 Solana 钱包”。系统程序是密钥对账户的拥有者。

程序初始化的 PDA 和密钥对账户归程序所有

程序能够向 PDA 或者在程序外创建但由程序初始化的密钥对账户写入数据的原因是程序拥有它们。

我们将在讨论重新初始化攻击时更详细地探讨初始化,但现在重要的是要了解 初始化账户会将账户的所有者从系统程序更改为程序。

为了说明这一点,考虑以下初始化 PDA 和密钥对账户的程序。 Typescript 测试将在初始化事务之前和之后打印出拥有者。

如果我们尝试确定一个不存在的地址的拥有者,我们会得到 null

以下是 Rust 代码:

use anchor_lang::prelude::*;

declare_id!("C2ZKJPhNiCM6CqTneGUXJoE4o6YhMzNUes3q5WNcH3un");

#[program]
pub mod owner {
    use super::*;

    pub fn initialize_keypair(ctx: Context<InitializeKeypair>) -> Result<()> {
        Ok(())
    }

    pub fn initialize_pda(ctx: Context<InitializePda>) -> Result<()> {
        Ok(())
    }
}

#[derive(Accounts)]
pub struct InitializeKeypair<'info> {
    #[account(init, payer = signer, space = 8)]
    keypair: Account<'info, Keypair>,
    #[account(mut)]
    signer: Signer<'info>,
    system_program: Program<'info, System>,
}

#[derive(Accounts)]
pub struct InitializePda<'info> {
    #[account(init, payer = signer, space = 8, seeds = [], bump)]
    pda: Account<'info, Pda>,
    #[account(mut)]
    signer: Signer<'info>,
    system_program: Program<'info, System>,
}

#[account]
pub struct Keypair();

#[account]
pub struct Pda();

以下是 Typescript 代码:

import * as anchor from "@coral-xyz/anchor";
import { Program } from "@coral-xyz/anchor";
import { Owner } from "../target/types/owner";

async function airdropSol(publicKey, amount) {
  let airdropTx = await anchor.getProvider().connection.requestAirdrop(publicKey, amount * anchor.web3.LAMPORTS_PER_SOL);
  await confirmTransaction(airdropTx);
}

async function confirmTransaction(tx) {
  const latestBlockHash = await anchor.getProvider().connection.getLatestBlockhash();
  await anchor.getProvider().connection.confirmTransaction({
    blockhash: latestBlockHash.blockhash,
    lastValidBlockHeight: latestBlockHash.lastValidBlockHeight,
    signature: tx,
  });
}

describe("owner", () => {
  // 配置客户端以使用本地集群。
  anchor.setProvider(anchor.AnchorProvider.env());

  const program = anchor.workspace.Owner as Program<Owner>;

  it("Is initialized!", async () => {
    console.log("program address", program.programId.toBase58());    
    const seeds = []
    const [pda, bump_] = anchor.web3.PublicKey.findProgramAddressSync(seeds, program.programId);

    console.log("owner of pda before initialize:",
    await anchor.getProvider().connection.getAccountInfo(pda));

    await program.methods.initializePda().accounts({pda: pda}).rpc();

    console.log("owner of pda after initialize:",
    (await anchor.getProvider().connection.getAccountInfo(pda)).owner.toBase58());

    let keypair = anchor.web3.Keypair.generate();

    console.log("owner of keypair before airdrop:",
    await anchor.getProvider().connection.getAccountInfo(keypair.publicKey));

    await airdropSol(keypair.publicKey, 1); // 1 SOL

    console.log("owner of keypair after airdrop:",
    (await anchor.getProvider().connection.getAccountInfo(keypair.publicKey)).owner.toBase58());

    await program.methods.initializeKeypair()
      .accounts({keypair: keypair.publicKey})
      .signers([keypair]) // 签名者必须是密钥对
      .rpc();

    console.log("owner of keypair after initialize:",
    (await anchor.getProvider().connection.getAccountInfo(keypair.publicKey)).owner.toBase58());

  });
});

测试的工作原理如下:

  1. 它预测 PDA 的地址并查询其拥有人。得到 null
  2. 它调用 initializePDA 然后查询拥有人。得到程序的地址。
  3. 它生成一个密钥对账户并查询其拥有人。得到 null
  4. 它向密钥对账户空投 SOL。现在的拥有者是系统程序,就像正常钱包一样。
  5. 它调用 initializeKeypair 然后查询拥有人。得到程序的地址。

测试结果的截图如下:

测试结果:Is initialized

这就是程序能够对账户写入数据的方式:它拥有它们。在初始化期间,程序接管了账户的所有权。

练习:修改测试以打印出密钥对和 PDA 的地址。然后使用 Solana CLI 检查这些账户的拥有者应该与测试打印的一致。确保 solana-test-validator 在后台运行以便你可以使用 CLI。

BPFLoaderUpgradeable 拥有程序

让我们使用 Solana CLI 确定我们的程序的拥有者:

Solana 元数据:拥有者:BPFLoaderUpgradable

部署程序的钱包并不是程序的拥有者。Solana 程序能够通过部署钱包进行升级的原因是 BpfLoaderUpgradeable 能够将新字节码写入程序,并且它只接受来自预先指定地址的新字节码:最初部署程序的地址。

当我们部署(或升级)一个程序时,实际上是在调用 BPFLoaderUpgradeable 程序,正如日志中所示:

  Signature: 2zBBEPWsMvf8t7wkNEDqfHJKw83aBMgwGi3G9uZ6m9qG9t4kjJA2wFEP84dkKCjiCdbh54xeEDYFeDcNS7FkyLEw  
  Status: Ok  
  Log Messages:
    Program 11111111111111111111111111111111 invoke [1]
    Program 11111111111111111111111111111111 success
    Program BPFLoaderUpgradeab1e11111111111111111111111 invoke [1]
    Program 11111111111111111111111111111111 invoke [2]
    Program 11111111111111111111111111111111 success
    Deployed program C2ZKJPhNiCM6CqTneGUXJoE4o6YhMzNUes3q5WNcH3un
    Program BPFLoaderUpgradeab1e11111111111111111111111 success
Transaction executed in slot 34:

程序可以转移拥有的账户的所有权

这是你可能不常使用的功能,但这是执行此操作的代码。

Rust:

use anchor_lang::prelude::*;
use std::mem::size_of;
use anchor_lang::system_program;

declare_id!("Hxj38tktrD7YcSvKRxVrYQfxptkZd7NVbmrRKvLxznyA");


#[program]
pub mod change_owner {
    use super::*;

    pub fn initialize(ctx: Context<Initialize>) -> Result<()> {
        Ok(())
    }

    pub fn change_owner(ctx: Context<ChangeOwner>) -> Result<()> {
        let account_info = &mut ctx.accounts.my_storage.to_account_info();

    // assign 是转移所有权的函数
    account_info.assign(&system_program::ID);

    // 我们必须在转让之前清除账户中的所有数据,否则转让将失败
        let res = account_info.realloc(0, false);

        if !res.is_ok() {
            return err!(Err::ReallocFailed);
        }

        Ok(())
    }
}

#[error_code]
pub enum Err {
    #[msg("realloc failed")]
    ReallocFailed,
}

#[derive(Accounts)]
pub struct Initialize<'info> {

    #[account(init,
              payer = signer,
              space=size_of::<MyStorage>() + 8,
              seeds = [],
              bump)]
    pub my_storage: Account<'info, MyStorage>,

    #[account(mut)]
    pub signer: Signer<'info>,

    pub system_program: Program<'info, System>,
}

#[derive(Accounts)]
pub struct ChangeOwner<'info> {
    #[account(mut)]
    pub my_storage: Account<'info, MyStorage>,
}

#[account]
pub struct MyStorage {
    x: u64,
}

Typescript:

import * as anchor from "@coral-xyz/anchor";
import { Program } from "@coral-xyz/anchor";
import { ChangeOwner } from "../target/types/change_owner";

import privateKey from '/Users/jeffreyscholz/.config/solana/id.json';

describe("change_owner", () => {
  // 配置客户端以使用本地集群。
  anchor.setProvider(anchor.AnchorProvider.env());

  const program = anchor.workspace.ChangeOwner as Program<ChangeOwner>;

  it("Is initialized!", async () => {
    const deployer = anchor.web3.Keypair.fromSecretKey(Uint8Array.from(privateKey));

    const seeds = []
    const [myStorage, _bump] = anchor.web3.PublicKey.findProgramAddressSync(seeds, program.programId);

    console.log("the storage account address is", myStorage.toBase58());

    await program.methods.initialize().accounts({myStorage: myStorage}).rpc();
    await program.methods.change_owner().accounts({myStorage: myStorage}).rpc();

    // 转移所有权后
    // 该账户仍然可以再次初始化
    await program.methods.initialize().accounts({myStorage: myStorage}).rpc();
  });
});

我们要注意的几点:

  • 转移账户后,数据必须在同一事务中清除。否则,我们可能会在其他程序的拥有账户中插入数据。这是 account_info.realloc(0, false) 的代码。false 表示不清零数据,但这没有区别,因为数据已经没有了。
  • 转移账户所有权并不会永久移除账户,它可以像测试所示那样再次初始化。

现在我们清楚理解程序拥有 PDAs 和由它们初始化的密钥对账户后,我们可以做的有趣且有用的事情是从它们转移 SOL。

从 PDA 转移 SOL:众筹示例

以下是一个粗城县众筹应用程序的代码。我们感兴趣的功能是 withdraw 函数,其中程序从 PDA 转移 lamports 到提取者。

use anchor_lang::prelude::*;
use anchor_lang::system_program;
use std::mem::size_of;
use std::str::FromStr;

declare_id!("BkthFL8LV2V2MxVgQtA9tT5goeeJhUdxRPahzavqHPFZ");

#[program]
pub mod crowdfund {
    use super::*;

    pub fn initialize(ctx: Context<Initialize>) -> Result<()> {
        let initialized_pda = &mut ctx.accounts.pda;
        Ok(())
    }

    pub fn donate(ctx: Context<Donate>, amount: u64) -> Result<()> {
        let cpi_context = CpiContext::new(
            ctx.accounts.system_program.to_account_info(),
            system_program::Transfer {
                from: ctx.accounts.signer.to_account_info().clone(),
                to: ctx.accounts.pda.to_account_info().clone(),
            },
        );

        system_program::transfer(cpi_context, amount)?;

        Ok(())
    }

    pub fn withdraw(ctx: Context<Withdraw>, amount: u64) -> Result<()> {
        ctx.accounts.pda.sub_lamports(amount)?;
        ctx.accounts.signer.add_lamports(amount)?;

        // 在 anchor 0.28 或更低版本,使用以下语法:
        // ctx.accounts.pda.to_account_info().try_borrow_mut_lamports()? -= amount;
        // ctx.accounts.signer.to_account_info().try_borrow_mut_lamports()? += amount;
        Ok(())
    }
}

#[derive(Accounts)]
pub struct Initialize<'info> {
    #[account(mut)]
    pub signer: Signer<'info>,

    #[account(init, payer = signer, space=size_of::<Pda>() + 8, seeds=[], bump)]
    pub pda: Account<'info, Pda>,
    pub system_program: Program<'info, System>,
}

#[derive(Accounts)]
pub struct Donate<'info> {
    #[account(mut)]
    pub signer: Signer<'info>,

    #[account(mut)]
    pub pda: Account<'info, Pda>,
    pub system_program: Program<'info, System>,
}

#[derive(Accounts)]
pub struct Withdraw<'info> {
    #[account(mut, address = Pubkey::from_str("5jmigjgt77kAfKsHri3MHpMMFPo6UuiAMF19VdDfrrTj").unwrap())]
    pub signer: Signer<'info>,

    #[account(mut)]
    pub pda: Account<'info, Pda>,
}

#[account]
pub struct Pda {}

因为程序拥有 PDA,因此可以直接从账户中扣除 lamport 余额。

当我们作为常规钱包交易的一部分转移 SOL 时,我们不会直接从中扣除 lamport 余额,因为我们不是账户的拥有者。系统程序拥有钱包,并将在看到有效签名请求进行扣款时进行扣款。

在这种情况下,程序拥有 PDA,因此可以直接从中扣除 lamports。

代码中还值得注意的其他事项:

  • 我们硬编码了谁可以从 PDA 提取,通过约束 #[account(mut, address = Pubkey::from_str("5jmigjgt77kAfKsHri3MHpMMFPo6UuiAMF19VdDfrrTj").unwrap())]。这检查该账户的地址是否与字符串中的地址匹配。为了使此代码正常工作,我们还需要导入 use std::str::FromStr;。要测试此代码,将字符串中的地址更改为你的 solana address
  • 在 Anchor 0.29 中,我们可以使用语法 ctx.accounts.pda.sub_lamports(amount)?;ctx.accounts.signer.add_lamports(amount)?;。对于早期版本的 Anchor,请使用 ctx.accounts.pda.to_account_info().try_borrow_mut_lamports()? -= amount; ctx.accounts.signer.to_account_info().try_borrow_mut_lamports()? += amount;
  • 你不需要拥有你要转移 lamports 的账户。

以下是伴随的 Typescript 代码:

import * as anchor from "@coral-xyz/anchor";
import { Program } from "@coral-xyz/anchor";
import { Crowdfund } from "../target/types/crowdfund";

describe("crowdfund", () => {
  // 配置客户端以使用本地集群。
  anchor.setProvider(anchor.AnchorProvider.env());

  const program = anchor.workspace.Crowdfund as Program<Crowdfund>;

  it("Is initialized!", async () => {
    const programId = await program.account.pda.programId;

    let seeds = [];
    let pdaAccount = anchor.web3.PublicKey.findProgramAddressSync(seeds, programId)[0];

    const tx = await program.methods.initialize().accounts({
      pda: pdaAccount
    }).rpc();

    // 转移 2 SOL
    const tx2 = await program.methods.donate(new anchor.BN(2_000_000_000)).accounts({
      pda: pdaAccount
    }).rpc();

    console.log("lamport balance of pdaAccount",
    await anchor.getProvider().connection.getBalance(pdaAccount));

    // 转回 1 SOL
    // 签名者是被允许的地址
    await program.methods.withdraw(new anchor.BN(1_000_000_000)).accounts({
      pda: pdaAccount
    }).rpc();

    console.log("lamport balance of pdaAccount",
    await anchor.getProvider().connection.getBalance(pdaAccount));

  });
});

练习:尝试向接收地址添加的 lamports 多于你从 PDA 中提取的。即将代码更改为以下内容:

ctx.accounts.pda.sub_lamports(amount)?;
// 额外添加一个 lamport
ctx.accounts.signer.add_lamports(amount + 1)?;


运行时应会阻止你。

请注意,如果将 lamport 余额提取到低于租金豁免阈值,将导致账户被关闭。如果账户中有数据,则会被清除。因此,程序应跟踪提取 SOL 之前所需的租金豁免金额,除非他们不在乎账户被清除。
转载:https://learnblockchain.cn/article/11417

Solana基础 - PDA(程序派生地址)与 Solana 中的密钥对账户

文章详细介绍了 Solana 区块链中的 Program Derived Address (PDA) 和 Keypair Account 的区别与使用场景,并通过代码示例展示了如何创建和初始化这两种账户,解释了它们的安全性和应用差异。

一个程序派生地址(PDA)是一个账户,其地址是由创建它的程序的地址和传递给 init 交易的 seeds 派生而来的。到目前为止,我们只使用了 PDAs。

也可以在程序外创建一个账户,然后在程序内对该账户进行 init

有趣的是,我们在程序外创建的账户将有一个私钥,但是我们会看到这并不会如看上去那样带来安全隐患。我们将其称为“keypair account”。

账户创建回顾

在讨论 keypair accounts 之前,让我们回顾一下我们在 Solana 教程 中创建账户的方法。这是我们使用的相同代码模版,它创建程序派生地址(PDA):

use anchor_lang::prelude::*;
use std::mem::size_of; 

declare_id!("4wLnxvLwgXGT4eNg3D456K6Fxa1RieaUdERSPQ3WEpuV");

#[program]
pub mod keypair_vs_pda {
    use super::*;

    pub fn initialize_pda(ctx: Context&lt;InitializePDA>) -> Result&lt;()> {
        Ok(())
    }
}

#[derive(Accounts)]
pub struct InitializePDA&lt;'info> {

    // 这是程序派生地址
    #[account(init,
              payer = signer,
              space=size_of::&lt;MyPDA>() + 8,
              seeds = [],
              bump)]
    pub my_pda: Account&lt;'info, MyPDA>,

    #[account(mut)]
    pub signer: Signer&lt;'info>,

    pub system_program: Program&lt;'info, System>,
}

#[account]
pub struct MyPDA {
    x: u64,
}

以下是调用 initialize 的关联 Typescript 代码:

import * as anchor from "@coral-xyz/anchor";
import { Program } from "@coral-xyz/anchor";
import { KeypairVsPda } from "../target/types/keypair_vs_pda";

describe("keypair_vs_pda", () => {
  anchor.setProvider(anchor.AnchorProvider.env());

  const program = anchor.workspace.KeypairVsPda as Program&lt;KeypairVsPda>;

  it("已初始化 -- PDA 版本", async () => {
    const seeds = []
    const [myPda, _bump] = anchor.web3.PublicKey.findProgramAddressSync(seeds, program.programId);

    console.log("存储账户地址是", myPda.toBase58());

    const tx = await program.methods.initializePda().accounts({myPda: myPda}).rpc();
  });
});

到目前为止,这些都应该是熟悉的,除了我们明确调用我们的账户为“PDA”。

程序派生地址

如果一个账户的地址是由程序的地址派生而来的,例如在 findProgramAddressSync(seeds, program.programId) 中的 programId,那么该账户就是程序派生地址(PDA)。它也是 seeds 的一个函数。

具体地说,我们知道它是一个 PDA,因为 seedsbump 出现在 init 宏中。

Keypair Account

以下代码将与上面的代码非常相似,但是请注意 init 宏缺少 seedsbump

use anchor_lang::prelude::*;
use std::mem::size_of;

declare_id!("4wLnxvLwgXGT4eNg3D456K6Fxa1RieaUdERSPQ3WEpuV");

#[program]
pub mod keypair_vs_pda {
    use super::*;

    pub fn initialize_keypair_account(ctx: Context&lt;InitializeKeypairAccount>) -> Result&lt;()> {
        Ok(())
    }
}

#[derive(Accounts)]
pub struct InitializeKeypairAccount&lt;'info> {
    // 这是程序派生地址
    #[account(init,
              payer = signer,
              space = size_of::&lt;MyKeypairAccount>() + 8,)]
    pub my_keypair_account: Account&lt;'info, MyKeypairAccount>,

    #[account(mut)]
    pub signer: Signer&lt;'info>,

    pub system_program: Program&lt;'info, System>,
}

#[account]
pub struct MyKeypairAccount {
    x: u64,
}

seedbump 缺失时,Anchor 程序现在期望我们先创建一个账户,然后将该账户传递给程序。由于我们自己创建该账户,其地址将不会是“派生自”程序的地址。换句话说,它将不是程序派生账户(PDA)

为程序创建一个账户简单到只需生成一个新的 keypair(以与我们用来 测试不同签名者在 Anchor 中 相同的方式)。是的,这听起来可能有点可怕,因为我们持有用来存储数据的账户的秘密钥匙——我们稍后会重新讨论这一点。现在,这是创建新账户并将其传递给上述程序的 Typescript 代码。我们会对此中的重要部分进行强调:

import * as anchor from "@coral-xyz/anchor";
import { Program } from "@coral-xyz/anchor";
import { KeypairVsPda } from "../target/types/keypair_vs_pda";

// 该函数向一个地址空投sol
async function airdropSol(publicKey, amount) {
  let airdropTx = await anchor.getProvider().connection.requestAirdrop(publicKey, amount * anchor.web3.LAMPORTS_PER_SOL);
  await confirmTransaction(airdropTx);
}

async function confirmTransaction(tx) {
  const latestBlockHash = await anchor.getProvider().connection.getLatestBlockhash();
  await anchor.getProvider().connection.confirmTransaction({
    blockhash: latestBlockHash.blockhash,
    lastValidBlockHeight: latestBlockHash.lastValidBlockHeight,
    signature: tx,
  });
}

describe("keypair_vs_pda", () => {
  anchor.setProvider(anchor.AnchorProvider.env());

  const program = anchor.workspace.KeypairVsPda as Program&lt;KeypairVsPda>;

  it("已初始化 -- keypair 版本", async () => {

    const newKeypair = anchor.web3.Keypair.generate();
    await airdropSol(newKeypair.publicKey, 1e9); // 1 SOL

    console.log("keypair 账户地址是", newKeypair.publicKey.toBase58());

    await program.methods.initializeKeypairAccount()
      .accounts({myKeypairAccount: newKeypair.publicKey})
      .signers([newKeypair]) // 签名者必须是keypair
      .rpc();
  });
});

我们想强调的几点:

  • 我们添加了一个工具函数 airdropSol,以将 SOL 空投到我们创建的 newKeypair。如果没有 SOL,将无法支付交易费用。此外,因为这是用来存储数据的相同账户,它需要一个 SOL 余额以 达到租金豁免。在空投 SOL 时,需要额外的 confirmTransaction 例程,因为在运行时关于 SOL 实际空投的时间以及交易确认时间之间似乎存在竞争条件。
  • 我们将 signers 从默认的一个改为 newKeypair。当创建 keypair 账户时,无法创建你不持有私钥的账户。

不可能初始化一个没有私钥的 keypair 账户

如果可以用任意地址创建账户,那将是一个重大的安全风险,因为你可以将恶意数据插入任意账户。

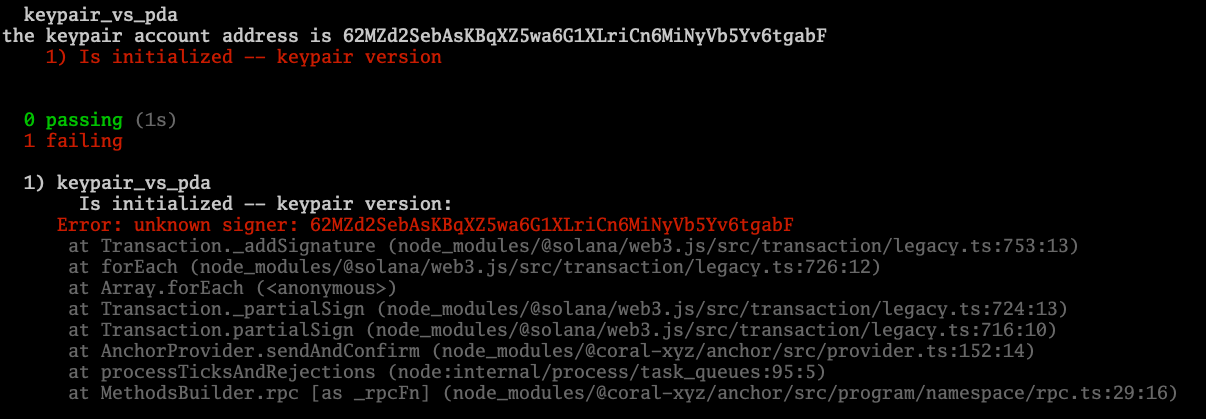
练习 : 修改测试以生成第二个 keypair secondKeypair。使用第二个 keypair 的公钥并将 .accounts({myKeypairAccount: newKeypair.publicKey}) 替换为 .accounts({myKeypairAccount: secondKeypair.publicKey})。不要更改签名者。你应该看到测试失败。你不需要给新 keypair 空投 SOL,因为它不是交易的签名者。

你应该看到类似以下的错误:

keypair_vs_pda : Error: unknown signer

如果我们尝试伪造 PDA 的地址会怎样?

练习 : 而不是从上述练习传递 secondKeypair,派生一个 PDA:

const seeds = []
const [pda, _bump] = anchor
                        .web3
                        .PublicKey
                        .findProgramAddressSync(
                            seeds,
                            program.programId);

然后将 myKeypairAccount 参数替换为 .accounts({myKeypairAccount: pda})

你应该再次看到 unknown signer 错误。

Solana 运行时不会让你这样做。如果程序突然出现未初始化的 PDAs,这将导致严重的安全问题。

拥有私钥账户是否有问题?

看起来持有私钥的人能够从账户中花费 SOL,并可能将其带入租金豁免阈值。可是,Solana 运行时在账户由程序初始化时防止这种情况发生。

为了查看这点,请考虑以下单元测试:

  • 在 Typescript 中创建一个 keypair 账户
  • 向 keypair 账户空投 SOL
  • 从 keypair 账户转移 SOL 到另一个地址(成功)
  • 初始化 keypair 账户
  • 尝试使用 keypair 作为签名者从 keypair 账户转移 SOL(失败)

代码如下所示:

import * as anchor from "@coral-xyz/anchor";
import { Program } from "@coral-xyz/anchor";
import { KeypairVsPda } from "../target/types/keypair_vs_pda";

// 更改为你的路径
import privateKey from '/Users/RareSkills/.config/solana/id.json';

import { fs } from fs;

async function airdropSol(publicKey, amount) {
  let airdropTx = await anchor.getProvider().connection.requestAirdrop(publicKey, amount * anchor.web3.LAMPORTS_PER_SOL);
  await confirmTransaction(airdropTx);
}

async function confirmTransaction(tx) {
  const latestBlockHash = await anchor.getProvider().connection.getLatestBlockhash();
  await anchor.getProvider().connection.confirmTransaction({
    blockhash: latestBlockHash.blockhash,
    lastValidBlockHeight: latestBlockHash.lastValidBlockHeight,
    signature: tx,
  });
}

describe("keypair_vs_pda", () => {
  const deployer = anchor.web3.Keypair.fromSecretKey(Uint8Array.from(privateKey));

  anchor.setProvider(anchor.AnchorProvider.env());

  const program = anchor.workspace.KeypairVsPda as Program&lt;KeypairVsPda>;

  it("写入 keypair 账户失败", async () => {
    const newKeypair = anchor.web3.Keypair.generate();
    var recieverWallet = anchor.web3.Keypair.generate();

    await airdropSol(newKeypair.publicKey, 10);

    var transaction = new anchor.web3.Transaction().add(
      anchor.web3.SystemProgram.transfer({
        fromPubkey: newKeypair.publicKey,
        toPubkey: recieverWallet.publicKey,
        lamports: 1 * anchor.web3.LAMPORTS_PER_SOL,
      }),
    );
    await anchor.web3.sendAndConfirmTransaction(anchor.getProvider().connection, transaction, [newKeypair]);
    console.log('发送1 lamport') 

    await program.methods.initializeKeypairAccount()
      .accounts({myKeypairAccount: newKeypair.publicKey})
      .signers([newKeypair]) // 签名者必须是keypair
      .rpc();

    console.log("已初始化");
    // 再次尝试转移,这会失败
    var transaction = new anchor.web3.Transaction().add(
      anchor.web3.SystemProgram.transfer({
        fromPubkey: newKeypair.publicKey,
        toPubkey: recieverWallet.publicKey,
        lamports: 1 * anchor.web3.LAMPORTS_PER_SOL,
      }),
    );
    await anchor.web3.sendAndConfirmTransaction(anchor.getProvider().connection, transaction, [newKeypair]);
  });
});

这里是预期的错误消息:

keypair_vs_pda : Error: failed to send transaction

即使我们持有该账户的私钥,我们也无法从账户中“花费” SOL,因为它现在由程序拥有。

所有权和初始化介绍

Solana 运行时如何知道在初始化后阻止 SOL 转移?

练习 : 将测试修改为以下代码。请注意已经添加的控制台日志语句。它们在记录账户中的“所有者”元数据字段和程序地址:

import * as anchor from "@coral-xyz/anchor";
import { Program } from "@coral-xyz/anchor";
import { KeypairVsPda } from "../target/types/keypair_vs_pda";

import privateKey from '/Users/jeffreyscholz/.config/solana/id.json';

async function airdropSol(publicKey, amount) {
  let airdropTx = await anchor.getProvider().connection.requestAirdrop(publicKey, amount * anchor.web3.LAMPORTS_PER_SOL);
  await confirmTransaction(airdropTx);
}

async function confirmTransaction(tx) {
  const latestBlockHash = await anchor.getProvider().connection.getLatestBlockhash();
  await anchor.getProvider().connection.confirmTransaction({
    blockhash: latestBlockHash.blockhash,
    lastValidBlockHeight: latestBlockHash.lastValidBlockHeight,
    signature: tx,
  });
}

describe("keypair_vs_pda", () => {
  const deployer = anchor.web3.Keypair.fromSecretKey(Uint8Array.from(privateKey));

  anchor.setProvider(anchor.AnchorProvider.env());

  const program = anchor.workspace.KeypairVsPda as Program&lt;KeypairVsPda>;
  it("控制台记录账户所有者", async () => {

    console.log(`程序地址是 ${program.programId}`) 
    const newKeypair = anchor.web3.Keypair.generate();
    var recieverWallet = anchor.web3.Keypair.generate();

    // 在初始化之前获取账户所有者
    await airdropSol(newKeypair.publicKey, 10);
    const accountInfoBefore = await anchor.getProvider().connection.getAccountInfo(newKeypair.publicKey);
    console.log(`初始 keypair 账户所有者是 ${accountInfoBefore.owner}`);

    await program.methods.initializeKeypairAccount()
      .accounts({myKeypairAccount: newKeypair.publicKey})
      .signers([newKeypair]) // 签名者必须是keypair
      .rpc();

    // 在初始化后获取账户所有者

    const accountInfoAfter = await anchor.getProvider().connection.getAccountInfo(newKeypair.publicKey);
    console.log(`初始 keypair 账户所有者是 ${accountInfoAfter.owner}`);
  });
});

下面是预期结果的截图:

keypair_vs_pda : 1 passing

初始化后,keypair 账户的所有者从 111...111 更改为部署的程序。我们尚未在我们的 Solana 教程 中深入探讨账户所有权或系统程序(所有为一的地址的重要性)。但是,这应该让你了解“初始化”在做什么,以及私钥的拥有者为何无法从账户中转移 SOL。

我是应该使用 PDA 还是 Keypair 账户?

一旦账户初始化,它们的行为是一样的,因此实际上没有太大区别。

唯一显著的差异(这不会影响大多数应用程序)是 PDA 只能用大小为 10,240 字节的账户进行初始化,而 keypair 账户可以初始化到最大的 10MB。然而,PDA 可以调整大小到 10MB 限制。

大多数应用程序使用 PDA,因为它们可以通过 seeds 参数以编程方式进行寻址,但是要访问 keypair 账户必须事先知道其地址。我们包含 keypair 账户的讨论是因为网上有几个教程将其用作示例,因此我们希望你有一些上下文。然而,在实践中,PDA 是存储数据的首选方式。

转载:https://learnblockchain.cn/article/11399

Solana基础 - 使用不同签名者修改账户

文章详细介绍了在Solana区块链上如何使用不同的签名者初始化账户并进行更新操作,通过Rust代码和客户端代码示例,展示了如何实现账户管理和权限控制。

在我们迄今为止的 Solana 教程中,我们只初始化并写入一个账户。

在实际操作中,这非常有限制。举个例子,如果用户 Alice 正在将积分转移给 Bob,Alice 必须能够写入由用户 Bob 初始化的账户。

在本教程中,我们将演示如何使用一个钱包初始化一个账户,并使用另一个钱包更新它。

初始化步骤

我们用于初始化账户的 Rust 代码没有改变:

use anchor_lang::prelude::*;
use std::mem::size_of;

declare_id!("61As9Y8pREgvFZzps6rpFai8UkageeHT6kW1dnGRiefb");

#[program]
pub mod other_write {
    use super::*;

    pub fn initialize(ctx: Context<Initialize>) -> Result<()> {
        Ok(())
    }
}

#[derive(Accounts)]
pub struct Initialize<'info> {
    #[account(init,
              payer = signer,
              space=size_of::<MyStorage>() + 8,
              seeds = [],
              bump)]
    pub my_storage: Account<'info, MyStorage>,

    #[account(mut)]
    pub signer: Signer<'info>,

    pub system_program: Program<'info, System>,
}

#[account]
pub struct MyStorage {
    x: u64,
}

使用备用钱包进行初始化事务

然而,客户端代码中有一个重要的变化:– 为了测试,我们创建了一个名为 newKeypair 的新钱包。与 Anchor 默认提供的一个不同。– 我们向新钱包空投 1 SOL,这样它可以支付交易费用。– 请注意注释 // THIS MUST BE EXPLICITLY SPECIFIED。我们正在将该钱包的 publicKey 传递给 Signer 字段。当我们使用内置 Anchor 的默认签名者时,Anchor 在后台为我们传递这个。但是,当我们使用不同的钱包时,我们需要显式提供这个。– 我们通过 .signers([newKeypair]) 配置设置签名者为 newKeypair

在这个代码片段之后我们将解释为何我们看起来是在两次指定签名者:

import * as anchor from "@coral-xyz/anchor";
import { Program } from "@coral-xyz/anchor";
import { OtherWrite } from "../target/types/other_write";

// 此函数向地址空投 SOL
async function airdropSol(publicKey, amount) {
  let airdropTx = await anchor.getProvider().connection.requestAirdrop(publicKey, amount);
  await confirmTransaction(airdropTx);
}

async function confirmTransaction(tx) {
  const latestBlockHash = await anchor.getProvider().connection.getLatestBlockhash();
  await anchor.getProvider().connection.confirmTransaction({
    blockhash: latestBlockHash.blockhash,
    lastValidBlockHeight: latestBlockHash.lastValidBlockHeight,
    signature: tx,
  });
}

describe("other_write", () => {
  anchor.setProvider(anchor.AnchorProvider.env());

  const program = anchor.workspace.OtherWrite as Program<OtherWrite>;

  it("Is initialized!", async () => {
    const newKeypair = anchor.web3.Keypair.generate();
    await airdropSol(newKeypair.publicKey, 1e9); // 1 SOL

    let seeds = [];
    const [myStorage, _bump] = anchor.web3.PublicKey.findProgramAddressSync(seeds, program.programId);

    await program.methods.initialize().accounts({
      myStorage: myStorage,
      signer: newKeypair.publicKey // ** THIS MUST BE EXPLICITLY SPECIFIED **
    }).signers([newKeypair]).rpc();
  });
});

signer 这个键并不一定要叫 signer

练习:在 Rust 代码中,将 payer = signer 改为 payer = fren,并将 pub signer: Signer<'info> 改为 pub fren: Signer<'info>,然后在测试中将 signer: newKeypair.publicKey 改为 fren: newKeypair.publicKey。初始化应该会成功,测试应该通过。

为什么 Anchor 需要指定 Signer 和 publicKey?

乍一看,似乎我们在两次指定签名者是多余的,但让我们仔细看看:

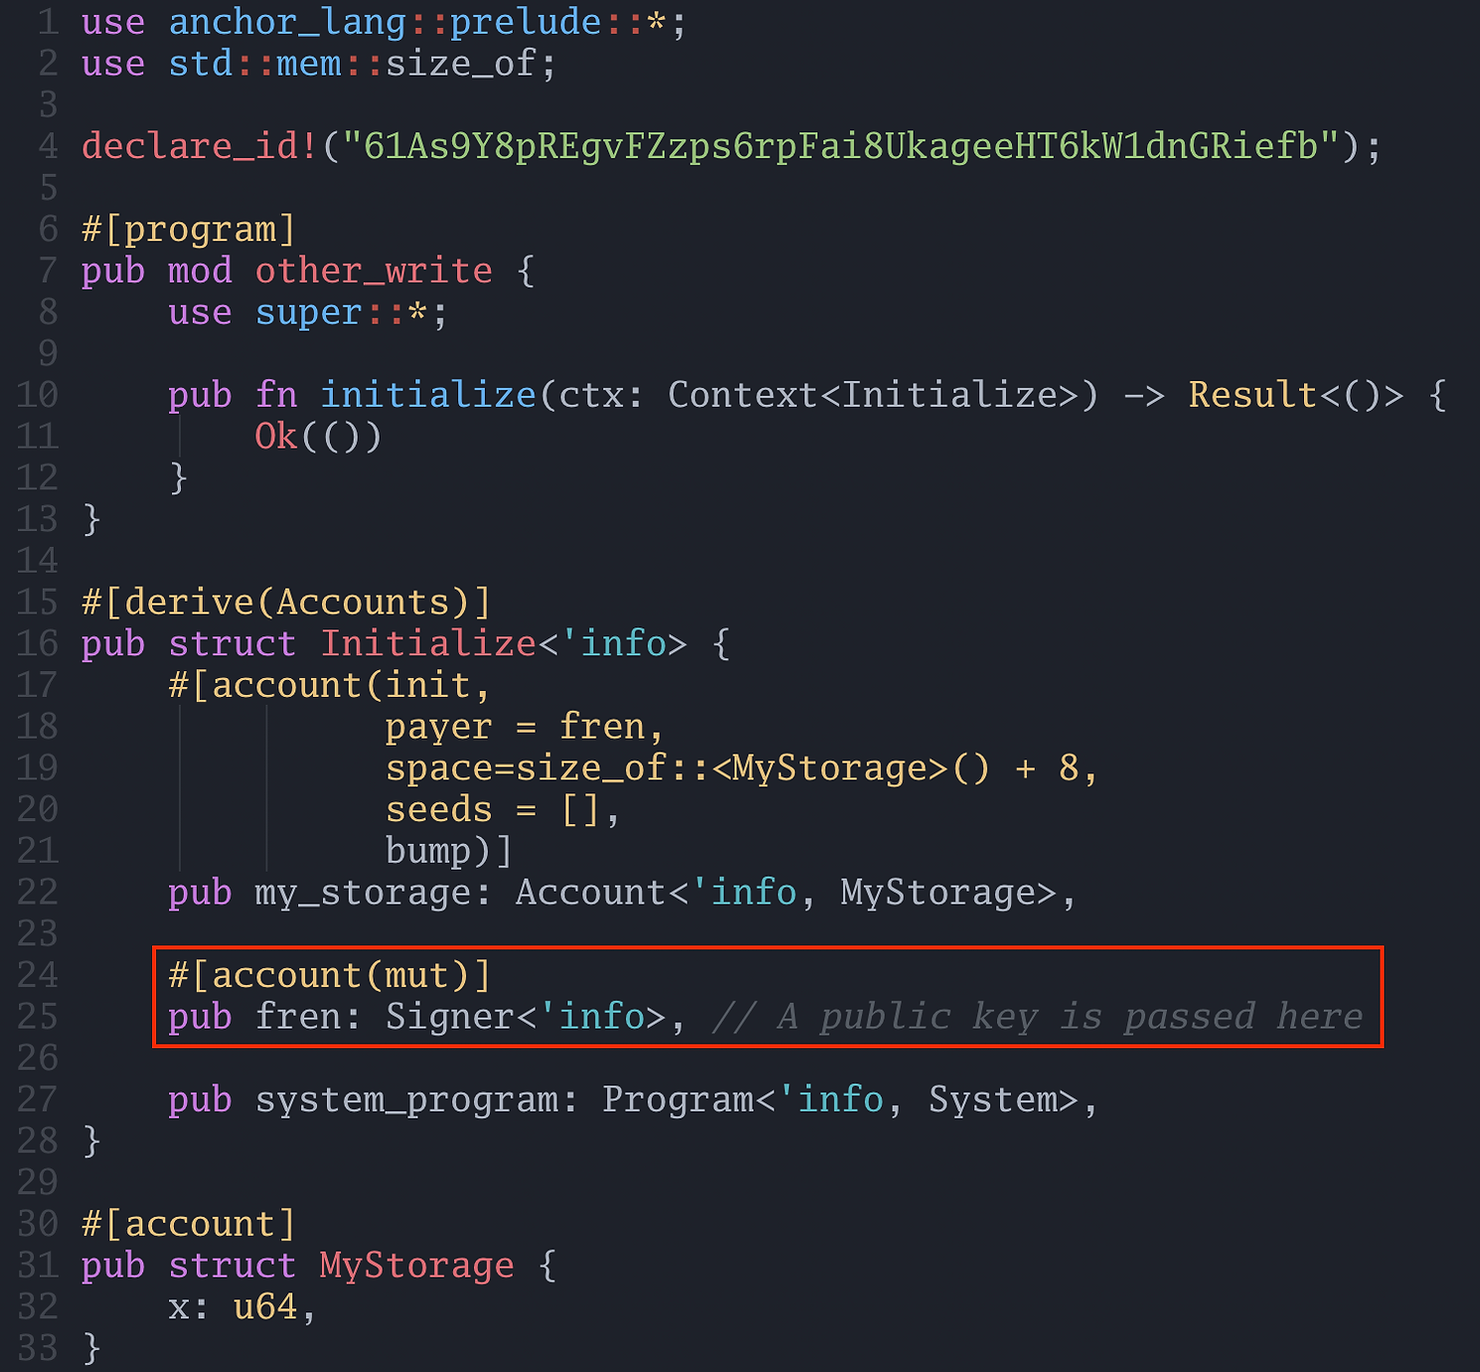
公共密钥在此传递

在红色框中,我们看到 fren 字段被指定为一个 Signer 账户。Signer 类型意味着 Anchor 将查看交易的签名,并确保签名与此处传递的地址匹配。

稍后我们将看到如何使用它来验证签名者是否被授权进行某些交易。

Anchor 一直在幕后执行这一操作,但由于我们传入了一个与 Anchor 默认使用的签名者不同的 Signer,所以我们必须明确指定 Signer 是哪个账户。

错误:在 Solana Anchor 中未知的签名者

unknown signer 错误发生在交易的签名者与传递给 Signer 的 public key 不匹配时。

假设我们修改了测试,去除 .signers([newKeypair]) 规范。Anchor 将使用默认签名者,而默认签名者不会匹配我们的 newKeypair 钱包的 publicKey

去掉 .signers([newKeypair])

我们将得到以下错误:

错误:签名验证失败

类似地,如果我们没有明确传入 publicKey,Anchor 将默默地使用默认签名者:

未传入 publicKey

我们将得到以下 错误:未知的签名者

错误:未知的签名者

有些误导性地,Anchor 并不是因为没有指定签名者而说签名者是未知的。Anchor 能够推断出如果没有指定签名者,则将使用默认签名者。如果我们同时去除 .signers([newKeypair]) 代码和 fren: newKeypair.publicKey 代码,那么 Anchor 将为验证公共密钥进行签名,并且验证签名者的签名是否与公共密钥匹配。

以下代码将导致成功初始化,因为 Signer 的公共密钥和签署交易的账户都是 Anchor 默认签名者。

await program.methods.initialize().accounts({
  myStorage: myStorage
}).rpc();

other_write 初始化

Bob 可以写入 Alice 初始化的账户

下面我们展示一个带有初始化账户和写入功能的 Anchor 程序。

这将让人熟悉我们的 Solana 计数器程序教程,但注意底部标记的 // THIS FIELD MUST BE INCLUDED 注释中的小更改:

use anchor_lang::prelude::*;
use std::mem::size_of;

declare_id!("61As9Y8pREgvFZzps6rpFai8UkageeHT6kW1dnGRiefb");

#[program]
pub mod other_write {
    use super::*;

    pub fn initialize(ctx: Context<Initialize>) -> Result<()> {
        Ok(())
    }

    pub fn update_value(ctx: Context<UpdateValue>, new_value: u64) -> Result<()> {
        ctx.accounts.my_storage.x = new_value;
        Ok(())
    }
}

#[derive(Accounts)]
pub struct Initialize<'info> {
    #[account(init,
              payer = fren,
              space=size_of::<MyStorage>() + 8,
              seeds = [],
              bump)]
    pub my_storage: Account<'info, MyStorage>,

    #[account(mut)]
    pub fren: Signer<'info>, // 此处传递了一个公共密钥

    pub system_program: Program<'info, System>,
}

#[derive(Accounts)]
pub struct UpdateValue<'info> {
    #[account(mut, seeds = [], bump)]
    pub my_storage: Account<'info, MyStorage>,

    // THIS FIELD MUST BE INCLUDED
    #[account(mut)]
    pub fren: Signer<'info>,
}

#[account]
pub struct MyStorage {
    x: u64,
}

以下客户端代码将为 Alice 和 Bob 创建钱包,并向他们分别空投 1 SOL。Alice 将初始化 MyStorage 账户,Bob 将写入它:

import * as anchor from "@coral-xyz/anchor";
import { Program } from "@coral-xyz/anchor";
import { OtherWrite } from "../target/types/other_write";

// 此函数向地址空投 SOL
async function airdropSol(publicKey, amount) {
  let airdropTx = await anchor.getProvider().connection.requestAirdrop(publicKey, amount);
  await confirmTransaction(airdropTx);
}

async function confirmTransaction(tx) {
  const latestBlockHash = await anchor.getProvider().connection.getLatestBlockhash();
  await anchor.getProvider().connection.confirmTransaction({
    blockhash: latestBlockHash.blockhash,
    lastValidBlockHeight: latestBlockHash.lastValidBlockHeight,
    signature: tx,
  });
}

describe("other_write", () => {
  // 配置客户端以使用本地集群。
  anchor.setProvider(anchor.AnchorProvider.env());

  const program = anchor.workspace.OtherWrite as Program<OtherWrite>;

  it("Is initialized!", async () => {
    const alice = anchor.web3.Keypair.generate();
    const bob = anchor.web3.Keypair.generate();

    const airdrop_alice_tx = await anchor.getProvider().connection.requestAirdrop(alice.publicKey, 1 * anchor.web3.LAMPORTS_PER_SOL);
    await confirmTransaction(airdrop_alice_tx);

    const airdrop_alice_bob = await anchor.getProvider().connection.requestAirdrop(bob.publicKey, 1 * anchor.web3.LAMPORTS_PER_SOL);
    await confirmTransaction(airdrop_alice_bob);

    let seeds = [];
    const [myStorage, _bump] = anchor.web3.PublicKey.findProgramAddressSync(seeds, program.programId);

    // ALICE 初始化账户
    await program.methods.initialize().accounts({
      myStorage: myStorage,
      fren: alice.publicKey
    }).signers([alice]).rpc();

    // BOB 写入账户
    await program.methods.updateValue(new anchor.BN(3)).accounts({
      myStorage: myStorage,
      fren: bob.publicKey
    }).signers([bob]).rpc();

    let value = await program.account.myStorage.fetch(myStorage);
    console.log(`存储的值为 ${value.x}`);
  });
});

限制对 Solana 账户的写入

在实际应用中,我们不希望 Bob 随意向任意账户写入数据。让我们创建一个基本示例,用户可以用 10 积分初始化一个账户,并将这些积分转移到另一个账户。(显而易见的问题是黑客可以使用不同钱包创建任意数量的账户,但这超出了我们示例的范围)。

构建一个原型 ERC20 程序

Alice 应该能够修改她的账户和 Bob 的账户。也就是说,她应该能够扣除她的积分并转到 Bob 的积分。她不应该扣除 Bob 的积分——只有 Bob 才能这样做。

根据惯例,我们称一个能够对账户进行特权更改的地址为 Solana 中的“authority”。在账户结构中存储“authority”字段是一种常见模式,以表示只有该账户才能对该账户进行敏感操作(如在我们的示例中扣除积分)。

这在一定程度上类似于 Solidity 中的 onlyOwner 模式,不过它适用于单个账户,而不是整个合约:

use anchor_lang::prelude::*;
use std::mem::size_of;

declare_id!("HFmGQX4wPgPYVMFe4WrBi925NKvGySrEG2LGyRXsXJ4Z");

const STARTING_POINTS: u32 = 10;

#[program]
pub mod points {
    use super::*;

    pub fn initialize(ctx: Context<Initialize>) -> Result<()> {
        ctx.accounts.player.points = STARTING_POINTS;
        ctx.accounts.player.authority = ctx.accounts.signer.key();
        Ok(())
    }

    pub fn transfer_points(ctx: Context<TransferPoints>,
                           amount: u32) -> Result<()> {
        require!(ctx.accounts.from.authority == ctx.accounts.signer.key(), Errors::SignerIsNotAuthority);
        require!(ctx.accounts.from.points >= amount, Errors::InsufficientPoints);

        ctx.accounts.from.points -= amount;
        ctx.accounts.to.points += amount;
        Ok(())
    }
}

#[error_code]
pub enum Errors {
    #[msg("SignerIsNotAuthority")]
    SignerIsNotAuthority,
    #[msg("InsufficientPoints")]
    InsufficientPoints
}

#[derive(Accounts)]
pub struct Initialize<'info> {
    #[account(init,
              payer = signer,
              space = size_of::<Player>() + 8,
              seeds = [&(signer.as_ref().key().to_bytes())],
              bump)]
    player: Account<'info, Player>,
    #[account(mut)]
    signer: Signer<'info>,
    system_program: Program<'info, System>,
}

#[derive(Accounts)]
pub struct TransferPoints<'info> {
    #[account(mut)]
    from: Account<'info, Player>,
    #[account(mut)]
    to: Account<'info, Player>,
    #[account(mut)]
    signer: Signer<'info>,
}

#[account]
pub struct Player {
    points: u32,
    authority: Pubkey
}

请注意,我们使用签名者的地址(&(signer.as_ref().key().to_bytes()))来推导存储其积分的账户的地址。这类似于 Solidity 中的 mapping in Solana,其中 Solana “msg.sender / tx.origin” 是键。

initialize 函数中,程序将初始积分设置为 10,并将 authority 设置为 signer。用户无法控制这些初始值。

transfer_points 函数使用 Solana Anchor require 宏和错误代码宏 来确保:1)交易的签名者是正在扣减余额的账户的管理员;2)该账户有足够的积分余额进行转移。

测试代码库应该易于理解。Alice 和 Bob 初始化他们的账户,然后 Alice 把 5 分转移给 Bob:

import * as anchor from "@coral-xyz/anchor";
import { Program } from "@coral-xyz/anchor";
import { Points } from "../target/types/points";

// 此函数向地址空投 SOL
async function airdropSol(publicKey, amount) {
  let airdropTx = await anchor.getProvider().connection.requestAirdrop(publicKey, amount);
  await confirmTransaction(airdropTx);
}

async function confirmTransaction(tx) {
  const latestBlockHash = await anchor.getProvider().connection.getLatestBlockhash();
  await anchor.getProvider().connection.confirmTransaction({
    blockhash: latestBlockHash.blockhash,
    lastValidBlockHeight: latestBlockHash.lastValidBlockHeight,
    signature: tx,
  });
}

describe("points", () => {
  anchor.setProvider(anchor.AnchorProvider.env());
  const program = anchor.workspace.Points as Program<Points>;


  it("Alice transfers points to Bob", async () => {
    const alice = anchor.web3.Keypair.generate();
    const bob = anchor.web3.Keypair.generate();

    const airdrop_alice_tx = await anchor.getProvider().connection.requestAirdrop(alice.publicKey, 1 * anchor.web3.LAMPORTS_PER_SOL);
    await confirmTransaction(airdrop_alice_tx);

    const airdrop_alice_bob = await anchor.getProvider().connection.requestAirdrop(bob.publicKey, 1 * anchor.web3.LAMPORTS_PER_SOL);
    await confirmTransaction(airdrop_alice_bob);

    let seeds_alice = [alice.publicKey.toBytes()];
    const [playerAlice, _bumpA] = anchor.web3.PublicKey.findProgramAddressSync(seeds_alice, program.programId);

    let seeds_bob = [bob.publicKey.toBytes()];
    const [playerBob, _bumpB] = anchor.web3.PublicKey.findProgramAddressSync(seeds_bob, program.programId);

    // Alice 和 Bob 初始化他们的账户
    await program.methods.initialize().accounts({
      player: playerAlice,
      signer: alice.publicKey,
    }).signers([alice]).rpc();

    await program.methods.initialize().accounts({
      player: playerBob,
      signer: bob.publicKey,
    }).signers([bob]).rpc();

    // Alice 将 5 积分转移给 Bob。请注意,这是一个 u32
    // 所以我们不需要一个 BigNum
    await program.methods.transferPoints(5).accounts({
      from: playerAlice,
      to: playerBob,
      signer: alice.publicKey,
    }).signers([alice]).rpc();

    console.log(`Alice 现在有 ${(await program.account.player.fetch(playerAlice)).points} 积分`);
    console.log(`Bob 现在有 ${(await program.account.player.fetch(playerBob)).points} 积分`);
  });
});

练习:创建一个 keypair mallory,尝试通过在 .signers([mallory]) 中使用 mallory 来窃取 Alice 或 Bob 的积分。你的攻击应该会失败,但你还是应该尝试。

使用 Anchor 约束替代 require! 宏

另一种替代写法 require!(ctx.accounts.from.authority == ctx.accounts.signer.key(), Errors::SignerIsNotAuthority); 的方法是使用 Anchor 约束。Anchor 账户文档提供了一系列可用的约束。

Anchor has_one 约束

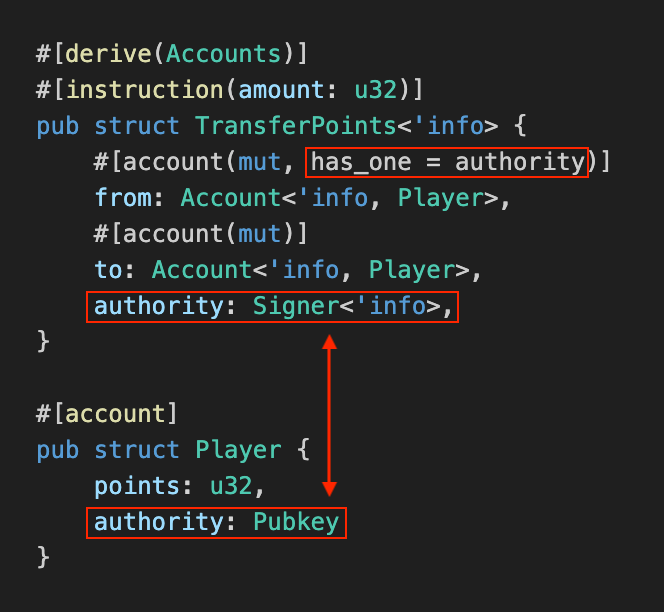
has_one 约束假设在 #[derive(Accounts)]#[account] 之间存在“共享键”,并检查这两个键的值是否相等。最好的展示方式是用图片:

从属结构 TransferPoints

在幕后,如果作为交易的一部分传递的 authority 账户(作为 Signer)不等于账户中存储的 authority,则 Anchor 将阻止该交易。

在我们上面的实现中,我们在账户中使用了字符 authority,而在 #[derive(Accounts)] 中用 signer。这种键名不匹配将阻止这个宏的工作,因此,上面的代码将 signer 的键更改为 authorityauthority 不是一个特殊的关键字,只是一种约定。作为练习,你可以将所有 authority 实例改为 fren,代码将会以同样的方式工作。

Anchor constraint 约束

我们还可以将宏 require!(ctx.accounts.from.points >= amount, Errors::InsufficientPoints); 替换为 Anchor 约束。

constraint 宏允许我们对传递给交易的账户和账户中的数据施加任意约束。在我们的情况下,我们希望确保发送者有足够的积分:

#[derive(Accounts)]
#[instruction(amount: u32)] // amount 必须做为指令传递
pub struct TransferPoints<'info> {
    #[account(mut,
              has_one = authority,
              constraint = from.points >= amount)]
    from: Account<'info, Player>,
    #[account(mut)]
    to: Account<'info, Player>,
    authority: Signer<'info>,
}

#[account]
pub struct Player {
    points: u32,
    authority: Pubkey
}

宏足够聪明,能识别出 from 是基于传递进来的 from 键的账户,并且该账户有 points 字段。来自 transfer_points 函数参数的 amount 必须通过 instruction 宏进行传递,以便 constraint 宏将 amount 与账户中的积分余额进行比较。

向 Anchor 约束添加自定义错误消息

我们可以通过添加自定义错误来提高约束违规时错误消息的可读性,这些自定义错误与我们通过 @ 符号传递给 require! 宏的错误相同:

#[derive(Accounts)]
#[instruction(amount: u32)]
pub struct TransferPoints<'info> {
    #[account(mut,
              has_one = authority @ Errors::SignerIsNotAuthority,
              constraint = from.points >= amount @ Errors::InsufficientPoints)]
    from: Account<'info, Player>,
    #[account(mut)]
    to: Account<'info, Player>,
    authority: Signer<'info>,
}

#[account]
pub struct Player {
    points: u32,
    authority: Pubkey
}

之前在 Rust 代码中定义的 Errors 枚举使用了这些错误,并在 require! 宏中用到了它们。

练习:修改测试以违反 has_oneconstraint 宏,并观察错误消息。

转载:https://learnblockchain.cn/article/11408

Solana基础 - 在 Solana 上实现 SOL 转账及构建支付分配器

在 Solana 上实现 SOL 转账及构建支付分配器
本教程将介绍 Solana Anchor 程序如何在交易中转移 SOL 的机制。

与以太坊不同,在以太坊中,钱包通过 msg.value 指定交易的一部分并“推送” ETH 到合约,而 Solana 程序则是从钱包“拉取” Solana。

因此,没有“可支付”函数或“msg.value”这样的概念。

下面我们创建了一个新的 anchor 项目,名为 sol_splitter,并放置了将 SOL 从发送者转移到接收者的 Rust 代码。

当然,如果发送者直接发送 SOL,而不是通过程序来完成,这样会更高效,但我们想要说明的是如何做到这一点:

    use anchor_lang::prelude::*;
    use anchor_lang::system_program;

    declare_id!("9qnGx9FgLensJQy1hSB4b8TaRae6oWuNDveUrxoYatr7");

    #[program]
    pub mod sol_splitter {
        use super::*;

        pub fn send_sol(ctx: Context<SendSol>, amount: u64) -> Result<()> {

            let cpi_context = CpiContext::new(
                ctx.accounts.system_program.to_account_info(), 

                system_program::Transfer {
                    from: ctx.accounts.signer.to_account_info(),
                    to: ctx.accounts.recipient.to_account_info(),
                }
            );

            let res = system_program::transfer(cpi_context, amount);

            if res.is_ok() {
                return Ok(());
            } else {
                return err!(Errors::TransferFailed);
            }
        }
    }

    #[error_code]
    pub enum Errors {
        #[msg("transfer failed")]
        TransferFailed,
    }

    #[derive(Accounts)]
    pub struct SendSol<'info> {
        /// CHECK: we do not read or write the data of this account
        #[account(mut)]
        recipient: UncheckedAccount<'info>,

        system_program: Program<'info, System>,

        #[account(mut)]
        signer: Signer<'info>,
    }

这里有很多内容需要解释。

引入 CPI:跨程序调用

在以太坊中,转移 ETH 只需在 msg.value 字段中指定一个值。在 Solana 中,一个名为 system program 的内置程序将 SOL 从一个账户转移到另一个账户。这就是为什么在我们初始化账户时,它不断出现并且需要支付费用来初始化它们。

你可以大致将系统程序视为以太坊中的预编译。想象一下,它的行为有点像内置于协议中的 ERC-20 代币,用作原生货币。它有一个名为 transfer 的公共函数。

CPI 交易的上下文

每当调用 Solana 程序函数时,必须提供一个 Context。该 Context 包含程序将要交互的所有账户。

调用系统程序没有什么不同。系统程序需要一个 Context,其中包含 fromto 账户。转移的 amount 作为“常规”参数传递——它不是 Context 的一部分(因为“amount”不是一个账户,它只是一个值)。

现在我们可以解释下面的代码片段:

cpi_context system_program transfer

我们正在构建一个新的 CpiContext,它将我们要调用的程序作为第一个参数(绿色框),以及将作为该交易一部分的账户(黄色框)。参数 amount 在这里没有提供,因为 amount 不是一个账户。

现在我们已经构建了 cpi_context,可以在指定金额的同时对系统程序进行跨程序调用(橙色框)。

这返回一个 Result<()> 类型,就像我们 Anchor 程序上的公共函数一样。

不要忽视跨程序调用的返回值。

要检查跨程序调用是否成功,我们只需检查返回值是否为 Ok。Rust 通过 is_ok() 方法使这变得简单:

            let res = system_program::transfer(cpi_context, amount);

            if res.is_ok() {
                return Ok(());
            } else {
                return err!(Errors::TransferFailed);
            }
        }
    }

    #[error_code]
    pub enum Errors {
        #[msg("transfer failed")]
        TransferFailed,
    }

只有签名者可以是“from”

如果你调用系统程序时 from 是一个不是 Signer 的账户,那么系统程序将拒绝该调用。没有签名,系统程序无法知道你是否授权了该调用。

TypeScript 代码:

    import * as anchor from "@coral-xyz/anchor";
    import { Program } from "@coral-xyz/anchor";
    import { SolSplitter } from "../target/types/sol_splitter";

    describe("sol_splitter", () => {
      // Configure the client to use the local cluster.
      anchor.setProvider(anchor.AnchorProvider.env());

      const program = anchor.workspace.SolSplitter as Program<SolSplitter>;

      async function printAccountBalance(account) {
        const balance = await anchor.getProvider().connection.getBalance(account);
        console.log(`${account} has ${balance / anchor.web3.LAMPORTS_PER_SOL} SOL`);
      }

      it("Transmit SOL", async () => {
        // generate a new wallet
        const recipient = anchor.web3.Keypair.generate();

        await printAccountBalance(recipient.publicKey);

        // send the account 1 SOL via the program
        let amount = new anchor.BN(1 * anchor.web3.LAMPORTS_PER_SOL);
        await program.methods.sendSol(amount)
          .accounts({recipient: recipient.publicKey})
          .rpc();

        await printAccountBalance(recipient.publicKey);
      });
    });

一些需要注意的事项:

  • 我们创建了一个辅助函数 printAccountBalance 来显示余额的前后
  • 我们使用 anchor.web3.Keypair.generate() 生成了接收者钱包
  • 我们将 1 SOL 转移到新账户

当我们运行代码时,预期结果如下。打印语句是接收者地址的前后余额:

result sol_sprinter

练习:构建一个 Solana 程序,将传入的 SOL 平均分配给两个接收者。你将无法通过函数参数来完成此操作,账户需要在 Context 结构中。

构建支付分割器:使用 remaining_accounts 处理任意数量的账户。

我们可以看到,如果我们想将 SOL 分配给多个账户,必须指定一个 Context 结构会显得相当笨拙:

    #[derive(Accounts)]
    pub struct SendSol<'info> {
        /// CHECK: we do not read or write the data of this account
        #[account(mut)]
        recipient1: UncheckedAccount<'info>,

        /// CHECK: we do not read or write the data of this account
        #[account(mut)]
        recipient2: UncheckedAccount<'info>,

        /// CHECK: we do not read or write the data of this account
        #[account(mut)]
        recipient3: UncheckedAccount<'info>,

        // ...

        /// CHECK: we do not read or write the data of this account
        #[account(mut)]
        recipientn: UncheckedAccount<'info>,

        system_program: Program<'info, System>,

        #[account(mut)]
        signer: Signer<'info>,
    }

为了解决这个问题,Anchor 在 Context 结构中添加了一个 remaining_accounts 字段。

下面的代码说明了如何使用这个特性:

    use anchor_lang::prelude::*;
    use anchor_lang::system_program;

    declare_id!("9qnGx9FgLensJQy1hSB4b8TaRae6oWuNDveUrxoYatr7");

    #[program]
    pub mod sol_splitter {
        use super::*;

        // 'a, 'b, 'c 是 Rust 生命周期,暂时忽略它们
        pub fn split_sol<'a, 'b, 'c, 'info>(
            ctx: Context<'a, 'b, 'c, 'info, SplitSol<'info>>,
            amount: u64,
        ) -> Result<()> {

            let amount_each_gets = amount / ctx.remaining_accounts.len() as u64;
            let system_program = &ctx.accounts.system_program;

            // 注意关键字 `remaining_accounts`
            for recipient in ctx.remaining_accounts {
                let cpi_accounts = system_program::Transfer {
                    from: ctx.accounts.signer.to_account_info(),
                    to: recipient.to_account_info(),
                };
                let cpi_program = system_program.to_account_info();
                let cpi_context = CpiContext::new(cpi_program, cpi_accounts);

                let res = system_program::transfer(cpi_context, amount_each_gets);
                if !res.is_ok() {
                    return err!(Errors::TransferFailed);
                }
            }

            Ok(())
        }
    }

    #[error_code]
    pub enum Errors {
        #[msg("transfer failed")]
        TransferFailed,
    }

    #[derive(Accounts)]
    pub struct SplitSol<'info> {
        #[account(mut)]
        signer: Signer<'info>,
        system_program: Program<'info, System>,
    }

这是 TypeScript 代码:

    import * as anchor from "@coral-xyz/anchor";
    import { Program } from "@coral-xyz/anchor";
    import { SolSplitter } from "../target/types/sol_splitter";

    describe("sol_splitter", () => {
      // 配置客户端以使用本地集群。
      anchor.setProvider(anchor.AnchorProvider.env());

      const program = anchor.workspace.SolSplitter as Program<SolSplitter>;

      async function printAccountBalance(account) {
        const balance = await anchor.getProvider().connection.getBalance(account);
        console.log(`${account} has ${balance / anchor.web3.LAMPORTS_PER_SOL} SOL`);
      }

      it("Split SOL", async () => {
        const recipient1 = anchor.web3.Keypair.generate();
        const recipient2 = anchor.web3.Keypair.generate();
        const recipient3 = anchor.web3.Keypair.generate();

        await printAccountBalance(recipient1.publicKey);
        await printAccountBalance(recipient2.publicKey);
        await printAccountBalance(recipient3.publicKey);

        const accountMeta1 = {pubkey: recipient1.publicKey, isWritable: true, isSigner: false};
        const accountMeta2 = {pubkey: recipient2.publicKey, isWritable: true, isSigner: false};
        const accountMeta3 = {pubkey: recipient3.publicKey, isWritable: true, isSigner: false};

        let amount = new anchor.BN(1 * anchor.web3.LAMPORTS_PER_SOL);
        await program.methods.splitSol(amount)
          .remainingAccounts([accountMeta1, accountMeta2, accountMeta3])
          .rpc();

        await printAccountBalance(recipient1.publicKey);
        await printAccountBalance(recipient2.publicKey);
        await printAccountBalance(recipient3.publicKey);
      });
    });

运行测试显示了之前和之后的余额:

test result Split SOL

这里是对 Rust 代码的一些评论:

Rust 生命周期

split_sol 的函数声明有一些奇怪的语法:

    pub fn split_sol<'a, 'b, 'c, 'info>(
        ctx: Context<'a, 'b, 'c, 'info, SplitSol<'info>>,
        amount: u64,
    ) -> Result<()>

'a'b'c 是 Rust 生命周期。Rust 生命周期是一个复杂的话题,我们暂时不想涉及。但简单来说,Rust 代码需要确保在循环 for recipient in ctx.remaining_accounts 中传入的资源在整个循环期间始终存在。

ctx.remaining_accounts

循环通过 for recipient in ctx.remaining_accounts 遍历。关键字 remaining_accounts 是 Anchor 机制,用于传递任意数量的账户,而不必在 Context 结构中创建一堆键。

在 TypeScript 测试中,我们可以像这样将 remaining_accounts 添加到事务中:

    await program.methods.splitSol(amount)
      .remainingAccounts([accountMeta1, accountMeta2, accountMeta3])
      .rpc();

转载:https://learnblockchain.cn/article/10310

搜索