您正在查看: 2018年6月

push_transaction Error 3050003 eosio_assert_message assertion failure

查看nodeos 抛出log

Exception Details: 3050003 eosio_assert_message_exception: eosio_assert_message assertion failure
assertion failure with message: comparison of assets with different symbols is not allowed

是因为push_transaction中的代币符号与所需代币符号不一致

测试代码如下

eos = Eos({
        httpEndpoint: 'http://192.168.1.112:8888',
        chainId: 'cf057bbfb72640471fd910bcb67639c22df9f92470936cddc1ade0e2f2e7dc4f',
        keyProvider: wif,
        verbose: true
    })
const name = 'bcskillsurou'
    const pubkey = 'EOS68mvUMCz73a5Xj2wnJxdTW1aPjmiKCeSAjVdXjTd3D3g9A38EE'
     eos.transaction(tr => {
        tr.newaccount({
          creator: 'dapp.exec1',
          name,
          owner: pubkey,
          active: pubkey
        })

        tr.buyrambytes({
          payer: 'dapp.exec1',
          receiver: name,
          bytes: 8192
        })

        tr.delegatebw({
          from: 'dapp.exec1',
          receiver: name,
          stake_net_quantity: '10.0000 EOS',
          stake_cpu_quantity: '10.0000 EOS',
          transfer: 0
        })
    }).then(console.log)
    .catch(e => {
        console.error(e);
    })

由于测试网络中内置代币符号为 SYS,所以需要将上面的 EOS修改为 SYS
还有种就是将测试网内置代币修改为EOS
修改eos_source_dir/CMakeLists.txt
CORE_SYMBOL_NAME "SYS"修改为CORE_SYMBOL_NAME "EOS"重新编译项目

[EOS源码分析] EOS智能合约开发实践之数据库持久化

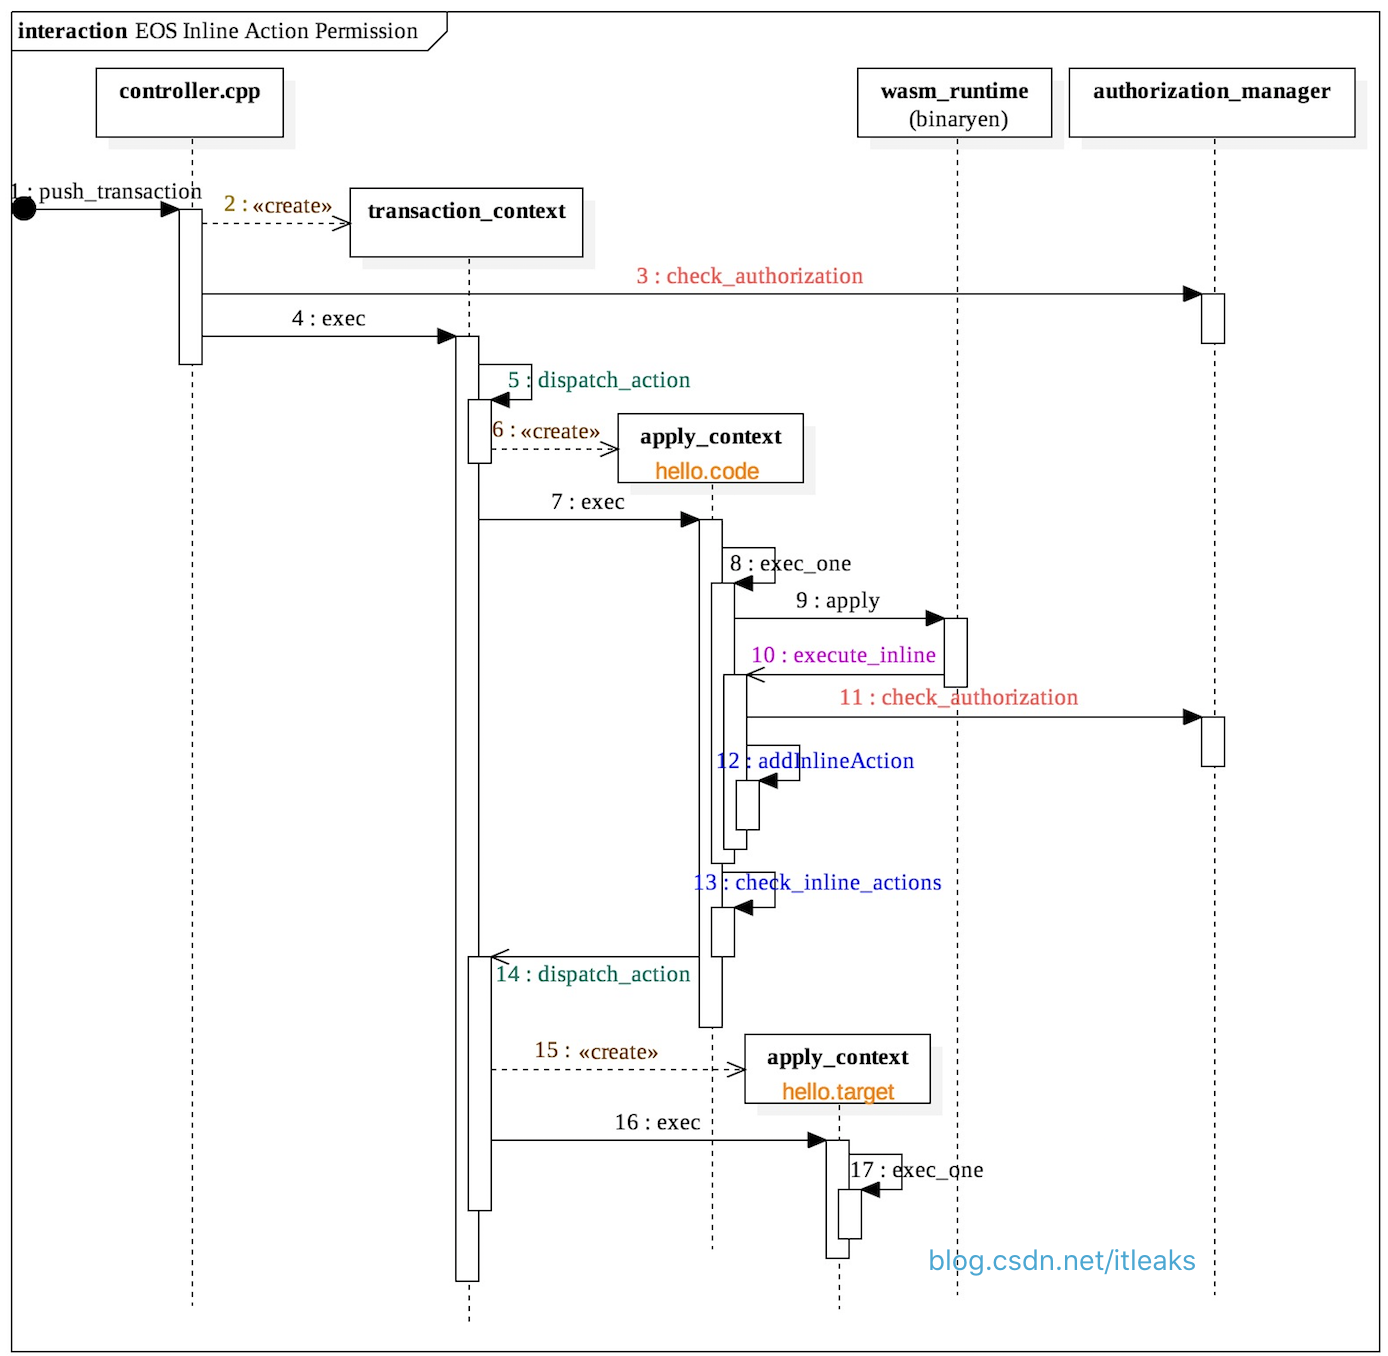
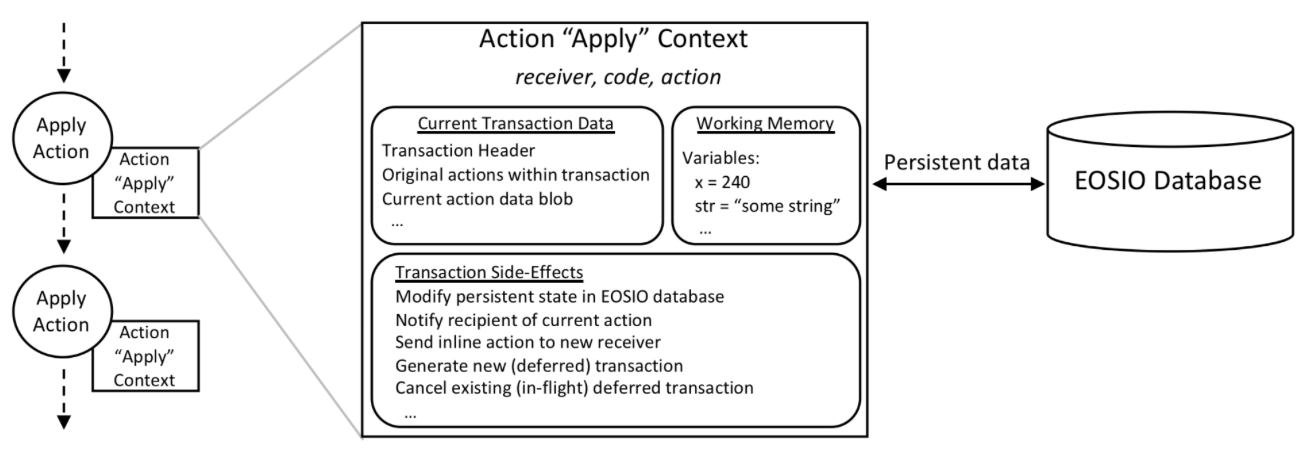
以太坊智能合约定义的全局变量的值是持久性的,就相当于智能合约一直在运行着。而EOS的智能合约更加接近我们平时使用的程序,每次执行action都相当于启动智能合约的一个新实例,一旦执行完,代码定义的变量就释放了,不会影响下一次执行环境。但是智能合约肯定需要有持久化存储的需求,比如永久保存智能合约代币的状态,不能代币转账执行完,代币的balance余额信息和转账前一样吧。这个持久化存储就是数据库存储数据。EOS允许智能合约定义自己的私有数据库表。比如下图,Apply Context的内容都是一次性的,一次action执行完成,对象就释放了,只有存储到EOSIO database的才被保存。

这个私有数据表是通过multi_index来访问和交互的。EOS的multi_index类似boost的multi_index,即多索引容器。有了多级索引,智能合约就具备了操作类似数据库模块的功能。eosio::multi_index支持主键,但是必须是唯一的无符号64位整数。eosio::multi_index中的对象容器按主键索引按无符号64位整数主键的升序排序。

申请私有数据表

定义一个multi_index对象即可

纯数据表

multi_index<table_name, record >
   > table( code, scope );

这里的code必须是contract的account_name, 因为这个数据表的操作api都有check,比如'modify' 函数.

void modify( const T& obj, uint64_t payer, Lambda&& updater ) {
         eosio_assert( _code == current_receiver(), "cannot modify objects in table of another contract" ); // Quick fix for mutating db using multi_index that shouldn't allow mutation. Real fix can come in RC2.
  }

scope参数,这个参数的初衷是用来实现交易action并行执行的。我们知道,action之间可能是存在依赖的,比如alice转给bob 5块钱(action1),alice转给james 5块钱(action2), action1和action2就有依赖关系。因为如果Alice只有6块钱,那么这两个action中必然有一个action是失败的。如果这两个action并行执行那这两个都会成功,明显是不合理的。你可能会说可以使用互斥锁解决冲突啊?事实上市不行的,申请互斥锁中的两段代码的执行顺序是随机的,所以导致action1和action2的执行顺序是随机的,这就违背了区块链的基本要求---确定性和可重复性,每个节点按相同顺序执行一个action列表,结果应该是一致的。所以为了解决这个问题就提出了scope的。假设这个balance的数据保存在‘balance’数据表里,scope为'balance_scope', 所以在提交action1时就会传入一个scope参数'balance_scope‘,这样系统根据action1和action的scope很容易知道action1, action2都会操作'balance_scope'对应的'balance'表,就不会让这两个action并行执行。其实,这里的核心问题是action操作的数据表的信息,如果提交的action不告知系统,系统必须要执行完action才能知道操作了哪个数据表,这自然没法实现并行。当然,目前版本scope基本没有起作用,action并行老版本有实现过的框架(但不起作用),最新的版本框架甚至已经删除了相关逻辑,看来action的并行化路漫慢而修远兮。

纯数据表示例

eosio.token合约

struct currency_stats {
    asset supply;
    asset max_supply;
    ccount_name issuer;

    //必须有该函数
    uint64_t primary_key()const { return supply.symbol.name(); }
};
typedef eosio::multi_index<N(stat), currency_stats> stats;

主键查找数据

纯数据表只能通过table.find函数以主键为参数查找数据

stats statstable( _self, sym.name() );
auto existing = statstable.find( sym.name() );

多索引数据表

基本格式
multi_index<table_name, record,
        indexed_by<index_name, index_func>,
        indexed_by<index_name_1, index_func_1>,
        ….>
   > table( code, scope );

和纯数据表相比,就多了index_by索引定义
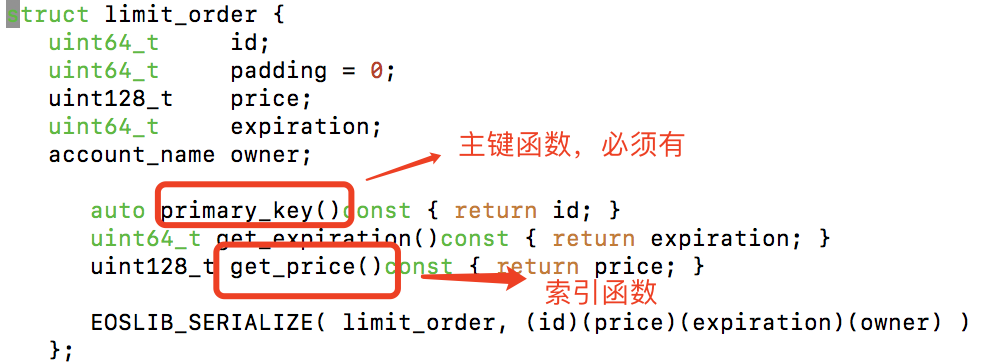
索引的定义格式是:indexed_by<索引名,索引键值函数>,比如这个实例:

eosio::multi_index<N(orders), limit_order,
        indexed_by< N(byexp), const_mem_fun<limit_order, uint64_t, &limit_order::get_expiration> >,
        indexed_by< N(byprice), const_mem_fun<limit_order, uint128_t, &limit_order::get_price> >
                     > orders( N(multitest), N(multitest) );

<N(orders), limit_order,这部分和纯数据表是一样的,第一个参数是表名,第二个参数是表行对象。这里有两个索引对象。分别是
indexed_by< N(byexp), const_mem_fun<limit_order, uint64_t, &limit_order::get_expiration>>
indexed_by< N(byprice), const_mem_fun<limit_order, uint128_t, &limit_order::get_price> >
N(byprice):索引名称是'byprice'
const_mem_fun<limit_order, uint128_t,&limit_order::get_price>中的const_mem_fun定义了一个索引键值函数,这个其实是通过boost::bind函数将对象的const成员函数转化为函数指针.其格式是<ObjectType, indexType(索引类型), &ObjectType::function>

索引查找数据

  auto priceidx = orders.get_index<N(byprice)>();
    print("Items sorted by price:\n");
    for( const auto& item : priceidx ) {
       print(" ID=", item.id, ", price=", item.price, ", owner=", name{item.owner}, "\n");
    }

二级索引类型限制

  • idx64 - 原始的64位无符号整数密钥.
  • idx128 - 原始128位无符号整数密钥.
  • idx256 - 256位固定大小的字典键.
  • idx_double - 双精度浮点键.
  • idx_long_double - 四倍精度浮点键.

查看数据表数据

$cleos get table cleos get table [OPTIONS] contract scope table

实例运行

源码
class tabletest : public eosio::contract {
    private:
        /// @abi table
         struct contact {
            account_name name;
            uint64_t     phone;

            auto primary_key()const { return name; }
            uint64_t get_phone()const { return phone; }

            EOSLIB_SERIALIZE( contact, (name)(phone))
        };
        typedef eosio::multi_index<N(contact), contact, indexed_by< N(byphone), const_mem_fun<contact, uint64_t, &contact::get_phone> >
                  > contacts;

    public:
        using contract::contract;

        /// @abi action
        void add(account_name owner, account_name name, uint64_t phone ) {
            //新增数据项
            contacts contacttable( _self, owner );//(code, scope)
            //(player, item),player域指由谁来支付这个数据存储费用
            contacttable.emplace( _self, [&]( auto& o ) {
                o.name = name;
                o.phone = phone;
            });
        }

        /// @abi action
        void remove(account_name owner, account_name contact_name) {
            //删除数据项
            contacts contacttable( _self, owner );
            name n{contact_name};
            auto item = contacttable.find( contact_name );
            if( item == contacttable.end() ) {
                print_f("Not found name:%sn", n.to_string().data());
            } else {
                contacttable.erase(item);
            };
        }

        /// @abi action
        void modify(account_name owner, account_name contact_name, uint64_t phone) {
            //修改数据项
            contacts contacttable( _self, owner );
            name n{contact_name};
            auto item = contacttable.find( contact_name );
            if( item == contacttable.end() ) {
                print_f("Not found name:%sn", n.to_string().data());
            } else {
                contacttable.modify( item, _self, [&]( auto& o ) {
                    o.phone = phone;
                });
            };
        }

        /// @abi action
        void findbyname(account_name owner, account_name contact_name) {
            //根据name主键查找数据项
            contacts contacttable( _self, owner );
            name n{contact_name};
            auto item = contacttable.find( contact_name );
            if( item == contacttable.end() ) {
                print_f("Not found name:%s\n", n.to_string().data());
            } else {
                n = name{item->name};
                print_f("Found phone:%, for %s\n", item->phone, n.to_string().data());
            };
        }

        /// @abi action
        void findbyphone(account_name owner, uint64_t phone) {
            //根据phone索引查找数据项
            contacts contacttable( _self, owner );
            auto phoneinx = contacttable.get_index<N(byphone)>();
            auto item = phoneinx.find(phone);
            if( item == phoneinx.end() ) {
                print_f("Not found phone:%\n", phone);
            } else {
                name n{item->name};
                print_f("Found name:%s for phone:%\n", n.to_string().data(), item->phone);
            };
        }
};

EOSIO_ABI( tabletest, (add) (remove) (modify) (findbyname) (findbyphone))

编译

请参考【EOS编写HelloWorld智能合约】

执行

$cleos create account eosio table.code $KEY_PUB_1 $KEY_PUB_1
$cleos set contract table.code ./table -p table.code
$cleos create account eosio itleaks $KEY_PUB_2 $KEY_PUB_2
$cleos push action table.code add '[ "itleaks", "jackma", "13456" ]' -p itleaks
$cleos get table table.code itleaks contact

源码一键实践

https://github.com/itleaks/eos-contract/tree/master/table-exp

转载自:http://blog.csdn.net/itleaks

[EOS源码分析] EOS保留权限eosio.code深度解读

inline action简单来说就是action调用另外一个action, 具体来说就是一个智能合约的代码调用另外一个智能合约的函数。
eoiso.code这一特殊权限是dawn4.0后新增的内部特殊权限,用来加强inline action的安全性。比如alice调用智能合约contract1.test,一开始alice看过contract1.test的逻辑,发现它只是一个打印函数,并不会调用其他合约。所以alice以自己active的权限alice@active去执行contract1.test。但是contract1的拥有者某一天可能偷偷更改了test的实现,在test函数中调用eosio.token的transfer函数以alice@active权限就可以取走alice的EOS. 为了解决权限乱用问题,EOS新增了eosio.code这个特殊权限。采用eosio.code后,contract1.test要以alice@active去调用eosio.token,必须得到alice的授权,即必须在alice@active里添加contrac1@eosio.code授权

$cleos set account permission alice active '{"threshold": 1,"keys": [{"key":"EOS6MRyAjQq8ud7hVNYcfnVPJqcVpscN5So8BhtHuGYqET5GDW5CV", "weight":1}],"accounts": [{"permission":{"actor":"contract1","permission":"eosio.code"},"weight":1}]}' owner -p alice@owner

即用户调用push action -p permission授权的权限只作用域该action,要用到其他action必须再授权eosio.code

Inline action权限分析

我们以【inline action开发实践】博文中的实例为例,hello.code智能合约调用hello.target合约

class hello : public eosio::contract {
  public:
    using contract::contract;
    /// @abi action 
    void hi( account_name from, account_name to) {
        require_auth(from);
        print( "Hello, from:", name{from}, ", to:", name{to});
        action(
            //这里{to, active}必须授权给{_self, eosio.code}
            permission_level{to, N(active)},
            //调用 hello.target合约 的'callme' action
            N(hello.target), N(callme),
            std::make_tuple(to)
         ).send();
    }
};

通过下面的命令执行hello.code智能合约
$cleos push action hello.code hi '["args.user","args.user1"]' -p args.user
调用时序图如下

时序图中有2次调用check_authorization

  • 3中的check_authorization是检测交易的签名是否满足action 'hello.code@hi'调用的权限声明args.user@active,这个检测机制已经在【EOS权限机制】一文已经详细分析过了
  • 11中的check_authorization是检测hello.code@eosio.code是否满足action "hello.target@callme"的权限声明to@active(这里的to='args.user1'),也就是args.user1@active。所以为了让这个inline action调用成功,必须添加如下授权
    $cleos set account permission args.user1 active '{"threshold": 1,"keys": [],"accounts": [{"permission":{"actor":"hello.code","permission":"eosio.code"},"weight":1}]}' owner -p args.user1@owner

    这里有个疑问,为啥是检测(hello.code, eosio.code)授权是否满足权限声明呢?我们仔细看下上面的hi代码

    void hi( account_name from, account_name to) {
          require_auth(from);
          print( "Hello, from:", name{from}, ", to:", name{to});
          action(
              //这里{to, active}必须授权给{_self, eosio.code}
              permission_level{to, N(active)},
              //调用 hello.target合约 的'callme' action
              N(hello.target), N(callme),
              std::make_tuple(to)
           ).send();
      }

    当hello.code智能合约代码通过action.send调用其他智能合约时,hi代码是拿不到任何私钥的,也就没法为声明的权限签名,即没法证明该智能合约具备action声明的权限to@active。因此,只有系统代码做担保了,因而系统提出了一个虚拟权限eosio.code。然后系统直接告诉系统检验逻辑(authorization_manager) ,‘action(hello.target)’已经具备hello.code@eosio.code权限。然后authorization_manager只需检验to@active是否授权给hello.code@eosio.code即可。通过这种虚拟的权限证明解决了合约调用合约的权限检测问题

    上面红色的部分就是系统代为担保的权限证明。对于用户直接提交的action,这个权限证明是从transaction的签名里恢复出来的

    转载自:http://blog.csdn.net/itleaks

[EOS源码分析] EOS智能合约开发实践之合约调用合约(inline action)

首先,目前dawn-4.1, dawn-4.2使用inline action是会报如下错误

transaction declares authority '{"actor":"hello.code","permission":"active"}', but does not have signatures for it under a provided delay of 0 ms

这个问题是4.0以后inline action的权限发生变化导致的。这个改动在eos官网的#3013这个issue讨论BM有提到过

核心是为智能合约账号添加eosio.code permission,比如hello.code调用hello.target智能合约,需要添加如下permission

cleos set account permission args.user active '{"threshold": 1,"keys": [{"key":"EOS6MRyAjQq8ud7hVNYcfnVPJqcVpscN5So8BhtHuGYqET5GDW5CV", "weight":1}],"accounts": [{"permission":{"actor":"hello.code","permission":"eosio.code"},"weight":1}]}' owner -p args.user@owner

代码

新建两个contract: hello.code和hello.target

  • hello.target代码如下

     #include <eosiolib/eosio.hpp>
     #include <eosiolib/print.hpp>
     using namespace eosio;
    
     class target : public eosio::contract {
       public:
         using contract::contract;
    
         /// @abi action 
         void callme( account_name user ) {
             require_auth(user);
             print( "Call me from, ", name{user} );
         }
     };
    
     EOSIO_ABI( target, (callme) )
  • hello.code的代码:

     class hello : public eosio::contract {
       public:
         using contract::contract;
         /// @abi action
         void hi( account_name from, account_name to) {
             require_auth(from);
             print( "Hello, from:", name{from}, ", to:", name{to});
             action(
                 //这里{to, active}必须授权给{_self, eosio.code}
                 permission_level{to, N(active)},
                 //调用 hello.target合约 的'callme' action
                 N(hello.target), N(callme),
                 std::make_tuple(to)
              ).send();
         }
     };

    核心就是上面的红色字体的内容action(xx).send(),具体参数的含义是:

    Action(permssion_level, other_contract_account_name, method, args)

    所以:

    action(permission_level{to, N(active)},
            N(hello.target), N(callme), 
            std::make_tuple(to)
    ).send();

    这个等价于如下命令

    $cleos push action hello.target callme '["to"]' -p to

    测试

    $cleos create account eosio hello.code $KEY_PUB_1 $KEY_PUB_1
    $cleos set contract hello.code ./hello -p hello.code
    $cleos create account eosio args.user $KEY_PUB_2 $KEY_PUB_2
    $cleos create account eosio hello.target $KEY_PUB_3 $KEY_PUB_3
    $cleos create account eosio args.user1 $KEY_PUB_4 $KEY_PUB_4
    $cleos set contract hello.target ./hello.target -p hello.target
    $cleos set account permission args.user1 active '{"threshold": 1,"keys": [],"accounts": [{"permission":{"actor":"hello.code","permission":"eosio.code"},"weight":1}]}' owner -p args.user1@owner
    $cleos push action hello.code hi '["args.user", "args.user1"]' -p args.user

    源码一键实践

    https://github.com/itleaks/eos-contract/tree/master/callcontract-exp

    转载自:http://blog.csdn.net/itleaks

[EOS源码分析] EOS特殊智能合约eosio

这里说的eosio智能合约不是泛指eos的智能合约,它是一个特殊的具体的合约。它本事可大了,我们一起来看看它有哪些功能

负责智能合约部署

$ cleos set contract hello.code ../eos-contract/hello -p hello.code
Publishing contract...
executed transaction: daabe65267af4b9a11e5ff90a165bbaac68469630f499bcea1ef0eb7da6d970c  1792 bytes  2558 us
#         eosio <= eosio::setcode               {"account":"hello.code","vmtype":0,"vmversion":0,"code":"0061736d01000000013b0c60027f7e006000017e600...
#         eosio <= eosio::setabi                {"account":"hello.code","abi":"00010c6163636f756e745f6e616d65046e616d6501026869000104757365720c61636...

注意下 eosio <= eosio::setcodeeosio <= eosio::setabi
这段log很明显的说明了

$ cleos set contract eosio build/contracts/eosio.bios -p eosio

等价于调用eosio智能合约的setcode和setabi函数

$ cleos push action eosio setcode '[eosio.bios.wasm]' -p eosio
$ cleos push action eosio setabi eosio '[eosio.bios.abi] -p eosio

也就说合约部署是通过调用eosio合约来实现的
对应的源码:
set contract会产生setcode和setabi两个action

add_standard_transaction_options(contractSubcommand, "account@active");
   add_standard_transaction_options(codeSubcommand, "account@active");
   add_standard_transaction_options(abiSubcommand, "account@active");
   contractSubcommand->set_callback([&] {
      shouldSend = false;
      set_code_callback();
      set_abi_callback();
      std::cout << localized("Publishing contract...") << std::endl;
      send_actions(std::move(actions), 10000, packed_transaction::zlib);
   });

chain::action create_setcode(const name& account, const bytes& code) {
   return action {
      tx_permission.empty() ? vector<chain::permission_level>{{account,config::active_name}} : get_account_permissions(tx_permission),
      setcode{
         .account   = account,
         .vmtype    = 0,
         .vmversion = 0,
         .code      = code
      }
   };
}

struct setcode {
   account_name                     account;
   uint8_t                          vmtype = 0;
   uint8_t                          vmversion = 0;
   bytes                            code;

   static account_name get_account() {
      return config::system_account_name;
   }

   static action_name get_name() {
      return N(setcode);
   }
};

const static uint64_t system_account_name    = N(eosio);

set_code和set_abi都是通过调用system_account_name即eosio智能合约来执行的

负责账号创建

同样我们看看create account,其实就是调用eosio合约的newaccount函数

$ cleos create account eosio hello.code EOS7KBTMkUq4VPakqsZUnZfBbMbS2U7cn9qSa3q6G5ZzEeUeNSVgv EOS7KBTMkUq4VPakqsZUnZfBbMbS2U7cn9qSa3q6G5ZzEeUeNSVgv
executed transaction: 01aff4356a6277eec777494fc6aeaf97164c53997c46fe853247ed7e100f4987  200 bytes  911 us
#         eosio <= eosio::newaccount            {"creator":"eosio","name":"hello.code","owner":{"threshold":1,"keys":[{"key":"EOS7KBTMkUq4VPakqsZUnZ...

负责权限管理

这次是调用eosio的updateauth函数

$ cleos set account permission testaccount active '{"threshold" : 1, "keys" : [], "accounts" : [{"permission":{"actor":"bob","permission":"active"},"weight":1}, {"permission":{"actor":"stacy","permission":"active"},"weight":1}]}’ owner
executed transaction: b1bc9680a9ba615a6de8c3f7c692d7d28ff97edae245bb40f948692b14ea6c15  160 bytes  189 us
#         eosio <= eosio::updateauth            {"account":"testaccount","permission":"active","parent":"owner","auth":{"threshold":1,"keys":[],"acc...
warning: transaction executed locally, but may not be confirmed by the network yet

蛋生鸡,鸡生蛋问题

既然eosio是一个智能合约,而它又负责合约部署,那它自己是谁部署的呢?我们先来看下这个结构图

eosio contract负责系统服务,比如部署合约,创建账号。infra contracts层比如eosio.token和eosio.msig类似库作用的合约,比如多签名,发行代币,方便dapp层使用。Dapp才是用户直接接触的,每个开发人员编写程序然后部署,这些程序都是DApp。

eosio contract由3个部分构成
  • nativeaction
    nativeactions就是前面提到的setcode, setabi, newaccount功能的函数集。这部分代码是hardcode在EOS系统代码里的,也就说不需要部署这一步骤,所以就解决了蛋生鸡,鸡生蛋问题。
  • eosio.bios, eosio.system
    eosio.bios是一个智能合约的代码,是通过智能合约部署方式绑定到eosio contract上的。那你可能会说,eosio.bios部署后,nativeactions部分是不是就失效了啊。确实可以这样实现,由于setcode这些action需要永久生效,这就需要eosio.bios包含nativeactions这些函数,这样就出现了相同一份代码分散在两个模块,独立性和维护不够好。所以,目前的实现是通过特殊处理让nativeactions的函数有最高优先级,永不覆盖,哪怕eosio.bios实现了同样的函数(比如set_code, set_abi)。但是eosio.system和eosio.bios是一个级别的,都是contract, 是水火不相容的,一旦将eosio.system绑定到eosio这个账号,eosio.bios就失效了,所以eosio.bios的函数要么是临时用途的,要么就需要bios.system重新实现,比如setalimits会失效,而setpriv会在eosio.system重新实现。这个和cpu启动一样,一开始bios(bootloader)代码运行,然后引导system代码,当system加载后,bios(bootloader)代码失效。所以从这个设计和名字可以看出,EOS确实是在按照操作系统的逻辑设计。
    eosio.bios的接口
    EOSIO_ABI( eosio::bios, (setpriv)(setalimits)(setglimits)(setprods)(reqauth) )

    eosio.sytem的接口

    EOSIO_ABI( eosiosystem::system_contract,
    (setram)
    // delegate_bandwith.cpp
    (delegatebw)(undelegatebw)(refund)
    (buyram)(buyrambytes)(sellram)
    // voting.cpp
    // producer_pay.cpp
    (regproxy)(regproducer)(unregprod)(voteproducer)
    (claimrewards)
    // native.hpp
    (onblock)
    (newaccount)(updateauth)(deleteauth)(linkauth)(unlinkauth)(postrecovery)(passrecovery)(vetorecovery)(onerror)(canceldelay)
    //this file
    (setpriv)
    )

nativeaction解读

  • nativeaction注册
    nativeaction是通过SET_APP_HANDLER注册的

    #define SET_APP_HANDLER( receiver, contract, action) \
     set_apply_handler( #receiver, #contract, #action, &BOOST_PP_CAT(apply_, BOOST_PP_CAT(contract, BOOST_PP_CAT(_,action) ) ) )
    
     SET_APP_HANDLER( eosio, eosio, newaccount );
     SET_APP_HANDLER( eosio, eosio, setcode );
     SET_APP_HANDLER( eosio, eosio, setabi );
     SET_APP_HANDLER( eosio, eosio, updateauth );
     SET_APP_HANDLER( eosio, eosio, deleteauth );
     SET_APP_HANDLER( eosio, eosio, linkauth );
     SET_APP_HANDLER( eosio, eosio, unlinkauth );
    /*
     SET_APP_HANDLER( eosio, eosio, postrecovery );
     SET_APP_HANDLER( eosio, eosio, passrecovery );
     SET_APP_HANDLER( eosio, eosio, vetorecovery );
    */
    
     SET_APP_HANDLER( eosio, eosio, canceldelay );
     void set_apply_handler( account_name receiver, account_name contract, action_name action, apply_handler v ) {
        apply_handlers[receiver][make_pair(contract,action)] = v;
     }

    对应的函数名是apply_eosio_xxx,比如apply_eosio_setcode,apply_eosio_newaccount

  • nativeaction函数调用
    系统会先检测action的名字是否注册在native handler里,如果在则直接调用,不在的话,执行合约代码,并跳转到相应的action函数

      class apply_context { 
          { 
          public:
            apply_context(controller& con, transaction_context& trx_ctx, const action& a, uint32_t depth=0)
            :control(con)
            ,db(con.db())
            ,trx_context(trx_ctx)
            ,act(a)
            //合约的账号
            ,receiver(act.account)
            ,used_authorizations(act.authorization.size(), false)
      }
    
      action_trace apply_context::exec_one()
      {
         auto start = fc::time_point::now();
    
         const auto& cfg = control.get_global_properties().configuration;
         try {
            //获取智能合约对象
            const auto &a = control.get_account(receiver);
            privileged = a.privileged;
            //检测该action是否是native action,如果是则调用native handler
            auto native = control.find_apply_handler(receiver, act.account, act.name);
            if (native) {
               //hative handler(action)存在,则调用
               (*native)(*this);
            }
            //只要不是setcode调用,允许nativehandler和contract部署的代码都执行
            if( a.code.size() > 0
                && !(act.account == config::system_account_name && act.name == N(setcode) && receiver == config::system_account_name) ) {
               try {
                  control.get_wasm_interface().apply(a.code_version, a.code, *this);
               } catch ( const wasm_exit& ){}
            }
           ….
    
         } FC_CAPTURE_AND_RETHROW((_pending_console_output.str()));
      }
    转载自:http://blog.csdn.net/itleaks