您正在查看: 2019年5月

EOS源码分析之四智能合约

eos源码分析之四智能合约

智能合约和虚拟机部分会混合在一起讲,然后在各自的范围内偏向于哪个部分。

一、一个简单智能合约


智能合约的编译使用WASM来编译,也使用了一些自定义的代码用来固定智能合约的格式和入口等。智能合约产生二进制后会放到虚拟机中执行。首先看一个入门的智能合约,helloworld.

hello.cpp:

#include<eosiolib/eosio.hpp>
#include<eosiolib/print.hpp>
usingnamespace eosio;
class hello :public eosio::contract
{
  public:using contract::contract;
  /// @abi action
  void helloworld( account_name user )
  {
    print( "Hello, ", name{user} );
  }
};
EOSIO_ABI( hello, (hi) )


在EOS的源码中最EOSIO_ABI被定义成:

#define EOSIO_ABI( TYPE, MEMBERS ) \
extern "C" { \
   void apply( uint64_t receiver, uint64_t code, uint64_t action ) { \
      auto self = receiver; \
      if( code == self ) { \
         TYPE thiscontract( self ); \  //注意这个变量,后面会引用
         switch( action ) { \
            EOSIO_API( TYPE, MEMBERS ) \
         } \
         eosio_exit(0); \
      } \
   } \
} \


这时候再对照一下EOS自带的一个空的智能合约的例子:

//noop.hpp
#pragma once

#include <eosiolib/eosio.hpp>
#include <eosiolib/dispatcher.hpp>

namespace noop {
   using std::string;
   /**
      noop contract
      All it does is require sender authorization.
      Actions: anyaction*/
   class noop {
      public:

         ACTION(N(noop), anyaction) {
            anyaction() { }
            anyaction(account_name f, const string& t, const string& d): from(f), type(t), data(d) { }

            account_name from;
            string type;
            string data;

            EOSLIB_SERIALIZE(anyaction, (from)(type)(data))
         };

         static void on(const anyaction& act)
         {
            require_auth(act.from);
         }
   };
} /// noop

//noop.cpp
#include <noop/noop.hpp>

namespace noop {
   extern "C" {
      /// The apply method implements the dispatch of events to this contract
      void apply( uint64_t receiver, uint64_t code, uint64_t action ) {
         eosio::dispatch<noop, noop::anyaction>(code, action);
      }
   }
}


通过二者的对比可以发现,其实宏EOSIO_ABI自动完成了对action的映射分发。而EOS自带的则手动实现了静态分发,结果是一样的。它们的核心其实都是apply这个函数,如果有std::bind的使用经验,发现他们还是有些类似的。


继续接着分析EOSIO_ABI的内部代码,里面调用了一个宏:

#define EOSIO_API_CALL( r, OP, elem ) \
   case ::eosio::string_to_name( BOOST_PP_STRINGIZE(elem) ): \
      eosio::execute_action( &thiscontract, &OP::elem ); \
      return;

#define EOSIO_API( TYPE,  MEMBERS ) \
   BOOST_PP_SEQ_FOR_EACH( EOSIO_API_CALL, TYPE, MEMBERS )


BOOST_PP_SEQ_FOR_EACH这个宏前面讲过,是按最后一个参数展开第一个宏。再看一执行的代码:

template<typename T, typename Q, typename... Args>
bool execute_action( T* obj, void (Q::*func)(Args...)  ) {
   size_t size = action_data_size();

   //using malloc/free here potentially is not exception-safe, although WASM doesn't support exceptions
   constexpr size_t max_stack_buffer_size = 512;
   void* buffer = max_stack_buffer_size < size ? malloc(size) : alloca(size);
   read_action_data( buffer, size );

   auto args = unpack<std::tuple<std::decay_t<Args>...>>( (char*)buffer, size );

   if ( max_stack_buffer_size < size ) {
      free(buffer);
   }

   auto f2 = [&]( auto... a ){  
      (obj->\*func)( a... ); //调用指定类对象的指定的函数,如果对照前面就是hello对象的helloworld
   };

   boost::mp11::tuple_apply( f2, args );//惰性求值
   return true;
}


在bancor、currency的目录下,主要是货币转换相关的部分,dice是一个掷骰子的游戏的合约。eosio.msig,eosio.token,eosio.bios 都是相关的智能合约的程序,可认为是EOS自带的智能合约或者说自带的软件。

二、智能合约


1、智能合约的内容

看完了上面的代码分析,回到智能合约本身来。智能合约是什么?有几部分?怎么执行?


EOS智能合约通过messages 及 共享内存数据库(比如只要一个合约被包含在transaction的读取域中with an async vibe,它就可以读取另一个合约的数据库)相互通信。异步通信导致的spam问题将由资源限制算法来解决。下面是两个在合约里可定义的通信模型:


1、Inline:Inline保证执行当前的transaction或unwind;无论成功或失败都不会有通知。Inline 操作的scopes和authorities和原来的transaction一样。


2、Deferred: Defer将稍后由区块生产者来安排;结果可能是传递通信结果或者只是超时。Deferred可以触及不同的scopes,可以携带发送它的合约的authority*此特性在STAT不可用


message 和Transaction的关系:


一个message代表一个操作,一个Transaction中可以包含一个或者多个message,合约和帐户通过其来通信。Message既可以单独发送也可以批量发送。

//单MESSAGE的Transaction
{
  "ref_block_num": "100",
  "ref_block_prefix": "137469861",
  "expiration": "2017-09-25T06:28:49",
  "scope": ["initb","initc"],
  "messages": [
  {
    "code": "eos",
    "type": "transfer",
    "authorization": [
    {
      "account": "initb",
      "permission": "active"
      }
      ],
      "data": "000000000041934b000000008041934be803000000000000" }
      ],
  "signatures": [],
  "authorizations": []
}

//多Message的Transaction
{
  "ref_block_num": "100",
  "ref_block_prefix": "137469861",
  "expiration": "2017-09-25T06:28:49",
  "scope": [...],
  "messages":
  [
  {
    "code": "...",
    "type": "...",
    "authorization": [...],
  "data": "..."
  },
  {
    "code": "...",
    "type": "...",
  "authorization": [...],
  "data": "..."
  }, ...
  ],
  "signatures": [],
  "authorizations": []
}


2、Message名的限定和技术限制

Message的类型实际上是base32编码的64位整数。所以Message名的前12个字符需限制在字母a-z, 1-5, 以及'.' 。第13个以后的字符限制在前16个字符('.' and a-p)。


另外需要注意的是,在合约中不得存在浮点数,所有的Transaction必须在1ms内执行完成,否则失败。从目前来看每个帐户每秒最多发出30个Transactions。

3、智能合约的模块


在前面的例程里可以看到在智能合约中有apply这个函数,也知道这个函数是非常重要的,其实还有别的几个函数也挺重要:

init

init仅在被初次部署的时候执行一次。它是用于初始化合约变量的,例如货币合约中提供token的数量。

apply

apply是message处理器,它监听所有输入的messages并根据函数中的规定进行反馈。apply函数需要两个输入参数,code和 action。

code filter

为了响应特定message,您可以如下构建您的apply函数。您也可以忽略code filter来构建一个响应通用messages的函数。

if (code == N(${contract_name}) {
    //响应特定message的处理器
}


在其中您可以定义对不同actions的响应。

action filter

为了相应特定action,您可以如下构建您的apply函数。常和code filter一起使用。

if (action == N(${action_name}) {
    //响应该action的处理器
}


三、智能合约的编译


EOS的智能合约必须使用EOSCPP这个命令来编译,任何需要布置在EOS上的智能合约必须编译成wasm(.wast)文件,并且有一个abi的文件。wasm-jit提供了这个编译的过程,在虚拟机的部分详细的介绍一下编译和执行的过程。

四、智能合约的执行

在加载自定义的智能合约前,一般会加在上面提到的三个智能合约,用来测权限和相关的配置。这里看一看最基础的BIOS这个智能合约:


$ cleos set contract hello hello.wast hello.abi


$ cleos push action hello helloworld '["fred" ]' -p hello

然后就可以在本地的nodeos节点的日志中查阅到上面的信息。

五、智能合约的调试

参考EOS的github上的wiki的智能合约部分,其实上面有相当一部分就是从上面摘抄下来的。


转载自:https://github.com/XChainLab/documentation/edit/master/eos/eos%E6%BA%90%E7%A0%81%E5%88%86%E6%9E%90%E4%B9%8B%E5%9B%9B%E6%99%BA%E8%83%BD%E5%90%88%E7%BA%A6.md

EOS源码分析之三交易

eos源码分析之三交易

一、交易的介绍


说明:最新的1.0及以上代码中已经移除了相关的cycle和shared部分


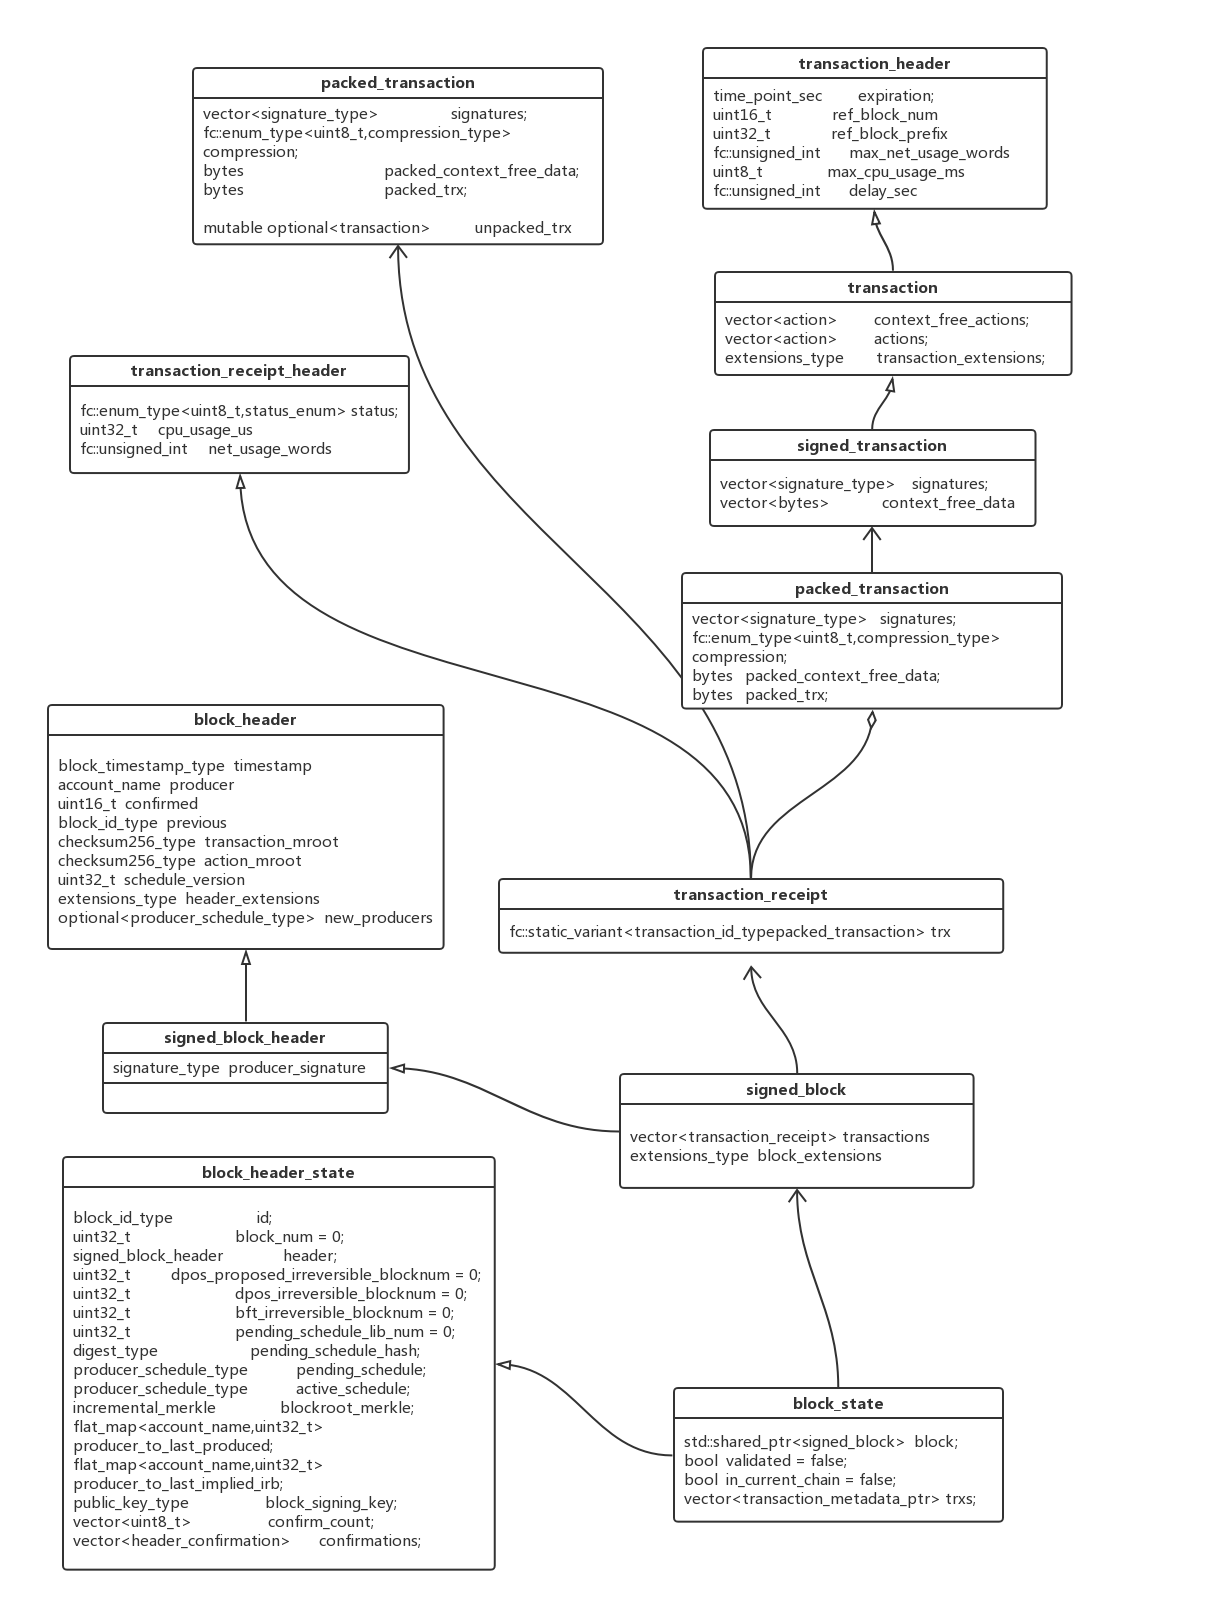
基本上区块链都是这几板斧,又轮到交易了。一般交易都是最复杂的部分,因为它涉及到网络,帐户,数据库,共识,内存池等等好多部分。EOS的交易数据结构主要有两种:

1、signed_transaction:用户发起的交易


2、deferred_transaction:延期交易,注释的说明这种交易可以返回错误给当事人。


EOS为了应对海量的交易,引入分片(shard)技术,即在区块中维护了一条私有区块链,将一个block分割成多个cycle(循环),每个cycle的生成时间很短,而且不用等待完整的block确认完成(3秒),生成后直接异步广播发送,这样,交易在很快就被确认了。在一个cycle中,如果存在有大量互不想干的交易,但么多核多线程技术将极大的提高交易的处理速度 。
这次仍然从客户端发起一笔交易开始来查看整个代码的流程,基本上是cleos发出Transaction到nodeos的HTTP接口,接口接收到消息,分析打包。

二、交易的具体过程

1、客户端发起交易:


无论是send_actions 还是 send_transaction最终都落到push_transaction

fc::variant push_transaction( signed_transaction& trx, int32_t extra_kcpu = 1000, packed_transaction::compression_type compression = packed_transaction::none ) {
   auto info = get_info();
   trx.expiration = info.head_block_time + tx_expiration;
   trx.set_reference_block(info.head_block_id);

   if (tx_force_unique) {
      trx.context_free_actions.emplace_back( generate_nonce() );
   }

   auto required_keys = determine_required_keys(trx);
   size_t num_keys = required_keys.is_array() ? required_keys.get_array().size() : 1;

   trx.max_kcpu_usage = (tx_max_cpu_usage + 1023)/1024;
   trx.max_net_usage_words = (tx_max_net_usage + 7)/8;

   if (!tx_skip_sign) {
     //生成交易
      sign_transaction(trx, required_keys);
   }

   if (!tx_dont_broadcast) {
     //调用HTTP接口,packed_transaction打包交易
      return call(push_txn_func, packed_transaction(trx, compression));
   } else {
      return fc::variant(trx);
   }
}
void sign_transaction(signed_transaction& trx, fc::variant& required_keys) {
   // TODO determine chain id
   fc::variants sign_args = {fc::variant(trx), required_keys, fc::variant(chain_id_type{})};
   const auto& signed_trx = call(wallet_host, wallet_port, wallet_sign_trx, sign_args);
   trx = signed_trx.as<signed_transaction>();
}


看到调用call,那么进去:

template<typename T>
fc::variant call( const std::string& server, uint16_t port,
                  const std::string& path,
                  const T& v ) { return eosio::client::http::call( server, port, path, fc::variant(v) ); }

template<typename T>
fc::variant call( const std::string& path,
                  const T& v ) { return eosio::client::http::call( host, port, path, fc::variant(v) ); }
//最终调用
fc::variant call( const std::string& server, uint16_t port,
                  const std::string& path,
                  const fc::variant& postdata ) {
try {
......

   while( endpoint_iterator != end ) {
      // Try each endpoint until we successfully establish a connection.
      tcp::socket socket(io_service);
      try {
         boost::asio::connect(socket, endpoint_iterator);
         endpoint_iterator = end;
      }
      ......

      // Form the request. We specify the "Connection: close" header so that the
      // server will close the socket after transmitting the response. This will
      // allow us to treat all data up until the EOF as the content.
      //组建请求的流
      boost::asio::streambuf request;
      std::ostream request_stream(&request);
      request_stream << "POST " << path << " HTTP/1.0\r\n";
      request_stream << "Host: " << server << "\r\n";
      request_stream << "content-length: " << postjson.size() << "\r\n";
      request_stream << "Accept: */*\r\n";
      request_stream << "Connection: close\r\n\r\n";
      request_stream << postjson;

      // Send the request.发送组织好的Request
      boost::asio::write(socket, request);

      // Read the response status line. The response streambuf will automatically
      // grow to accommodate the entire line. The growth may be limited by passing
      // a maximum size to the streambuf constructor.
      //读取并处理Response
      boost::asio::streambuf response;
      boost::asio::read_until(socket, response, "\r\n");

      // Check that response is OK.判断格式
      std::istream response_stream(&response);
      std::string http_version;
      response_stream >> http_version;
      unsigned int status_code;
      response_stream >> status_code;
      std::string status_message;
      std::getline(response_stream, status_message);
      FC_ASSERT( !(!response_stream || http_version.substr(0, 5) != "HTTP/"), "Invalid Response" );

      // Read the response headers, which are terminated by a blank line.
      boost::asio::read_until(socket, response, "\r\n\r\n");

      // Process the response headers.读取头
      std::string header;
      while (std::getline(response_stream, header) && header != "\r")
      {
      //      std::cout << header << "\n";
      }
      //      std::cout << "\n";

      std::stringstream re;
      // Write whatever content we already have to output.
      if (response.size() > 0)
         //   std::cout << &response;
         re << &response;

      // Read until EOF, writing data to output as we go.读取数据
      boost::system::error_code error;
      while (boost::asio::read(socket, response,
                               boost::asio::transfer_at_least(1), error))
         re << &response;

......
   }

   FC_ASSERT( !"unable to connect" );
} FC_CAPTURE_AND_RETHROW()  // error, "Request Path: ${server}:${port}${path}\nRequest Post Data: ${postdata}" ,
                        // ("server", server)("port", port)("path", path)("postdata", postdata) )
}


在HTTP的名空间里定义了一大堆的API接口,这里用的是:


const string chain_func_base = "/v1/chain";


const string push_txns_func = chain_func_base + "/push_transactions";(httpc.hpp中)


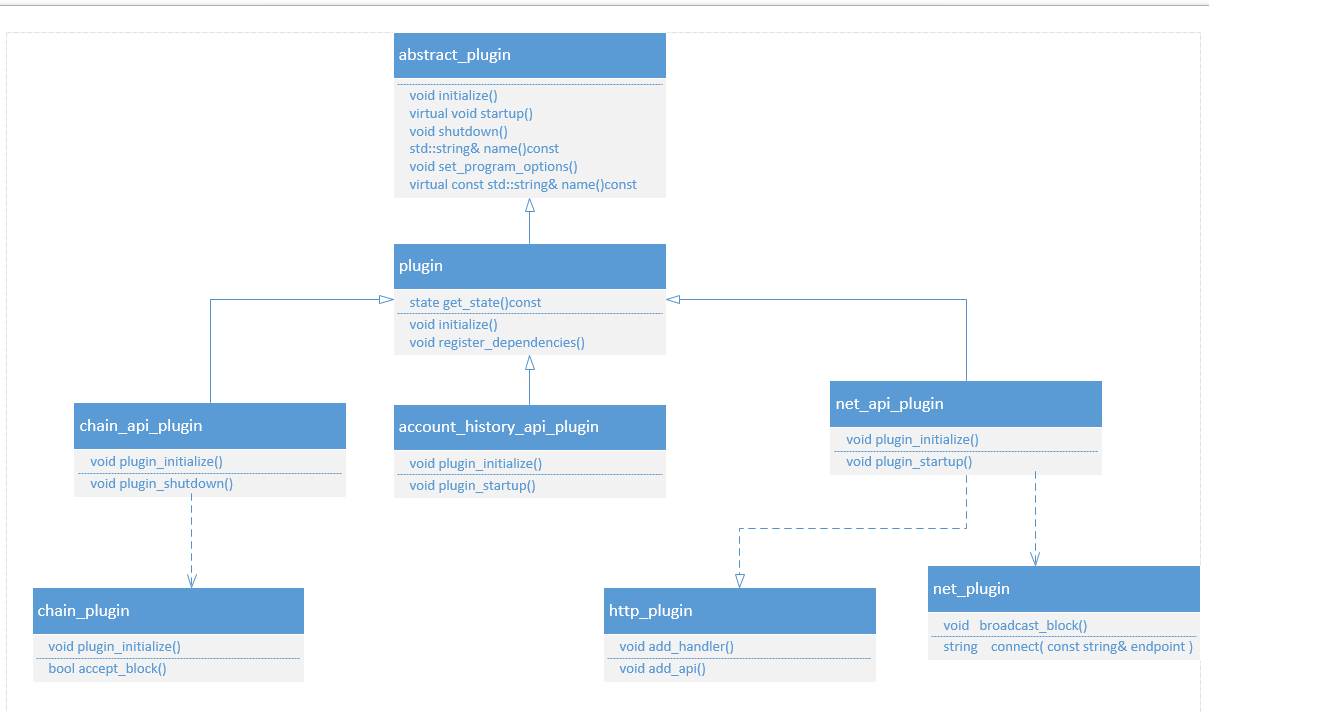
这里基本就相当于调用HTTP的接口了,也就是说cleos把相关的API调用及内容发到了服务端,也就是nodeos端。那就去服务端看看nodeos接收到请求后干了些什么,有什么具体的动作。上面使用的路径是chain, 所以到chain_api_plugin.cpp中去看。


在前面的整体NODEOS启动时,会有插件启动这个函数执行:

//最终调用下面这个宏,这个宏展开稍微有一些复杂,其实就是名字替换和参数转换   类似struct get_account_params {name account_name;};
#define CALL(api_name, api_handle, api_namespace, call_name, http_response_code) \
{std::string("/v1/" #api_name "/" #call_name), \
   [this, api_handle](string, string body, url_response_callback cb) mutable { \
          try { \
             if (body.empty()) body = "{}"; \
             auto result = api_handle.call_name(fc::json::from_string(body).as<api_namespace::call_name ## \_params>()); \
             cb(http_response_code, fc::json::to_string(result)); \
          } \
          ......//去除异常
       }}
//用下面两个宏来展开增加的API
#define CHAIN_RO_CALL(call_name, http_response_code) CALL(chain, ro_api, chain_apis::read_only, call_name, http_response_code)
#define CHAIN_RW_CALL(call_name, http_response_code) CALL(chain, rw_api, chain_apis::read_write, call_name, http_response_code)
void chain_api_plugin::plugin_startup() {
   ilog( "starting chain_api_plugin" );
   my.reset(new chain_api_plugin_impl(app().get_plugin<chain_plugin>().chain()));
   auto ro_api = app().get_plugin<chain_plugin>().get_read_only_api();
   auto rw_api = app().get_plugin<chain_plugin>().get_read_write_api();
//注册相关API
   app().get_plugin<http_plugin>().add_api({
      CHAIN_RO_CALL(get_info, 200),
      CHAIN_RO_CALL(get_block, 200),
      CHAIN_RO_CALL(get_account, 200),
      CHAIN_RO_CALL(get_code, 200),
      CHAIN_RO_CALL(get_table_rows, 200),
      CHAIN_RO_CALL(get_currency_balance, 200),
      CHAIN_RO_CALL(get_currency_stats, 200),
      CHAIN_RO_CALL(abi_json_to_bin, 200),
      CHAIN_RO_CALL(abi_bin_to_json, 200),
      CHAIN_RO_CALL(get_required_keys, 200),
      CHAIN_RW_CALL(push_block, 202),
      CHAIN_RW_CALL(push_transaction, 202),
      CHAIN_RW_CALL(push_transactions, 202)
   });
}


上面的api_handle.call_name展开后是:read_write::push_transaction_results read_write::push_transaction(),在chain_plugin.cpp文件中。

read_write::push_transaction_results read_write::push_transaction(const read_write::push_transaction_params& params) {
   packed_transaction pretty_input;
   auto resolver = make_resolver(this);
   try {
      abi_serializer::from_variant(params, pretty_input, resolver);
   } EOS_RETHROW_EXCEPTIONS(chain::packed_transaction_type_exception, "Invalid packed transaction")

   auto result = db.push_transaction(pretty_input, skip_flags);//这行是根本,db定义为chain_controller
#warning TODO: get transaction results asynchronously
   fc::variant pretty_output;
   abi_serializer::to_variant(result, pretty_output, resolver);
   return read_write::push_transaction_results{ result.id, pretty_output };
}


因为这个函数其实是调用的chain_controller的同名函数:

/**
 * Attempts to push the transaction into the pending queue
 *
 * When called to push a locally generated transaction, set the skip_block_size_check bit on the skip argument. This
 * will allow the transaction to be pushed even if it causes the pending block size to exceed the maximum block size.
 * Although the transaction will probably not propagate further now, as the peers are likely to have their pending
 * queues full as well, it will be kept in the queue to be propagated later when a new block flushes out the pending
 * queues.
 */
transaction_trace chain_controller::push_transaction(const packed_transaction& trx, uint32_t skip)
{ try {
   // If this is the first transaction pushed after applying a block, start a new undo session.
   // This allows us to quickly rewind to the clean state of the head block, in case a new block arrives.
   if( !\_pending_block ) {
      _start_pending_block();
   }

   return with_skip_flags(skip, [&]() {
      return \_db.with_write_lock([&]() {
         return _push_transaction(trx);
      });
   });
} EOS_CAPTURE_AND_RETHROW( transaction_exception ) }


看注释说得很清楚了,


如果是交易写入块后的第一个交易,是启动一个可撤销的Session,保证在新块到来时可以进行回滚:

void chain_controller::_start_pending_block( bool skip_deferred )
{
  //配置等待块
   FC_ASSERT( !\_pending_block );
   \_pending_block         = signed_block();
   \_pending_block_trace   = block_trace(\*\_pending_block);
   \_pending_block_session = \_db.start_undo_session(true);
  \_pending_block->regions.resize(1);
   \_pending_block_trace->region_traces.resize(1);

   _start_pending_cycle();//处理里块的cycle
   _apply_on_block_transaction();
   _finalize_pending_cycle();

   _start_pending_cycle();

   if ( !skip_deferred ) {
      _push_deferred_transactions( false );
      if (\_pending_cycle_trace && \_pending_cycle_trace->shard_traces.size() > 0 && \_pending_cycle_trace->shard_traces.back().transaction_traces.size() > 0) {
         _finalize_pending_cycle();
         _start_pending_cycle();
      }
   }
}
//下面的两个函数比较关键,一个是处理cycle,一个是添加交易,下面的英文注释说得也比较清楚
/**
 *  Wraps up all work for current shards, starts a new cycle, and
 *  executes any pending transactions
 */
void chain_controller::_start_pending_cycle() {
   // only add a new cycle if there are no cycles or if the previous cycle isn't empty
   if (\_pending_block->regions.back().cycles_summary.empty() ||
       (!\_pending_block->regions.back().cycles_summary.back().empty() &&
        !\_pending_block->regions.back().cycles_summary.back().back().empty()))
      \_pending_block->regions.back().cycles_summary.resize( \_pending_block->regions[0].cycles_summary.size() + 1 );


   \_pending_cycle_trace = cycle_trace();

   \_pending_cycle_trace->shard_traces.resize(\_pending_cycle_trace->shard_traces.size() + 1 );//当前分片

   auto& bcycle = \_pending_block->regions.back().cycles_summary.back();
   if(bcycle.empty() || !bcycle.back().empty())
      bcycle.resize( bcycle.size()+1 );
}
void chain_controller::_apply_on_block_transaction()
{
   \_pending_block_trace->implicit_transactions.emplace_back(_get_on_block_transaction());
   transaction_metadata mtrx(packed_transaction(\_pending_block_trace->implicit_transactions.back()), get_chain_id(), head_block_time(), optional<time_point>(), true /*is implicit*/);
   _push_transaction(std::move(mtrx));
}
//再处理一下deferred
vector<transaction_trace> chain_controller::_push_deferred_transactions( bool flush )
{
   FC_ASSERT( \_pending_block, " block not started" );

   if (flush && \_pending_cycle_trace && \_pending_cycle_trace->shard_traces.size() > 0) {
      // TODO: when we go multithreaded this will need a better way to see if there are flushable
      // deferred transactions in the shards
      auto maybe_start_new_cycle = [&]() {
         for (const auto &st: \_pending_cycle_trace->shard_traces) {
            for (const auto &tr: st.transaction_traces) {
               for (const auto &req: tr.deferred_transaction_requests) {
                  if ( req.contains<deferred_transaction>() ) {
                     const auto& dt = req.get<deferred_transaction>();
                     if ( fc::time_point(dt.execute_after) <= head_block_time() ) {
                        // force a new cycle and break out
                        _finalize_pending_cycle();
                        _start_pending_cycle();
                        return;
                     }
                  }
               }
            }
         }
      };

      maybe_start_new_cycle();
   }
 }


这里得重点看看下面这个函数:

void chain_controller::_finalize_pending_cycle()
{
   // prune empty shard
   if (!\_pending_block->regions.back().cycles_summary.empty() &&
       !\_pending_block->regions.back().cycles_summary.back().empty() &&
       \_pending_block->regions.back().cycles_summary.back().back().empty()) {
      \_pending_block->regions.back().cycles_summary.back().resize( \_pending_block->regions.back().cycles_summary.back().size() - 1 );
      \_pending_cycle_trace->shard_traces.resize(\_pending_cycle_trace->shard_traces.size() - 1 );
   }
   // prune empty cycle
   if (!\_pending_block->regions.back().cycles_summary.empty() &&
       \_pending_block->regions.back().cycles_summary.back().empty()) {
      \_pending_block->regions.back().cycles_summary.resize( \_pending_block->regions.back().cycles_summary.size() - 1 );
      \_pending_cycle_trace.reset();
      return;
   }

   for( int idx = 0; idx < \_pending_cycle_trace->shard_traces.size(); idx++ ) {
      auto& trace = \_pending_cycle_trace->shard_traces.at(idx);
      auto& shard = \_pending_block->regions.back().cycles_summary.back().at(idx);

      trace.finalize_shard();
      shard.read_locks.reserve(trace.read_locks.size());
      shard.read_locks.insert(shard.read_locks.end(), trace.read_locks.begin(), trace.read_locks.end());

      shard.write_locks.reserve(trace.write_locks.size());
      shard.write_locks.insert(shard.write_locks.end(), trace.write_locks.begin(), trace.write_locks.end());
   }

   _apply_cycle_trace(*\_pending_cycle_trace);
   \_pending_block_trace->region_traces.back().cycle_traces.emplace_back(std::move(*\_pending_cycle_trace));
   \_pending_cycle_trace.reset();
}


这里遇到的问题是,没有找到Cycle的周期性增加,对块内的分片也因此不是非常清楚。


现在接着回到交易,看前面调用了_push_transaction, 它有两个重载,前面的重载会在函数内调用后面的重载函数,即:


transaction_trace chain_controller::_push_transaction(const packed_transaction& packed_trx)
{ try {
......

   // 根据情况来分别打包普通交易和延迟交易
   if( mtrx.delay.count() == 0 ) {
      result = _push_transaction( std::move(mtrx) );
   } else {

      result = wrap_transaction_processing( std::move(mtrx),
                                            [this](transaction_metadata& meta) { return delayed_transaction_processing(meta); } );
   }

   // notify anyone listening to pending transactions
   //这个最终会调用connections的enqueue-queue_write-do_queue_write,然后发送广播消息
   on_pending_transaction(\_pending_transaction_metas.back(), packed_trx);

   \_pending_block->input_transactions.emplace_back(packed_trx);//插入到区块中
......

} FC_CAPTURE_AND_RETHROW( (transaction_header(packed_trx.get_transaction())) ) }

transaction_trace chain_controller::_push_transaction( transaction_metadata&& data )
{ try {
   auto process_apply_transaction = [this](transaction_metadata& meta) {
......
      /// TODO: move \_pending_cycle into db so that it can be undone if transation fails, for now we will apply
      /// the transaction first so that there is nothing to undo... this only works because things are currently
      /// single threaded
      // set cycle, shard, region etc
      meta.region_id = 0;
      meta.cycle_index = cyclenum;
      meta.shard_index = 0;
      return _apply_transaction( meta );//交易打入块中
   };
 //  wdump((transaction_header(data.trx())));
   return wrap_transaction_processing( move(data), process_apply_transaction );
} FC_CAPTURE_AND_RETHROW( ) }


经过上面的处理之后,最后通过_apply_transaction把交易最终打入块中:

//写入并执行交易
transaction_trace chain_controller::__apply_transaction( transaction_metadata& meta )
{ try {
   transaction_trace result(meta.id);

   for (const auto &act : meta.trx().context_free_actions) {
      apply_context context(\*this, \_db, act, meta);
      context.context_free = true;
      context.exec();//执行
      fc::move_append(result.action_traces, std::move(context.results.applied_actions));
      FC_ASSERT( result.deferred_transaction_requests.size() == 0 );
   }

   for (const auto &act : meta.trx().actions) {
      apply_context context(\*this, \_db, act, meta);
      context.exec();
      context.results.applied_actions.back().auths_used = act.authorization.size() - context.unused_authorizations().size();
      fc::move_append(result.action_traces, std::move(context.results.applied_actions));
      fc::move_append(result.deferred_transaction_requests, std::move(context.results.deferred_transaction_requests));
   }

   update_resource_usage(result, meta);

   update_permission_usage(meta);
   record_transaction(meta.trx());//保存到数据库
   return result;
} FC_CAPTURE_AND_RETHROW() }

transaction_trace chain_controller::_apply_transaction( transaction_metadata& meta ) { try {
   auto execute = [this](transaction_metadata& meta) -> transaction_trace {
      try {
         auto temp_session = \_db.start_undo_session(true);
         auto result =  __apply_transaction(meta);
......
      } catch (...) {
......
      }
   };

......
} FC_CAPTURE_AND_RETHROW( (transaction_header(meta.trx())) ) }


交易完成后,就需要打包到块并进行广播了.这里只简单说一下,在介绍区块和共识时再详细说明:


在producer_plugin插件中:

void producer_plugin::plugin_startup()
{ try {
   ilog("producer plugin:  plugin_startup() begin");
   chain::chain_controller& chain = app().get_plugin<chain_plugin>().chain();

   if (!my->_producers.empty())
   {
......
      my->schedule_production_loop();
   } else
......
   } FC_CAPTURE_AND_RETHROW() }


void producer_plugin_impl::schedule_production_loop() {
   //Schedule for the next second's tick regardless of chain state
   // If we would wait less than 50ms (1/10 of block_interval), wait for the whole block interval.
......

   //\_timer.expires_from_now(boost::posix_time::microseconds(time_to_next_block_time));
  \_timer.expires_from_now( boost::posix_time::microseconds(time_to_next_block_time) );
   //\_timer.async_wait(boost::bind(&producer_plugin_impl::block_production_loop, this));
   \_timer.async_wait( [&](const boost::system::error_code&){ block_production_loop(); } );
}

block_production_condition::block_production_condition_enum producer_plugin_impl::block_production_loop() {
   block_production_condition::block_production_condition_enum result;
   fc::mutable_variant_object capture;
   try
   {
      result = maybe_produce_block(capture);//生产块
   }
   catch( const fc::canceled_exception& )
   {
    ......
   }

   if(result != block_production_condition::produced && result == \_prev_result) {
      \_prev_result_count++;
   }
   else {
      \_prev_result_count = 1;
      \_prev_result = result;
      switch(result)
         {
         case block_production_condition::produced: {
            const auto& db = app().get_plugin<chain_plugin>().chain();
            auto producer  = db.head_block_producer();
......
            break;
         }
......
         }
   }
   schedule_production_loop();//循环调用
   return result;
}

block_production_condition::block_production_condition_enum producer_plugin_impl::maybe_produce_block(fc::mutable_variant_object& capture) {
   chain::chain_controller& chain = app().get_plugin<chain_plugin>().chain();
   fc::time_point now = fc::time_point::now();

   if (app().get_plugin<chain_plugin>().is_skipping_transaction_signatures()) {
      \_production_skip_flags |= skip_transaction_signatures;
   }
   // If the next block production opportunity is in the present or future, we're synced.
   if( \!\_production_enabled )
   {
      if( chain.get_slot_time(1) >= now )
         \_production_enabled = true;
      else
         return block_production_condition::not_synced;
   }

   // is anyone scheduled to produce now or one second in the future?
   uint32_t slot = chain.get_slot_at_time( now );
   if( slot == 0 )
   {
      capture("next_time", chain.get_slot_time(1));
      return block_production_condition::not_time_yet;
   }

   //
   // this assert should not fail, because now <= db.head_block_time()
   // should have resulted in slot == 0.
   //
   // if this assert triggers, there is a serious bug in get_slot_at_time()
   // which would result in allowing a later block to have a timestamp
   // less than or equal to the previous block
   //
   assert( now > chain.head_block_time() );

   auto scheduled_producer = chain.get_scheduled_producer( slot );
   // we must control the producer scheduled to produce the next block.
   if( \_producers.find( scheduled_producer ) == \_producers.end() )
   {
      capture("scheduled_producer", scheduled_producer);
      return block_production_condition::not_my_turn;
   }

   auto scheduled_time = chain.get_slot_time( slot );
   eosio::chain::public_key_type scheduled_key = chain.get_producer(scheduled_producer).signing_key;
   auto private_key_itr = \_private_keys.find( scheduled_key );

......

   //此处产生块
   auto block = chain.generate_block(
      scheduled_time,
      scheduled_producer,
      private_key_itr->second,
      \_production_skip_flags
      );

   capture("n", block.block_num())("t", block.timestamp)("c", now)("count",block.input_transactions.size())("id",string(block.id()).substr(8,8));

   app().get_plugin<net_plugin>().broadcast_block(block);//广播块消息
   return block_production_condition::produced;
}


产生块的代码也比较简单,在chain-controller.cpp中:

signed_block chain_controller::generate_block(
   block_timestamp_type when,
   account_name producer,
   const private_key_type& block_signing_private_key,
   uint32_t skip /* = 0 */
   )
{ try {
   return with_skip_flags( skip | created_block, [&](){
      return \_db.with_write_lock( [&](){
        //直接调用同名函数
         return _generate_block( when, producer, block_signing_private_key );
      });
   });
} FC_CAPTURE_AND_RETHROW( (when) ) }

signed_block chain_controller::_generate_block( block_timestamp_type when,
                                              account_name producer,
                                              const private_key_type& block_signing_key )
{ try {

   try {
     //检测并获取相关参数值
      FC_ASSERT( head_block_time() < (fc::time_point)when, "block must be generated at a timestamp after the head block time" );
      uint32_t skip     = \_skip_flags;
      uint32_t slot_num = get_slot_at_time( when );//获取当前生产者的位置
      FC_ASSERT( slot_num > 0 );
      account_name scheduled_producer = get_scheduled_producer( slot_num );//获得当前区块的生产者
      FC_ASSERT( scheduled_producer == producer );

      const auto& producer_obj = get_producer(scheduled_producer);

      //如果符合条件,创建一个未决的块
      if( !\_pending_block ) {
         _start_pending_block();
      }
         //完成Cycle的构建
      _finalize_pending_cycle();

      if( !(skip & skip_producer_signature) )
         FC_ASSERT( producer_obj.signing_key == block_signing_key.get_public_key(),
                    "producer key ${pk}, block key ${bk}", ("pk", producer_obj.signing_key)("bk", block_signing_key.get_public_key()) );

      //设置未决块转成正式块的相关参数
      \_pending_block->timestamp   = when;
      \_pending_block->producer    = producer_obj.owner;
      \_pending_block->previous    = head_block_id();
      \_pending_block->block_mroot = get_dynamic_global_properties().block_merkle_root.get_root();
      \_pending_block->transaction_mroot = \_pending_block_trace->calculate_transaction_merkle_root();
      \_pending_block->action_mroot = \_pending_block_trace->calculate_action_merkle_root();

      if( is_start_of_round( \_pending_block->block_num() ) ) {
         auto latest_producer_schedule = _calculate_producer_schedule();
         if( latest_producer_schedule != _head_producer_schedule() )
            \_pending_block->new_producers = latest_producer_schedule;
      }
      \_pending_block->schedule_version = get_global_properties().active_producers.version;

      if( !(skip & skip_producer_signature) )
         \_pending_block->sign( block_signing_key );

     //结束块并广播消息保存相关数据
      _finalize_block( *\_pending_block_trace, producer_obj );

      \_pending_block_session->push();

      auto result = move( *\_pending_block );

      clear_pending();

      if (!(skip&skip_fork_db)) {
         \_fork_db.push_block(result);//加入到链中
      }
      return result;
   } catch ( ... ) {
      clear_pending();

      elog( "error while producing block" );
      _start_pending_block();
      throw;
   }

} FC_CAPTURE_AND_RETHROW( (producer) ) }


交易基本就完成了,这块比较麻烦,而且有些细节其实资料和代码有此不匹配,留待后面继续解决。


转载自:https://github.com/XChainLab/documentation/edit/master/eos/eos%E6%BA%90%E7%A0%81%E5%88%86%E6%9E%90%E4%B9%8B%E4%B8%89%E4%BA%A4%E6%98%93.md

EOS源码分析之二网络

# eos源码分析之二网络

一、网络的初始化和启动


P2P网络是区块链的运行的基础模块,在EOS中,主要就是net_plugin,http_plugin,net_pai_plugin,当然在这个过程中网络也会引用到其它的一些模块的接口,但为了清晰,重点介绍网络相关部分,其它略过。


首先看一下网络插件生成的时候的代码:

net_plugin::net_plugin()
   :my( new net_plugin_impl ) {
   my_impl = my.get();//此处写得不是太好,从智能指针又退化回到 普通指针
}


可以看到,它生成了一个net_plugin_impl的实例,真正的网络操作相关的代码其实在这个类中,看名字也可以明白,JAVA接口经常这么干。然后接着按Main函数中的初始化来看:

void net_plugin::plugin_initialize( const variables_map& options ) {
......//日志相关忽略

   //初始化相关参数,版本,是否发送完整块,交易周期等
   my->network_version = static_cast<uint16_t>(app().version());
   my->network_version_match = options.at("network-version-match").as<bool>();
   my->send_whole_blocks = def_send_whole_blocks;

   my->sync_master.reset( new sync_manager(options.at("sync-fetch-span").as<uint32_t>() ) );
   my->big_msg_master.reset( new big_msg_manager );

   my->connector_period = std::chrono::seconds(options.at("connection-cleanup-period").as<int>());
   my->txn_exp_period = def_txn_expire_wait;
   my->resp_expected_period = def_resp_expected_wait;
   my->big_msg_master->just_send_it_max = def_max_just_send;
   my->max_client_count = options.at("max-clients").as<int>();

   my->num_clients = 0;
   my->started_sessions = 0;

   //使用BOOST的resolver来处理与网络相关的数据格式的转换
   my->resolver = std::make_shared<tcp::resolver>( std::ref( app().get_io_service() ) );

   //根据options设置来设置相关配置
   if(options.count("p2p-listen-endpoint")) {
      my->p2p_address = options.at("p2p-listen-endpoint").as< string >();
      auto host = my->p2p_address.substr( 0, my->p2p_address.find(':') );
      auto port = my->p2p_address.substr( host.size()+1, my->p2p_address.size() );
      idump((host)(port));
      tcp::resolver::query query( tcp::v4(), host.c_str(), port.c_str() );
      // Note: need to add support for IPv6 too?
      //得到监听地址
      my->listen_endpoint = \*my->resolver->resolve( query);
      //重置boost socket网络接收器
      my->acceptor.reset( new tcp::acceptor( app().get_io_service() ) );
   }
   if(options.count("p2p-server-address")) {
      my->p2p_address = options.at("p2p-server-address").as< string >();
   }
   else {
      if(my->listen_endpoint.address().to_v4() == address_v4::any()) {
         boost::system::error_code ec;
         auto host = host_name(ec);
         if( ec.value() != boost::system::errc::success) {

            FC_THROW_EXCEPTION( fc::invalid_arg_exception,
                                "Unable to retrieve host_name. ${msg}",( "msg",ec.message()));

         }
         auto port = my->p2p_address.substr( my->p2p_address.find(':'), my->p2p_address.size());
         my->p2p_address = host + port;
      }
   }
   ......
   //处理连接设置
   if(options.count("allowed-connection")) {
      const std::vector<std::string> allowed_remotes = options["allowed-connection"].as<std::vector<std::string>>();
      for(const std::string& allowed_remote : allowed_remotes)
         {
            if(allowed_remote == "any")
               my->allowed_connections |= net_plugin_impl::Any;
            else if(allowed_remote == "producers")
               my->allowed_connections |= net_plugin_impl::Producers;
            else if(allowed_remote == "specified")
               my->allowed_connections |= net_plugin_impl::Specified;
            else if(allowed_remote == "none")
               my->allowed_connections = net_plugin_impl::None;
         }
   }
......
   //查找依赖的链插件
   my->chain_plug = app().find_plugin<chain_plugin>();//插件已经在上一篇中讲过的宏中注册
   my->chain_plug->get_chain_id(my->chain_id);
   fc::rand_pseudo_bytes(my->node_id.data(), my->node_id.data_size());
   ilog("my node_id is ${id}",("id",my->node_id));
   //重置心跳定时器
   my->keepalive_timer.reset(new boost::asio::steady_timer(app().get_io_service()));
   my->ticker();
}


初始化完成后,看一下启动的代码

void net_plugin::plugin_startup() {
   if( my->acceptor ) {
      常见的网络服务操作,打开监听服务,设置选项,绑定地址,启动监听
      my->acceptor->open(my->listen_endpoint.protocol());
      my->acceptor->set_option(tcp::acceptor::reuse_address(true));
      my->acceptor->bind(my->listen_endpoint);
      my->acceptor->listen();
      ilog("starting listener, max clients is ${mc}",("mc",my->max_client_count));
      my->start_listen_loop();//循环接收连接
   }

   //绑定等待交易信号
   my->chain_plug->chain().on_pending_transaction.connect( &net_plugin_impl::transaction_ready);
   my->start_monitors();//启动连接和交易到期的监视(一个自循环)

   for( auto seed_node : my->supplied_peers ) {
      connect( seed_node );//连接种子节点,接入P2P网络
   }
}


代码看上去很少,其实信息量真的不小。下面分别来说明。

二、网络的监听和接收


先看一下循环监听,写得跟别人不一样,但是目的达到的是一样。

void net_plugin_impl::start_listen_loop( ) {
   auto socket = std::make_shared<tcp::socket>( std::ref( app().get_io_service() ) );
    //异步监听的lambada表达式
   acceptor->async_accept( *socket, [socket,this]( boost::system::error_code ec ) {
         if( !ec ) {
            uint32_t visitors = 0;
            for (auto &conn : connections) {
               if(conn->current() && conn->peer_addr.empty()) {
                  visitors++;
               }
            }
            //判断新连接并增加计数
            if (num_clients != visitors) {
               ilog ("checking max client, visitors = ${v} num clients ${n}",("v",visitors)("n",num_clients));
               num_clients = visitors;
            }
            if( max_client_count == 0 || num_clients < max_client_count ) {
               ++num_clients;
               connection_ptr c = std::make_shared<connection>( socket );
               connections.insert( c );//保存新连接的指针
               start_session( c );
            } else {
               elog( "Error max_client_count ${m} exceeded",
                     ( "m", max_client_count) );
               socket->close( );
            }
            start_listen_loop();//继续监听
         } else {
            elog( "Error accepting connection: ${m}",( "m", ec.message() ) );
         }
      });
}
void net_plugin_impl::start_session( connection_ptr con ) {
   boost::asio::ip::tcp::no_delay nodelay( true );
   con->socket->set_option( nodelay );
   start_read_message( con );//开始读取连接的消息
   ++started_sessions;

   // for now, we can just use the application main loop.
   //     con->readloop_complete  = bf::async( [=](){ read_loop( con ); } );
   //     con->writeloop_complete = bf::async( [=](){ write_loop con ); } );
}

其实上面的代码没什么特殊的,只是引用了BOOST的库,可能得熟悉一下,接着看如何读取消息,真正的数据交互在这里:

void net_plugin_impl::start_read_message( connection_ptr conn ) {

   try {
      if(!conn->socket) {
         return;
      }
      //真正的数据异步读取
      conn->socket->async_read_some
         (conn->pending_message_buffer.get_buffer_sequence_for_boost_async_read(),
          [this,conn]( boost::system::error_code ec, std::size_t bytes_transferred ) {
            try {
               if( !ec ) {
                 //判断是否超大小读取数据
                  if (bytes_transferred > conn->pending_message_buffer.bytes_to_write()) {
                     elog("async_read_some callback: bytes_transfered = ${bt}, buffer.bytes_to_write = ${btw}",
                          ("bt",bytes_transferred)("btw",conn->pending_message_buffer.bytes_to_write()));
                  }
                  //判断是不是符合情况
                  FC_ASSERT(bytes_transferred <= conn->pending_message_buffer.bytes_to_write());
                  conn->pending_message_buffer.advance_write_ptr(bytes_transferred);
                  //处理数据
                  while (conn->pending_message_buffer.bytes_to_read() > 0) {
                     uint32_t bytes_in_buffer = conn->pending_message_buffer.bytes_to_read();

                     if (bytes_in_buffer < message_header_size) {
                        break;
                     } else {
                        uint32_t message_length;
                        auto index = conn->pending_message_buffer.read_index();
                        conn->pending_message_buffer.peek(&message_length, sizeof(message_length), index);
                        if(message_length > def_send_buffer_size*2) {
                           elog("incoming message length unexpected (${i})", ("i", message_length));
                           close(conn);
                           return;
                        }
                        if (bytes_in_buffer >= message_length + message_header_size) {
                           conn->pending_message_buffer.advance_read_ptr(message_header_size);
                           if (!conn->process_next_message(*this, message_length)) {
                              return;
                           }
                        } else {
                           conn->pending_message_buffer.add_space(message_length + message_header_size - bytes_in_buffer);
                           break;
                        }
                     }
                  }
                  start_read_message(conn);//继续读取
               } else {
                  auto pname = conn->peer_name();
                  if (ec.value() != boost::asio::error::eof) {
                     elog( "Error reading message from ${p}: ${m}",("p",pname)( "m", ec.message() ) );
                  } else {
                     ilog( "Peer ${p} closed connection",("p",pname) );
                  }
                  close( conn );
               }
            }
            catch(const std::exception &ex) {
......
            }
......
         } );
   } catch (...) {
......
   }
}

/*
 *  创建一个数据接收的缓冲区
 *  Creates and returns a vector of boost mutable_buffers that can
 *  be passed to boost async_read() and async_read_some() functions.
 *  The beginning of the vector will be the write pointer, which
 *  should be advanced the number of bytes read after the read returns.
 */
std::vector<boost::asio::mutable_buffer> get_buffer_sequence_for_boost_async_read() {
  std::vector<boost::asio::mutable_buffer> seq;
  FC_ASSERT(write_ind.first < buffers.size());
  seq.push_back(boost::asio::buffer(&buffers[write_ind.first]->at(write_ind.second),
                                            buffer_len - write_ind.second));
  for (std::size_t i = write_ind.first + 1; i < buffers.size(); i++) {
    seq.push_back(boost::asio::buffer(&buffers[i]->at(0), buffer_len));
  }
  return seq;
}


三、网络的连接


处理完成监听和接收,来看一下主动连接:

void net_plugin_impl::start_monitors() {
   connector_check.reset(new boost::asio::steady_timer( app().get_io_service()));
   transaction_check.reset(new boost::asio::steady_timer( app().get_io_service()));
   start_conn_timer();//调用两个函数
   start_txn_timer();
}
//调用的start_conn_timer
void net_plugin_impl::start_conn_timer( ) {
   connector_check->expires_from_now( connector_period);// 设置定时器
   connector_check->async_wait( [&](boost::system::error_code ec) {
         if( !ec) {
            connection_monitor( );//调用连接监控
         }
         else {
            elog( "Error from connection check monitor: ${m}",( "m", ec.message()));
            start_conn_timer( );
         }
      });
}
void net_plugin_impl::connection_monitor( ) {
   start_conn_timer();//循环调用
   vector <connection_ptr> discards;
   num_clients = 0;
   for( auto &c : connections ) {
      if( !c->socket->is_open() && !c->connecting) {
         if( c->peer_addr.length() > 0) {
            connect(c);//连接指定的点。
         }
         else {
            discards.push_back( c);
         }
      } else {
         if( c->peer_addr.empty()) {
            num_clients++;
         }
      }
   }
   //处理断开的连接
   if( discards.size( ) ) {
      for( auto &c : discards) {
         connections.erase( c );
         c.reset();
      }
   }
}
//交易的定时器监视
void net_plugin_impl::start_txn_timer() {
   transaction_check->expires_from_now( txn_exp_period);
   transaction_check->async_wait( [&](boost::system::error_code ec) {
         if( !ec) {
            expire_txns( );//处理到期交易的情况
         }
         else {
            elog( "Error from transaction check monitor: ${m}",( "m", ec.message()));
            start_txn_timer( );
         }
      });
}
void net_plugin_impl::expire_txns() {
   start_txn_timer( );
   auto &old = local_txns.get<by_expiry>();
   auto ex_up = old.upper_bound( time_point::now());
   auto ex_lo = old.lower_bound( fc::time_point_sec( 0));
   old.erase( ex_lo, ex_up);

   auto &stale = local_txns.get<by_block_num>();
   chain_controller &cc = chain_plug->chain();
   uint32_t bn = cc.last_irreversible_block_num();
   auto bn_up = stale.upper_bound(bn);
   auto bn_lo = stale.lower_bound(1);
   stale.erase( bn_lo, bn_up);
}


最后看一看连接的代码:


/**
 *  Used to trigger a new connection from RPC API
 */
string net_plugin::connect( const string& host ) {
   if( my->find_connection( host ) )
      return "already connected";

   connection_ptr c = std::make_shared<connection>(host);
   fc_dlog(my->logger,"adding new connection to the list");
   my->connections.insert( c );
   fc_dlog(my->logger,"calling active connector");
   my->connect( c );
   return "added connection";
}
//两个连接的重载,其实都很简单,第个Connect负责解析,第二个Connect负责真正连接
void net_plugin_impl::connect( connection_ptr c ) {
   if( c->no_retry != go_away_reason::no_reason) {
      fc_dlog( logger, "Skipping connect due to go_away reason ${r}",("r", reason_str( c->no_retry )));
      return;
   }

   auto colon = c->peer_addr.find(':');

   if (colon == std::string::npos || colon == 0) {
      elog ("Invalid peer address. must be \"host:port\": ${p}", ("p",c->peer_addr));
      return;
   }

   auto host = c->peer_addr.substr( 0, colon );
   auto port = c->peer_addr.substr( colon + 1);
   idump((host)(port));
   tcp::resolver::query query( tcp::v4(), host.c_str(), port.c_str() );
   // Note: need to add support for IPv6 too

   resolver->async_resolve( query,
                            [c, this]( const boost::system::error_code& err,
                                       tcp::resolver::iterator endpoint_itr ){
                               if( !err ) {
                                  connect( c, endpoint_itr );
                               } else {
                                  elog( "Unable to resolve ${peer_addr}: ${error}",
                                        (  "peer_addr", c->peer_name() )("error", err.message() ) );
                               }
                            });
}

void net_plugin_impl::connect( connection_ptr c, tcp::resolver::iterator endpoint_itr ) {
   if( c->no_retry != go_away_reason::no_reason) {
      string rsn = reason_str(c->no_retry);
      return;
   }
   auto current_endpoint = \*endpoint_itr;
   ++endpoint_itr;
   c->connecting = true;
   c->socket->async_connect( current_endpoint, [c, endpoint_itr, this] ( const boost::system::error_code& err ) {
         if( !err ) {
            start_session( c );//读取数据
            c->send_handshake ();//发送握手
         } else {
            if( endpoint_itr != tcp::resolver::iterator() ) {
               c->close();
               connect( c, endpoint_itr );
            }
            else {
               elog( "connection failed to ${peer}: ${error}",
                     ( "peer", c->peer_name())("error",err.message()));
               c->connecting = false;
               my_impl->close(c);
            }
         }
      } );
}


四、网络的数据同步


在前面看了start_read_message,对内部没有怎么做细节的分析,网络也启动了,节点也发现了,那么P2P的职责开始实现了,首先就是同步数据,和比特币类似,也有一个中心的消息处理系统,名字都有点像。

bool connection::process_next_message(net_plugin_impl& impl, uint32_t message_length) {
   try {
      // If it is a signed_block, then save the raw message for the cache
      // This must be done before we unpack the message.
      // This code is copied from fc::io::unpack(..., unsigned_int)
      auto index = pending_message_buffer.read_index();
      uint64_t which = 0; char b = 0; uint8_t by = 0;
      do {
         pending_message_buffer.peek(&b, 1, index);
         which |= uint32_t(uint8_t(b) & 0x7f) << by;
         by += 7;
      } while( uint8_t(b) & 0x80 );

      if (which == uint64_t(net_message::tag<signed_block>::value)) {
         blk_buffer.resize(message_length);
         auto index = pending_message_buffer.read_index();
         pending_message_buffer.peek(blk_buffer.data(), message_length, index);
      }
      auto ds = pending_message_buffer.create_datastream();
      net_message msg;
      fc::raw::unpack(ds, msg);
      msgHandler m(impl, shared_from_this() );//impl是net_plugin_impl
      msg.visit(m);//注意这里最终是调用一个仿函数,static_variant.hpp中
   } catch(  const fc::exception& e ) {
      edump((e.to_detail_string() ));
      impl.close( shared_from_this() );
      return false;
   }
   return true;
}

//仿函数实现是通过重载了小括号
struct msgHandler : public fc::visitor<void> {
   net_plugin_impl &impl;
   connection_ptr c;
   msgHandler( net_plugin_impl &imp, connection_ptr conn) : impl(imp), c(conn) {}

   template <typename T>
   void operator()(const T &msg) const
   {
      impl.handle_message( c, msg); //这里会调用net_plugin_impl中的handle_message
   }
};


下面开始调用分发函数:


void net_plugin_impl::handle_message( connection_ptr c, const handshake_message &msg) {
   fc_dlog( logger, "got a handshake_message from ${p} ${h}", ("p",c->peer_addr)("h",msg.p2p_address));
   if (!is_valid(msg)) {
      elog( "Invalid handshake message received from ${p} ${h}", ("p",c->peer_addr)("h",msg.p2p_address));
      c->enqueue( go_away_message( fatal_other ));
      return;
   }
   chain_controller& cc = chain_plug->chain();
   uint32_t lib_num = cc.last_irreversible_block_num( );
   uint32_t peer_lib = msg.last_irreversible_block_num;
   if( c->connecting ) {
      c->connecting = false;
   }
   if (msg.generation == 1) {
      if( msg.node_id == node_id) {
         elog( "Self connection detected. Closing connection");
         c->enqueue( go_away_message( self ) );
         return;
      }

      if( c->peer_addr.empty() || c->last_handshake_recv.node_id == fc::sha256()) {
         fc_dlog(logger, "checking for duplicate" );
         for(const auto &check : connections) {
            if(check == c)
               continue;
            if(check->connected() && check->peer_name() == msg.p2p_address) {
               // It's possible that both peers could arrive here at relatively the same time, so
               // we need to avoid the case where they would both tell a different connection to go away.
               // Using the sum of the initial handshake times of the two connections, we will
               // arbitrarily (but consistently between the two peers) keep one of them.
               if (msg.time + c->last_handshake_sent.time <= check->last_handshake_sent.time + check->last_handshake_recv.time)
                  continue;

               fc_dlog( logger, "sending go_away duplicate to ${ep}", ("ep",msg.p2p_address) );
               go_away_message gam(duplicate);
               gam.node_id = node_id;
               c->enqueue(gam);
               c->no_retry = duplicate;
               return;
            }
         }
      }
      else {
         fc_dlog(logger, "skipping duplicate check, addr == ${pa}, id = ${ni}",("pa",c->peer_addr)("ni",c->last_handshake_recv.node_id));
      }

      if( msg.chain_id != chain_id) {
         elog( "Peer on a different chain. Closing connection");
         c->enqueue( go_away_message(go_away_reason::wrong_chain) );
         return;
      }
      if( msg.network_version != network_version) {
         if (network_version_match) {
            elog("Peer network version does not match expected ${nv} but got ${mnv}",
                 ("nv", network_version)("mnv", msg.network_version));
            c->enqueue(go_away_message(wrong_version));
            return;
         } else {
            wlog("Peer network version does not match expected ${nv} but got ${mnv}",
                 ("nv", network_version)("mnv", msg.network_version));
         }
      }

      if(  c->node_id != msg.node_id) {
         c->node_id = msg.node_id;
      }

      if(!authenticate_peer(msg)) {
         elog("Peer not authenticated.  Closing connection.");
         c->enqueue(go_away_message(authentication));
         return;
      }

      bool on_fork = false;
      fc_dlog(logger, "lib_num = ${ln} peer_lib = ${pl}",("ln",lib_num)("pl",peer_lib));

      if( peer_lib <= lib_num && peer_lib > 0) {
         try {
            block_id_type peer_lib_id =  cc.get_block_id_for_num( peer_lib);
            on_fork =( msg.last_irreversible_block_id != peer_lib_id);
         }
         catch( const unknown_block_exception &ex) {
            wlog( "peer last irreversible block ${pl} is unknown", ("pl", peer_lib));
            on_fork = true;
         }
         catch( ...) {
            wlog( "caught an exception getting block id for ${pl}",("pl",peer_lib));
            on_fork = true;
         }
         if( on_fork) {
            elog( "Peer chain is forked");
            c->enqueue( go_away_message( forked ));
            return;
         }
      }

      if (c->sent_handshake_count == 0) {
         c->send_handshake();
      }
   }

   c->last_handshake_recv = msg;
   sync_master->recv_handshake(c,msg);//这里开始同步
}
void sync_manager::recv_handshake (connection_ptr c, const handshake_message &msg) {
   chain_controller& cc = chain_plug->chain();
......
   //--------------------------------
   // sync need checkz; (lib == last irreversible block)
   //
   // 0. my head block id == peer head id means we are all caugnt up block wise
   // 1. my head block num < peer lib - start sync locally
   // 2. my lib > peer head num - send an last_irr_catch_up notice if not the first generation
   //
   // 3  my head block num <= peer head block num - update sync state and send a catchup request
   // 4  my head block num > peer block num ssend a notice catchup if this is not the first generation
   //
   //-----------------------------

   uint32_t head = cc.head_block_num( );
   block_id_type head_id = cc.head_block_id();
   if (head_id == msg.head_id) {
      fc_dlog(logger, "sync check state 0");
      // notify peer of our pending transactions
      notice_message note;
      note.known_blocks.mode = none;
      note.known_trx.mode = catch_up;
      note.known_trx.pending = my_impl->local_txns.size();
      c->enqueue( note );
      return;
   }
   if (head < peer_lib) {
      fc_dlog(logger, "sync check state 1");
      start_sync( c, peer_lib);//同步
      return;
   }
......
}


再深入的细节就不再分析了,就是基本的数据交互通信。

转载自:https://github.com/XChainLab/documentation/edit/master/eos/eos%E6%BA%90%E7%A0%81%E5%88%86%E6%9E%90%E4%B9%8B%E4%BA%8C%E7%BD%91%E7%BB%9C.md

EOS源码分析之一整体介绍

EOS整体介绍


一、EOS的插件式设计


EOS中,虽然编程的复杂度和设计较比特币大幅提高,但其核心的思想其实并没有多大改变,目前来看,仍然以BOOST的signal,boost::asio的信号消息机制来完成模块间的解耦。相比比特币来言,做得更优雅,封装也更良好。


先看一下插件设计的整体类图:


从上面的类图可以清楚的看到,整个插件的依赖和传导机制。然后在下面的流程分析中会详细说明一下它的具体的应用。

二、EOS的整体流程


EOS的版本做了一次比较大的更迭,至少从形式上看是,它的生成路径下,完成了以下几个目标:


cleos:客户端,用来处理和区块链通信。帐户钱包等的管理。


eosio-abigen:二进制ABI的生成程序。


eosio-launcher:简化了eosd节点跨局域网或者跨更宽泛的网络的分布。


keosd:钱包和帐户的实现控制程序


nodeos:核心的节点程序,这个和老版本不一样了,至少名字不一样了。


一般情况下会启动cleos调用keosd来创建帐户和钱包。然后通过启动nodeos来产生节点,进行通信并根据配置生成区块和验证。进入重点,直接看一下 nodeos的创建代码:

int main(int argc, char** argv)
{
   try {
      app().set_version(eosio::nodeos::config::version);
      auto root = fc::app_path();
      app().set_default_data_dir(root / "eosio/nodeos/data" );
      app().set_default_config_dir(root / "eosio/nodeos/config" );
      //这里直接初始化了四个插件
      if(!app().initialize<chain_plugin, http_plugin, net_plugin, producer_plugin>(argc, argv))
         return -1;
      initialize_logging();
      ilog("nodeos version ${ver}", ("ver", eosio::nodeos::config::itoh(static_cast<uint32_t>(app().version()))));
      ilog("eosio root is ${root}", ("root", root.string()));
      app().startup();
      app().exec();
   } catch (const fc::exception& e) {
      elog("${e}", ("e",e.to_detail_string()));
   } catch (const boost::exception& e) {
      elog("${e}", ("e",boost::diagnostic_information(e)));
   } catch (const std::exception& e) {
      elog("${e}", ("e",e.what()));
   } catch (...) {
      elog("unknown exception");
   }
   return 0;
}


代码看上去并不多,当然,比之比特币最新中的几行代码来看,还是要稍有复杂的感觉,但是还可以承受,不过,随后可能c++技能的消耗水平会极剧增加。忽略开前几行的相关文件配置直接进行初始化代码看看去。


template<typename... Plugin>
bool                 initialize(int argc, char** argv) {
   return initialize_impl(argc, argv, {find_plugin<Plugin>()...});
}


没啥,一个向量的初始化。不过有一个变参模板,如果想深入学习的得去看看相关资料。

bool application::initialize_impl(int argc, char** argv, vector<abstract_plugin*> autostart_plugins) {
   set_program_options();//设置命令选项

   bpo::variables_map options;//声明保存结果变量
   bpo::store(bpo::parse_command_line(argc, argv, my->_app_options), options);//分析参数并保存

   if( options.count( "help" ) ) {
      cout << my->_app_options << std::endl;
      return false;
   }

   ......

   //分析配置文件
   bpo::store(bpo::parse_config_file<char>(config_file_name.make_preferred().string().c_str(),
                                           my->_cfg_options, true), options);

   if(options.count("plugin") > 0)
   {
      auto plugins = options.at("plugin").as<std::vector<std::string>>();
      for(auto& arg : plugins)
      {
         vector<string> names;
         boost::split(names, arg, boost::is_any_of(" \t,"));
         for(const std::string& name : names)
            get_plugin(name).initialize(options);//分步初始化第一步,获取指定名插件并初始化,其它类同
      }
   }
   //下面是注册插件,并查寻依赖的相关插件,然后调用,并初始化
   for (auto plugin : autostart_plugins)
      if (plugin != nullptr && plugin->get_state() == abstract_plugin::registered)
         plugin->initialize(options);//分步初始化第一步,获取指定名插件并初始化,其它类同

   bpo::notify(options);//更新最新参数至options

   return true;
}


里面反复的参数控制代码略过了。里面主要是使用了BOOST的参数解析和更新机制


这里的调用很简单,其实就是从map里查找相关的插件,用类名和字符串,这里面用到了BOOST中的一些库boost::core::demangle(typeid(Plugin).name()),用来返回类型的名字。然后再用名字的字符串查找出插件。这里面有一个问题,为什么从plugins这个map中可以查找出对象,仔细看一下有些插件的CPP文件中会有类似的代码:

static appbase::abstract_plugin& _net_plugin = app().register_plugin<net_plugin>();


静态注册了啊。但是有一些插件里没有啊,怎么回事儿?其实接着看代码就发现了问题所在。如下:

virtual void initialize(const variables_map& options) override {
   if(\_state == registered) {
      \_state = initialized;
      //分步初始化,第二步
      static_cast<Impl*>(this)->plugin_requires([&](auto& plug){ plug.initialize(options); });//初始化此插件依赖的插件,并递归调用依赖插件
      static_cast<Impl*>(this)->plugin_initialize(options);  //初始化插件
      //ilog( "initializing plugin ${name}", ("name",name()) );
      app().plugin_initialized(*this);//保存启动的插件
   }
   assert(\_state == initialized); /// if initial state was not registered, final state cannot be initiaized
}


plugin_requires,这个函数的定义就通过宏来产生了。

//先看一个调用实现
class chain_plugin : public plugin<chain_plugin> {
public:
   APPBASE_PLUGIN_REQUIRES()
......
};
#define APPBASE_PLUGIN_REQUIRES_VISIT( r, visitor, elem ) \
  visitor( appbase::app().register_plugin<elem>() );

#define APPBASE_PLUGIN_REQUIRES( PLUGINS )                               \
   template<typename Lambda>                                           \
   void plugin_requires( Lambda&& l ) {                                \
      BOOST_PP_SEQ_FOR_EACH( APPBASE_PLUGIN_REQUIRES_VISIT, l, PLUGINS ) \
   }
//再看另外一个调用实现
class producer_plugin : public appbase::plugin<producer_plugin> {
public:
   APPBASE_PLUGIN_REQUIRES((chain_plugin))
......
};


就这样,基础的插件和基础插件依赖的插件,就这么被一一加载初始化。


三、EOS的程序技术特点


1、使用了较多的宏,并配合BOOST库。


在EOS的代码中,可以隐约看到类似MFC的代码实现机制,举一个例子:

#define FC_CAPTURE_AND_RETHROW( ... ) \
   catch( fc::exception& er ) { \
      FC_RETHROW_EXCEPTION( er, warn, "", FC_FORMAT_ARG_PARAMS(__VA_ARGS__) ); \
   } catch( const std::exception& e ) {  \
      fc::exception fce( \
                FC_LOG_MESSAGE( warn, "${what}: ",FC_FORMAT_ARG_PARAMS(__VA_ARGS__)("what",e.what())), \
                fc::std_exception_code,\
                BOOST_CORE_TYPEID(decltype(e)).name(), \
                e.what() ) ; throw fce;\
   } catch( ... ) {  \
      throw fc::unhandled_exception( \
                FC_LOG_MESSAGE( warn, "",FC_FORMAT_ARG_PARAMS(__VA_ARGS__)), \
                std::current_exception() ); \
   }

FC_CAPTURE_AND_RETHROW( (t) )


包括前面提到的递归调用插件化的宏定义,再通过上面的调用实现对比,基本上是以动态生成代码为主,在比特币也有类似的实现,但规模和应用要小得多。

2、模板的使用普及化


在工程代码上广泛使用了模板,看一下插件的例子:

template<typename Impl>
class plugin : public abstract_plugin {
   public:
      plugin():\_name(boost::core::demangle(typeid(Impl).name())){}
      virtual ~plugin(){}

      virtual state get_state()const override         { ... }
      virtual const std::string& name()const override { ... }

      virtual void register_dependencies() {
.......
      }

      virtual void initialize(const variables_map& options) override {
......
      }

      virtual void startup() override {
......
      }

      virtual void shutdown() override {
......
      }

......
};


3、更深入的绑定使用了c++1X和BOOST


这个就非常明显了,试举一个简单的例子:

//c++11语法糖
for (const auto& at: trx_trace.action_traces) {
   for (const auto& auth: at.act.authorization) {
      result.emplace_back(auth.actor);
   }

   result.emplace_back(at.receiver);
}
//BOOST的网络通信
using boost::asio::ip::tcp;
unique_ptr<tcp::acceptor>        acceptor;
std::unique_ptr<class net_plugin_impl> my;
void net_plugin::plugin_startup() {
   if( my->acceptor ) {
      my->acceptor->open(my->listen_endpoint.protocol());
      my->acceptor->set_option(tcp::acceptor::reuse_address(true));
      my->acceptor->bind(my->listen_endpoint);
      my->acceptor->listen();
      ilog("starting listener, max clients is ${mc}",("mc",my->max_client_count));
      my->start_listen_loop();
   }

   my->chain_plug->chain().on_pending_transaction.connect( &net_plugin_impl::transaction_ready);
   my->start_monitors();

   for( auto seed_node : my->supplied_peers ) {
      connect( seed_node );
   }
}


目前初步看来,EOS对BOOST和c++14的依赖更深。

转载自:https://github.com/XChainLab/documentation/blob/master/eos/eos%E6%BA%90%E7%A0%81%E5%88%86%E6%9E%90%E4%B9%8B%E4%B8%80%E6%95%B4%E4%BD%93%E4%BB%8B%E7%BB%8D.md

EOS Block Data Structure

EOS Block Data Structure

整体数据结构定义图

我们先来看一张EOS整体的数据结构定义图

从这个图上可以看出来,EOS在区块数据结构的定义上并不是特别复杂.

Block 定义

// ..../eos/libraries/chain/include/eosio/chain/block.hpp
struct signed_block : public signed_block_header {
   using signed_block_header::signed_block_header;
   signed_block() = default;
   signed_block( const signed_block_header& h ):signed_block_header(h){}

   // 交易集合
   vector<transaction_receipt>   transactions;
   extensions_type               block_extensions;
};
using signed_block_ptr = std::shared_ptr<signed_block>;

// ..../eos/libraries/chain/include/eosio/chain/types.hpp
typedef vector<std::pair<uint16_t,vector<char>>> extensions_type;

Block的定义使用的是signed_block struct,这个struct是从signed_block_header继承而来的,在这个结构体中的关键部分是包含了Transaction的vector。区块是由按顺序组织的交易来构成的集合。

block_extensions则定义了一系列的扩展信息,这些信息都由一个整数类型的code来定义,需要的时候,都可以根据这个整数code来解析相应的信息。

在这个结构体中包含的transaction都是使用transaction_receipt结构体,这个结构体又是从transaction_receipt_header继承而来,下面我们看看这个两个struct的定义。

// ..../eos/libraries/chain/include/eosio/chain/block.hpp
struct transaction_receipt_header {
   // 定义交易状态的枚举类型
   enum status_enum {
      // 这个表示执行成功(所以不需要执行出错逻辑)
      executed  = 0,
      // 客观的来说,执行失败了(或者没有执行),某一个出错逻辑执行了
      soft_fail = 1,
      // 执行失败了,并且执行的出错逻辑也失败了,所以并没有状态改变
      hard_fail = 2,
      // 交易被延迟了,计划到未来的某个时间执行
      delayed   = 3,
      // 交易过期了,并且存储空间返还给用户
      expired   = 4  ///< transaction expired and storage space refuned to user
   };

   // 状态数据
   fc::enum_type<uint8_t,status_enum>   status;
   // CPU使用情况
   uint32_t                             cpu_usage_us;
   // 网络使用情况
   fc::unsigned_int                     net_usage_words;
};

struct transaction_receipt : public transaction_receipt_header {
   fc::static_variant<transaction_id_type, packed_transaction> trx;
};

transaction_receipt结构体主要包含了一个打包过的交易以及其对应的交易类型。其parent struct transaction_receipt_header则主要是记录了这个交易的状态信息,以及CPU和网络的使用情况。当一笔交易被某个区块引用时,区块生产者针对这笔交易会做出相应的操作,而操作的不同结果会导致这笔交易的不同状态.

packed_transaction,顾名思义,就是把交易数据打包了,这个结构体里面还定义了,打包数据是否经过了压缩的标识信息,

// ..../eos/libraries/chain/include/eosio/chain/transaction.hpp
struct packed_transaction {
   // 定义打包数据是否压缩的枚举类型
   enum compression_type {
      // 没有压缩
      none = 0,
      // 使用zlib压缩
      zlib = 1,
   };

   // 签名信息
   vector<signature_type>                  signatures;
   // 是否压缩的标识信息
   fc::enum_type<uint8_t,compression_type> compression;
   // 上下文无关的信息
   bytes                                   packed_context_free_data;
   // 打包后的交易数据
   bytes                                   packed_trx;
}

packed_transaction中打包的数据来自于signed_transaction结构体,这个结构体的主要作用就是对交易做签名。

signed_transaction又是从transaction结构体继承而来,一个transaction结构体的实例包含一系列的action,这些action要么全部成功,要么全部失败。

交易ID是通过对交易内容本身经过Hash运算得出,所以每个交易的ID是与其内容一一对应的。交易的主体是由操作构成的。一个交易在纳入区块之前必须含有签名,用以验证交易的合法性。

延迟型交易

交易分为两种类型:一种是账户发起的普通交易,一种是由代码生成的自动交易,自动交易可以设置一个延迟时间,这样的交易叫延迟型交易,这种交易不会立即被执行,而是等到设定时间到时才会被执行。

// ..../eos/libraries/chain/include/eosio/chain/transaction.hpp
struct signed_transaction : public transaction
{
    // 签名信息
     vector<signature_type>    signatures;
     // 上下文无关的数据
     vector<bytes>             context_free_data;
};

struct transaction : public transaction_header {
     // 上下文无关的action
     vector<action>         context_free_actions;
     // 交易操作
     vector<action>         actions;
     // 交易扩展类型
     extensions_type        transaction_extensions;
}

transaction_header结构体包含了与每一个交易相关联的固定大小的数据,这些数据从具体的交易数据中分离出来,可以在需要的时候,帮助解析交易数据,而不再需要更多的动态内存分配。

所有的交易都有一个期限,这个期限限定了一个交易必须在规定时间内被纳入区块链,如果我们发现一个交易的时限已经过去,就可以放心的放弃这个交易,因为所有生产者都不会将它纳入任何区块。

// ..../eos/libraries/chain/include/eosio/chain/transaction.hpp
struct transaction_header {
     // 这个交易的过期时间
     time_point_sec         expiration;
     // 在最后的2^16 blocks中指定一个具体的block number
     uint16_t               ref_block_num       = 0U;
     // 在指定的get_ref_blocknum的blockid中取低位的32bit
     uint32_t               ref_block_prefix    = 0UL;
     // 最大的网络带块
     fc::unsigned_int       max_net_usage_words = 0UL;
     // 最大的CPU使用
     uint8_t                max_cpu_usage_ms    = 0;
     // 这个交易的延期时间
     fc::unsigned_int       delay_sec           = 0UL;
}

signed_block结构体是从signed_block_header继承而来的,这个signed_block_header结构体只是包含了一条数据,那就是producer的签名。

signed_block_header结构体又是从block_header继承而来的,这个结构体就包含了一个block中很多重要的数据,包括,时间戳,producer的名字,所有交易的merkle root,所有action的root等信息。

// ..../eos/libraries/chain/include/eosio/chain/block_header.hpp
struct block_header
{
     block_timestamp_type             timestamp;
     account_name                     producer;
     uint16_t                         confirmed = 1;  

     block_id_type                    previous;

     checksum256_type                 transaction_mroot;
     checksum256_type                 action_mroot;

     uint32_t                          schedule_version = 0;
     optional<producer_schedule_type>  new_producers;
     extensions_type                   header_extensions;
};

struct signed_block_header : public block_header
{
     signature_type    producer_signature;
};

Action(操作)

在前面的transaction结构体中,我们看到包含了有action,这里我们对action做一下说明。

我们先看看action的数据结构定义:

// ..../eos/contracts/eosiolib/action.hpp
struct action {
   // 账户:操作的来源
   account_name               account;
   // 名称:操作的标识
   action_name                name;
   // 授权:执行操作的许可列表
   vector<permission_level>   authorization;
   // 数据:执行操作需要用到的信息
   bytes                      data;
}

EOS区块链中的交易是由一个个操作(action)组成的,操作可以理解成一个能够更改区块链全局状态的方法,操作的顺序是确定的,一个交易内的操作要么全部执行成功,要么都不执行,这与交易的本意是一致的。操作是区块链的最底层逻辑,相当于区块链这个大脑的神经元,区块链的智能最终也是通过一个个操作的组合来实现的。

操作的设计原则

  • 独立原则 操作本身须包含足以解释操作含义的信息,而不需要依赖区块链提供的上下文信息来帮助解释。所以,即便一个操作的当前状态可以通过区块链上的数据推导得出,我们也需要将状态信息纳入操作数据中,以便每个操作是容易理解的。这个原则体现的是区块的可解释性,这一点非常重要,这个底层的设计原则将影响整个区块链的使用效率
  • 余额可计算原则 一个账户当前的余额计算,仅仅依赖于与这个账户相关的信息便可得出,而不需要解析整个区块链才能获得。这个原则针对的是比特币的设计,由于比特币的余额计算需要扫描区块链中的所有交易才能精准的计算出一个账户的余额,这使得一个非常基础的计算落地起来都变得相当繁琐,EOS的这个设计目的在于提升运算效率。
  • 明确费用原则 区块链的交易费用随时间变化而变化,所以,一个签名过的交易须明确的认同这个交易所需要支付的费用,这个费用是在交易形成之前就已经设定并且明确好了的,这一点也非常重要,因为明确的费用协议才能保证余额的正确计算。
  • 明确授权原则 每个操作须包含足够的授权信息以标明是哪一个账户拥有授权这个操作的权力,这种明确授权的设计思路带来几个好处:
    • 便于集中管理
    • 可以优化授权管理
    • 便于并行处理
  • 关联账户原则 每个操作须包含足够的关联账户信息,以保证这个操作能够遍历所有相关联的账户,也就是这个操作能够影响的所有账户,这个原则的目的同样是为了确保账户的余额能够得到及时和准确的运算

操作的来源

一个操作可以通过两种途径产生:

  • 由一个账号产生,通过签名来授权,即显性方式。
  • 由代码生成,即隐形方式。

操作的设计遵循React Flux设计模式,就是每一个操作将会被赋予一个名称,然后被分发给一个或者多个handler。在EOS环境中,每个操作对应的handler是通过scope和name来定义的,默认的handler也可以再次将操作分发给下一级的多个handler。所以,每个EOS应用可以实现自己的handler,当操作被分发到这个应用时,相应的handler的代码就会被执行。

操作的设计思路中另一重要概念是授权。每一个操作的执行都必须确保具备了指定账户的授权。授权通过许可(permission)的方式声明,对于一个授权动作,账户可以要求任意数量的许可,许可的验证是独立于代码执行的,只有所有规定的许可被成功验证之后,对应的代码才能够被执行。安全特性深深的嵌入了区块链的底层设计逻辑,同时又不让安全机制成为性能和结构的累赘,让它自成体系,独立管理。

区块的存储 - 区块日志

区块日志是存储区块的二进制文件,区块日志的特性是只能从末尾追加(append only),区块日志包含两类文件:

区块文件,结构如下:

+---------+----------------+---------+----------------+-----+------------+-------------------+

| Block 1 | Pos of Block 1 | Block 2 | Pos of Block 2 | ... | Head Block | Pos of Head Block |

+---------+----------------+---------+----------------+-----+------------+-------------------+

区块文件包含区块的内容以及每个区块的位置信息。区块位置信息是固定的8字节宽度,这样便于在连续读取区块的时候,按照读一个区块,向后跳跃8个字节,读一个区块,向后跳跃8个字节的模式快速加载区块内容。

索引文件,结构如下:

+----------------+----------------+-----+-------------------+

| Pos of Block 1 | Pos of Block 2 | ... | Pos of Head Block |

+----------------+----------------+-----+-------------------+

区块索引的目的在于提供一个基于区块序号的快速随机搜索方法,使用索引文件可以快速定位目标区块在区块文件中的具体位置。索引文件不是必须的,没有索引文件区块链仍然可以运行,索引文件的主要作用是通过少量空间换取速度提升。索引文件可以通过顺序读取区块文件来重新构建。

转载自:https://github.com/XChainLab/documentation/blob/master/eos/eos.block.data.structure.md