您正在查看: 2020年9月

负载均衡Nginx、HAProxy和LVS

Nginx

Nginx优点:

1、工作在网络7层之上,可针对http应用做一些分流的策略,如针对域名、目录结构,它的正规规则比HAProxy更为强大和灵活,所以,目前为止广泛流行。

2、Nginx对网络稳定性的依赖非常小,理论上能ping通就能进行负载功能。

3、Nginx安装与配置比较简单,测试也比较方便,基本能把错误日志打印出来。

4、可以承担高负载压力且稳定,硬件不差的情况下一般能支撑几万次的并发量,负载度比LVS小。

5、Nginx可以通过端口检测到服务器内部的故障,如根据服务器处理网页返回的状态码、超时等,并会把返回错误的请求重新提交到另一个节点。

6、不仅仅是优秀的负载均衡器/反向代理软件,同时也是强大的Web应用服务器。LNMP也是近些年非常流行的Web架构,在高流量环境中稳定性也很好。

7、可作为中层反向代理使用。

8、可作为静态网页和图片服务器。

9、Nginx社区活跃,第三方模块非常多,相关的资料在网上比比皆是。

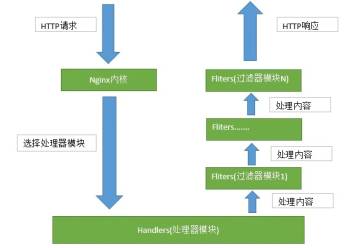
Nginx常规的和HTTP请求和相应流程图:

做负载均衡Nginx、HAProxy和LVS总有一个适合你

Nginx缺点:

1、适应范围较小,仅能支持http、https、Email协议。

2、对后端服务器的健康检查,只支持通过端口检测,不支持url来检测。比如用户正在上传一个文件,而处理该上传的节点刚好在上传过程中出现故障,Nginx会把上传切到另一台服务器重新处理,而LVS就直接断掉了,如果是上传一个很大的文件或者很重要的文件的话,用户可能会因此而不满。

LVS

LVS优点:

1、抗负载能力强、是工作在网络4层之上仅作分发之用,没有流量的产生,这个特点也决定了它在负载均衡软件里的性能最强的,对内存和cpu资源消耗比较低。

2、配置性比较低,这是一个缺点也是一个优点,因为没有可太多配置的东西,所以并不需要太多接触,大大减少了人为出错的几率。

3、工作稳定,因为其本身抗负载能力很强,自身有完整的双机热备方案,如LVS+Keepalived,不过我们在项目实施中用得最多的还是LVS/DR+Keepalived。

4、无流量,LVS只分发请求,而流量并不从它本身出去,这点保证了均衡器IO的性能不会收到大流量的影响。

5、应用范围比较广,因为LVS工作在4层,所以它几乎可以对所有应用做负载均衡,包括http、数据库、在线聊天室等等。

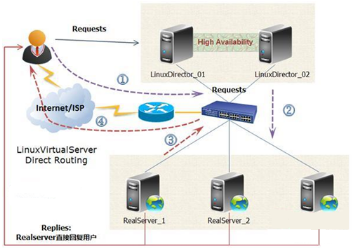
LVS DR(Direct Routing)模式的网络流程图:

做负载均衡Nginx、HAProxy和LVS总有一个适合你

LVS的缺点:

1、软件本身不支持正则表达式处理,不能做动静分离;而现在许多网站在这方面都有较强的需求,这个是Nginx/HAProxy+Keepalived的优势所在。

2、如果是网站应用比较庞大的话,LVS/DR+Keepalived实施起来就比较复杂了,特别后面有Windows Server的机器的话,如果实施及配置还有维护过程就比较复杂了,相对而言,Nginx/HAProxy+Keepalived就简单多了。

HAProxy

HAProxy优点:

1、HAProxy是支持虚拟主机的,可以工作在4、7层(支持多网段)

2、HAProxy的优点能够补充Nginx的一些缺点,比如支持Session的保持,Cookie的引导;同时支持通过获取指定的url来检测后端服务器的状态。

3、HAProxy跟LVS类似,本身就只是一款负载均衡软件;单纯从效率上来讲HAProxy会比Nginx有更出色的负载均衡速度,在并发处理上也是优于Nginx的。

4、HAProxy支持TCP协议的负载均衡转发,可以对MySQL读进行负载均衡,对后端的MySQL节点进行检测和负载均衡,大家可以用LVS+Keepalived对MySQL主从做负载均衡。

5、HAProxy负载均衡策略非常多,HAProxy的负载均衡算法现在具体有如下8种

① roundrobin

表示简单的轮询,每个服务器根据权重轮流使用,在服务器的处理时间平均分配的情况下这是最流畅和公平的算法。该算法是动态的,对于实例启动慢的服务器权重会在运行中调整。最大支持4095个后端主机;

② leastconn

连接数最少的服务器优先接收连接。leastconn建议用于长会话服务,例如LDAP、SQL、TSE等,而不适合短会话协议。如HTTP.该算法是动态的,对于实例启动慢的服务器权重会在运行中调整。

③ static-rr

每个服务器根据权重轮流使用,类似roundrobin,但它是静态的,意味着运行时修改权限是无效的。另外,它对服务器的数量没有限制。该算法一般不用;

④ source

对请求源IP地址进行哈希,用可用服务器的权重总数除以哈希值,根据结果进行分配。只要服务器正常,同一个客户端IP地址总是访问同一个服务器。如果哈希的结果随可用服务器数量而变化,那么客户端会定向到不同的服务器;该算法一般用于不能插入cookie的Tcp模式。它还可以用于广域网上为拒绝使用会话cookie的客户端提供最有效的粘连;该算法默认是静态的,所以运行时修改服务器的权重是无效的,但是算法会根据“hash-type”的变化做调整。

⑤ uri

表示根据请求的URI左端(问号之前)进行哈希,用可用服务器的权重总数除以哈希值,根据结果进行分配。只要服务器正常,同一个URI地址总是访问同一个服务器。一般用于代理缓存和反病毒代理,以最大限度的提高缓存的命中率。该算法只能用于HTTP后端;该算法一般用于后端是缓存服务器;该算法默认是静态的,所以运行时修改服务器的权重是无效的,但是算法会根据“hash-type”的变化做调整。

⑥ url_param

在HTTP GET请求的查询串中查找中指定的URL参数,基本上可以锁定使用特制的URL到特定的负载均衡器节点的要求;该算法一般用于将同一个用户的信息发送到同一个后端服务器;该算法默认是静态的,所以运行时修改服务器的权重是无效的,但是算法会根据“hash-type”的变化做调整。

⑦ hdr(name)

在每个HTTP请求中查找HTTP头,HTTP头将被看作在每个HTTP请求,并针对特定的节点;如果缺少头或者头没有任何值,则用roundrobin代替;该算法默认是静态的,所以运行时修改服务器的权重是无效的,但是算法会根据“hash-type”的变化做调整。

⑧ rdp-cookie(name)

为每个进来的TCP请求查询并哈希RDP cookie;该机制用于退化的持久模式,可以使同一个用户或者同一个会话ID总是发送给同一台服务器。如果没有cookie,则使用roundrobin算法代替;该算法默认是静态的,所以运行时修改服务器的权重是无效的,但是算法会根据“hash-type”的变化做调整。

haproxy的工作模型图:

做负载均衡Nginx、HAProxy和LVS总有一个适合你

HAPorxy缺点:

  1. 不支持POP/SMTP协议

  2. 不支持SPDY协议

  3. 不支持HTTP cache功能。现在不少开源的lb项目,都或多或少具备HTTP cache功能。

  4. 重载配置的功能需要重启进程,虽然也是soft restart,但没有Nginx的reaload更为平滑和友好。

  5. 多进程模式支持不够好
    原文链接:https://blog.csdn.net/qlj324513/article/details/81541282

Ubuntu18.04上源码安装Haproxy2.x

准备编译安装HAProxy的基础环境

sudo apt install make gcc build-essential libssl-dev zlib1g-dev libpcre3 libpcre3-dev libsystemd-dev libreadline-dev -y

编译安装lua

lua为HAProxy支持基于其实现功能扩展
注:HAProxy要求的lua最低版本为5.3

sudo wget -P /usr/local/src/ http://www.lua.org/ftp/lua-5.3.5.tar.gz
cd /usr/local/src/
sudo tar xf lua-5.3.5.tar.gz
cd lua-5.3.5/src/
sudo make linux

查看编译后的版本

surou@DESKTOP-CRS8RL6:/usr/local/src/lua-5.3.5/src$ ./lua -v
Lua 5.3.5  Copyright (C) 1994-2018 Lua.org, PUC-Rio

编译安装HAProxy

安装基础环境

sudo apt install iproute2 ntpdate tcpdump telnet traceroute nfs-kernel-server nfs-common lrzsz tree openssl libssl-dev libpcre3 libpcre3-dev zlib1g-dev  gcc openssh-server iotop unzip libreadline-dev libsystemd-dev

clone haproxy

git clone https://github.com/haproxy/haproxy.git
git checkout v2.3-dev5

编译源代码

make -j `lscpu |awk 'NR==4{print $2}'` ARCH=x86_64 TARGET=linux-glibc USE_PCRE=1 USE_OPENSSL=1 USE_ZLIB=1 USE_SYSTEMD=1 USE_CPU_AFFINITY=1 USE_LUA=1 LUA_INC=/usr/local/src/lua-5.3.5/src/ LUA_LIB=/usr/local/src/lua-5.3.5/src/ PREFIX=/apps/haproxy && make install PREFIX=./dist/haproxy

编译完,查看当前目录

cd dist/haproxy/sbin

查看版本

./haproxy -v
surou@DESKTOP-CRS8RL6:~/dist/haproxy/sbin$ ./haproxy -v
HA-Proxy version 2.3-dev5-7faeea-1 2020/09/26 - https://haproxy.org/
Status: development branch - not safe for use in production.
Known bugs: https://github.com/haproxy/haproxy/issues?q=is:issue+is:open
Running on: Linux 4.4.0-18362-Microsoft #1049-Microsoft Thu Aug 14 12:01:00 PST 2020 x86_64

参考

https://www.cnblogs.com/molson/p/13341108.html

Error 3010004: Invalid authority

当设置一个账户的权限为多个账户时

cleos set account permission bcskillsurou active  '{"threshold":1,"keys":[{"key":"EOS5bu13CujrEUdKB57LnvihUAqkdUycwSz2p7vPuac7vNBvfh7M7","weight":1}],"accounts":[{"permission":{"actor":"222222222222","permission":"eosio.code"},"weight":1},{"permission":{"actor":"111111111111","permission":"eosio.code"},"weight":1}],"waits":[{"wat_sec":1,"weight":1}]}'  owner -p bcskillsurou

报错如下

Error 3010004: Invalid authority
Ensure that your authority JSON is valid follows the following format!
{
  "threshold":      <INTEGER [1-2^32): the threshold that must be met to satisfy this authority>,
  "keys": [         <keys must be alpha-numerically sorted by their string representations and unique>
    ...
    {
      "key":        <STRING: EOS.IO compatible Public Key>,
      "weight":     <INTEGER [1-2^16): a signature from this key contributes this to satisfying the threshold>
    }
    ...
  ],
  "accounts": [     <accounts must be alpha-numerically sorted by their permission (actor, then permission) and unique>
    ...
    {
      "permission": {
        "actor":      <STRING: account name of the delegated signer>,
        "permission": <STRING: permission level on the account that must be satisfied>,
      },
      "weight":     <INTEGER [1-2^16): satisfying the delegation contributes this to satisfying the threshold>
    }
    ...
  ],
  "waits": [        <waits must be sorted by wait_sec, largest first, and be unique>
    ...
    {
      "wait_sec":   <INTEGER [1-2^32): seconds of delay which qualifies as passing this wait>
      "weight":     <INTEGER [1-2^16): satisfying the delay contributes this to satisfying the threshold>
    }
    ...
  ]
}

Error Details:
Authority failed validation! ensure that keys, accounts, and waits are sorted and that the threshold is valid and satisfiable!

解决问题

将添加的accounts按照ascii顺序添加
例如上面的例子,先添加 111111111111 再添加 222222222222

cleos set account permission bcskillsurou active  '{"threshold":1,"keys":[{"key":"EOS5bu13CujrEUdKB57LnvihUAqkdUycwSz2p7vPuac7vNBvfh7M7","weight":1}],"accounts":[{"permission":{"actor":"111111111111","permission":"eosio.code"},"weight":1},{"permission":{"actor":"222222222222","permission":"eosio.code"},"weight":1}],"waits":[{"wat_sec":1,"weight":1}]}'  owner -p bcskillsurou

参考

https://github.com/EOSIO/eos/issues/4433

基于 EOS 公钥加密,私钥解密示例

eos-crypto-java 使用指南

源码:https://github.com/yanjunli/eos-crypto-java

eos-crypto-java 目前可以支持 基于 ECC+AES 的加解密方式。

在本压缩包中,包含基于jdk1.5 打好的jar 包。

要求

jdk 1.5+

基于 EOS 公钥加密,私钥解密示例

        String privateKey =  "5KTZYCDdcfNrmEpcf97SJBCtToZjYHjHm8tqTWvzUbsUJgkxcfk";
        EosPrivateKey eosPrivateKey = new EosPrivateKey(privateKey);
        EosPublicKey  eosPublicKey = eosPrivateKey.getPublicKey();
        // 转换成 EC privatekey
        ECPrivateKey ecPrivateKey = eosPrivateKey.getECPrivateKey();
        ECPublicKey ecPublicKey = eosPublicKey.getECPublicKey();

        byte[] plaindata = "{\"age\": 1,\"12345\":\"24qqwazzxdtttdxkaskjewuizckczxnlsdosasda4!!!@#$$%^&&*(()(^#\"}".getBytes("utf8");

        System.out.println("加密原文:" + new String(plaindata));

        byte[] encryptdata = ECCUtil.publicEncrypt(plaindata,ecPublicKey);

        System.out.println("加密后密文:" + HexUtils.toHex(encryptdata));

        plaindata = ECCUtil.privateDecrypt(encryptdata,ecPrivateKey);

        System.out.println("解密后原文: "+ new String(plaindata));

基于ECC+AES 双向验证 加解密示例

/**
*
* sender  发起方密钥对
*
* EOS8g1u3ktAGHs4QsVp9aeaWNebFLtprQHwpaSjegx6iEuoTNhjXU
* 5KTZYCDdcfNrmEpcf97SJBCtToZjYHjHm8tqTWvzUbsUJgkxcfk
*
* receiver 接收方一密钥对
*
* EOS7ez2gagfoXw9XdW3kRx3EsCoWvupGR6u6ZJhFPEe9Q12V8JgUL
* 5JUrqxYcssR9LLVtWDeQcc9HCX4FEqBG7d9GW6t7mvmB1rUuZr9
*
* receiver 接收方二 密钥对
* EOS5WMHqw6jDDBPBm7JXTHemAwtSo2tp93pRysJMRhiT1zUYb24vL
* 5HrcVeuHHNwHsivrMoJ9XvU6EM7Q2wQ2ECiy8GeoiuamhNiSuZq
*/

// 1.  调用钱包获取 发送方私钥
  String senderPrivateKey =  "5KTZYCDdcfNrmEpcf97SJBCtToZjYHjHm8tqTWvzUbsUJgkxcfk";
  EosPrivateKey senderECPrivateKey = new EosPrivateKey(senderPrivateKey);
//        EosPublicKey senderECPublicKey = new EosPublicKey(senderPublicKey);
        // 2.  根据私钥 生成公钥。 或者直接根据公钥 调用钱包获取私钥。 都可以。
  EosPublicKey senderECPublicKey = senderECPrivateKey.getPublicKey();

  String senderPublicKey = senderECPublicKey.toString();
  /**
   * 调用钱包获取 接收方私钥   获取公私钥方式 根据需求确定。
   *  1. 可以根据公钥,从钱包里获取私钥
   *  2. 也可以直接从钱包里取出私钥,反向生成公钥
   *  
   *  实际业务场景,发起方只会有接收方公钥,并没有接收方私钥. 
   *  此时 可以通过 new EosPublicKey(receiverPublicKey) 方式 生成EosPublicKey 对象。
   */
  String receiverPrivateKey = "5JUrqxYcssR9LLVtWDeQcc9HCX4FEqBG7d9GW6t7mvmB1rUuZr9";
  EosPrivateKey receiverECPrivateKey = new EosPrivateKey(receiverPrivateKey);
  EosPublicKey receiverECPublicKey = receiverECPrivateKey.getPublicKey();
  String receiverPublicKey = receiverECPublicKey.toString();
  //        String receiverPublicKey =  "EOS7ez2gagfoXw9XdW3kRx3EsCoWvupGR6u6ZJhFPEe9Q12V8JgUL";


  /**
   * 使用 发送者方私钥 和接收方公钥,生成 aes key, 对数据进行加密
   * nonce  为初始化向量,可以使用固定值,
   *                      也可以使用随机值,并使用私有协议。根据业务需求选择。
   */
  byte[] nonce = new byte[16];
  MTRandom random=new MTRandom();
  random.nextBytes(nonce);

  // 待加密 数据
  byte[] params = "{\"test1\": 1,\"test2\":\"24qqwazzxdtttdxkaskjewuizckczxnlsdosasda4!!!@#$$%^&&*((){}(^#\"}".getBytes("utf8");

  System.out.println("原始加密数据: " + new String(params,"utf8"));

  byte[] encrypted = new byte[0];
  try {
      encrypted = CryptUtil.encrypt(senderECPrivateKey,receiverECPublicKey,nonce,params);
  } catch (InvalidCipherTextException e) {
      e.printStackTrace();
      System.out.println("  do something!!!!");
  }

  System.out.println("加密后数据: " + new String(encrypted,"utf8"));
  try {
      byte[] plainText = CryptUtil.decrypt(receiverECPrivateKey,senderECPublicKey,nonce,encrypted);
      // 解密后数据
      System.out.println("解密后数据 :  "+new String(plainText, "utf8"));
  } catch (InvalidCipherTextException e) {
      e.printStackTrace();
      System.out.println("  do something!!!!");
  }

基于数字信封的 加解密示例


/**
         *
         * sender
         *
         * EOS8g1u3ktAGHs4QsVp9aeaWNebFLtprQHwpaSjegx6iEuoTNhjXU
         * 5KTZYCDdcfNrmEpcf97SJBCtToZjYHjHm8tqTWvzUbsUJgkxcfk
         *
         * receiver 平台公私钥对
         *
         * EOS7ez2gagfoXw9XdW3kRx3EsCoWvupGR6u6ZJhFPEe9Q12V8JgUL
         * 5JUrqxYcssR9LLVtWDeQcc9HCX4FEqBG7d9GW6t7mvmB1rUuZr9
         *
         * receiver 省侧公私钥对
         * EOS5WMHqw6jDDBPBm7JXTHemAwtSo2tp93pRysJMRhiT1zUYb24vL
         * 5HrcVeuHHNwHsivrMoJ9XvU6EM7Q2wQ2ECiy8GeoiuamhNiSuZq
         */

        // 1.  调用钱包获取 发送方私钥
        String senderPrivateKey =  "5KTZYCDdcfNrmEpcf97SJBCtToZjYHjHm8tqTWvzUbsUJgkxcfk";
        EosPrivateKey senderECPrivateKey = new EosPrivateKey(senderPrivateKey);
//        EosPublicKey senderECPublicKey = new EosPublicKey(senderPublicKey);
        // 2.  根据私钥 生成公钥。 或者直接根据公钥 调用钱包获取私钥。 都可以,看具体业务需求
        EosPublicKey senderECPublicKey = senderECPrivateKey.getPublicKey();

        String senderPublicKey = senderECPublicKey.toString();
        /**
         * 调用钱包获取 接收方私钥   获取公私钥方式 根据业务需求确定。
         *  1. 可以根据公钥,从钱包里获取私钥
         *  2. 也可以直接从钱包里取出私钥,反向生成公钥
         */
        String receiverPrivateKey = "5JUrqxYcssR9LLVtWDeQcc9HCX4FEqBG7d9GW6t7mvmB1rUuZr9";
        EosPrivateKey receiverECPrivateKey = new EosPrivateKey(receiverPrivateKey);

        EosPublicKey receiverECPublicKey = receiverECPrivateKey.getPublicKey();

        /**
         * 生成对称密钥
         */
        byte[] nonce = new byte[16];
        MTRandom random=new MTRandom();
        random.nextBytes(nonce);

        // 待加密 数据
        byte[] params = "{\"age\": 1,\"汉字\":\"为初始化向量,可以使用固定值,\",\"12345\":\"24qqwazzxdtttdxkaskjewuizckczxnlsdosasda4!!!@#$$%^&&*(()(^#\"}".getBytes("utf8");

        System.out.println("加密前原始数据: " + new String(params,"utf8"));

        // 发起方使用对称密钥,对原始数据进行加密
        byte[] encryptedData = null;
        try {
            encryptedData = CryptUtil.aesEncryptWithNOIV(nonce,params);
        } catch (InvalidCipherTextException e) {
            e.printStackTrace();
            System.out.println("  do something!!!!");
        }

        System.out.println("加密后数据: " + HexUtils.toHex(encryptedData));


        System.out.println("加密前对称密钥: " + HexUtils.toHex(nonce));

        // 发起方使用 接收方公钥,对对称密钥进行加密
        byte[] encryptedKey = null;
        try {
            encryptedKey = ECCUtil.publicEncrypt(nonce,receiverECPublicKey.getECPublicKey());
        } catch (Exception e) {
            e.printStackTrace();
            System.out.println("  do something!!!!");
        }

        System.out.println("加密后对称密钥: " + HexUtils.toHex(encryptedKey));

        // 将对称密钥加密后的数据,密文组装后,进行网络传输。
        // 组装 demo
        /**
         *    4 byte                       |      encryptedKey                 |       4 byte              | encryptedData
         *    对称密钥加密后的数据长度      |      ECC 加密后的对称秘钥           |       密文数据长度         | AES 加密后的密文
         */

        ByteBuffer bytebuffer = ByteBuffer.allocate( 4 + encryptedKey.length + 4 +encryptedData.length);
        bytebuffer.putInt(encryptedKey.length);
        bytebuffer.put(encryptedKey);
        bytebuffer.putInt(encryptedData.length);
        bytebuffer.put(encryptedData);

//        String base58encode = Base58.encode(bytebuffer.array());
//        System.out.println("base58 编码后的:   " + base58encode);

        // 进行 16 进制编码
        String hexencode = HexUtils.toHex(bytebuffer.array());

        System.out.println(" 将数字信封和密文组装后的报文 16进制格式:" + hexencode);

        System.out.println("发送方数据加密完成,可以将数据发送出去 ");

        /**
         *****************************************************  以下为接收方 代码  *************************************
         */

//        byte[] base58decode = Base58.decode(hexencode);
        byte[] hexdecode = HexUtils.toBytes(hexencode);
        ByteBuffer receiveBuffer = ByteBuffer.wrap(hexdecode);

        // 获取到对称秘钥长度
        int receivedEncryptedKeyLength = receiveBuffer.getInt();
        // 加密后的对称密钥key
        byte[] receivedEncryptKey = new byte[receivedEncryptedKeyLength];
        receiveBuffer.get(receivedEncryptKey,0,receivedEncryptedKeyLength);

        System.out.println(" 接收到的 加密后的对称密钥 :" + HexUtils.toHex(receivedEncryptKey));
        // 获取到的 密文的长度
        int contextLength = receiveBuffer.getInt();
        // 密文
        byte[] receivedEncryptContext = new byte[contextLength];
        receiveBuffer.get(receivedEncryptContext,0,contextLength);

        System.out.println(" 接收到的 密文:" + HexUtils.toHex(receivedEncryptContext));


        // 使用接收方私钥,解密对称密钥
        byte[] receiveddecryptKey = null;
        try {
            receiveddecryptKey = ECCUtil.privateDecrypt(receivedEncryptKey,receiverECPrivateKey.getECPrivateKey());
        } catch (Exception e) {
            e.printStackTrace();
            System.out.println("  do something!!!!");
        }

        System.out.println(" 解密后的对称密钥 :" + HexUtils.toHex(receiveddecryptKey));

        // 使用对称密钥,对密文进行解密

        try {
            byte[] plainText = CryptUtil.aesDecryptWithNOIV(receiveddecryptKey,receivedEncryptContext);
            // 解密后数据
            System.out.println("解密后数据 :  "+new String(plainText, "utf8"));
        } catch (InvalidCipherTextException e) {
            e.printStackTrace();
            System.out.println("  do something!!!!");
        }

EOS js name To Uint64 OR Uint64 to name

源代码仓库地址:
https://github.com/bcskill/eosjs-name

演示地址
Try on run-kit https://npm.runkit.com/eosjs-account-name

测试代码
// name To Uint64

const eosjsAccountName = require("eosjs-account-name")
const n = eosjsAccountName.nameToUint64('eosio');
console.log('eosio to uint64: ' + n);
console.log('uint64 to name: ' + eosjsAccountName.uint64ToName(n));

// Uint64 to name

const uint64 = '6138663577826885632';
const name = eosjsAccountName.uint64ToName(uint64);