区块链的公链项目越来越多,每个项目都是一个孤立的网络体系,因此区块链项目之间的互联互通能力也是技术发展的大方向。这其中Cosmos项目是其中的优秀代表。本文作者从Cosmos核心技术Tendermint开始,深度剖析Cosmos项目,让大家对跨链技术将一个比较深入的了解。
导读
2017年以来,区块链项目出现了井喷式地上升,然而在喜人增长态势的背后,人们也注意到大部分项目都缺乏与其它区块链项目互连互通的能力而成为孤立的网络体系。因此,跨链技术也逐渐进入了大家的视野,本文将为大家解读一个跨链项目Cosmos,看看它是如何做到让不同区块链的价值网络实现互通的。通过对该项目的解读,让大家对跨链项目有个初步的了解。同时受限于篇幅,我们会分为上下两篇,上篇带大家先了解Cosmos的核心技术Tendermint,下篇会着重介绍Cosmos。
Tendermint概述
提到区块链,大家想必已然不陌生了,不过更多人想到的可能会是众所周知的Bitcoin和Ethereum。的确,两者分别是区块链技术的起源和发展的代表,也是大家广泛传播和深入研究的对象。但是随着Bitcoin的不断推进,比特币工作量证明共识机制在速度和扩展性上的不足也逐步展现出来。
Cosmos的开发团队Tendermint其实早在2014年就开始意识到了其不足,并持续专注于寻求不依赖挖矿等高电力消耗的共识机制,提供快速的交易处理能力,它们的目标是为全世界所有的区块链提供速度、安全和可扩展性。目前,Tendermint加入了微软Azure区块链即服务平台,也成为了以太坊区块链联盟成员之一,同时Tendermint也是跨链技术Cosmos的核心技术。两者大致的关系如下:
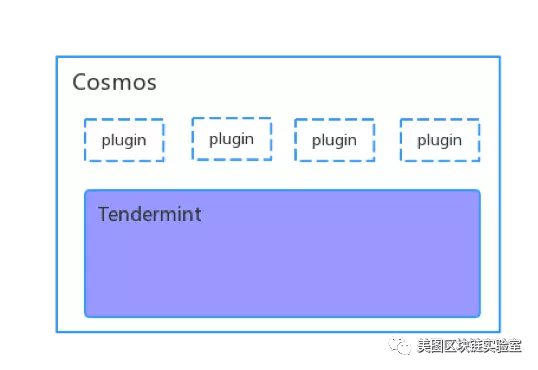
图中可以轻松看出Cosmos就是在Tendermint基础上添加一些插件功能来实现的,上篇暂不对Cosmos做过多阐述,先来认识一下Tendermint。
Tendermint是什么
Tendermint的详细定义可以参考官方文档:
https://tendermint.readthedocs.io/en/master/introduction.html#what-is-tendermint
这里总结下有以下几点:
- Tendermint是一个能够在不同机器上,安全一致复制应用的软件,其中安全性和一致性也是分布式账本的关键概念。
- Tendermint具备拜占庭容错能力,是一种拜占庭容错共识算法。
- Tendermint主要有两部分组成:
- Tendermint Core:区块链共识引擎,负责节点之间数据传输以及拜占庭共识。
- ABCI:区块链应用程序接口,也是一个协议,支持任何语言的交易处理实现。
总体来讲,Tendermint可以理解为一个模块化的区块链软件框架,支持开发者个性化定制自己的区块链,而又不需要考虑共识以及网络传输的实现。
Tendermint设计原则
先简单说说区块链的概念,区块链是一个具备确定性的状态机,可以在不信任的节点之间进行状态复制,包括应用的状态和改变状态的交易。从架构的层面上,区块链可以简单分为三个概念层:
- 网络层(Networking):负责交易和数据传输和同步。
- 共识算法(Consensus):负责不同的验证节点处理完交易后,保证状态的一致,也就是将交易打包到区块中。
- 应用程序(Application):交易的真正执行者。
大致框架如下:
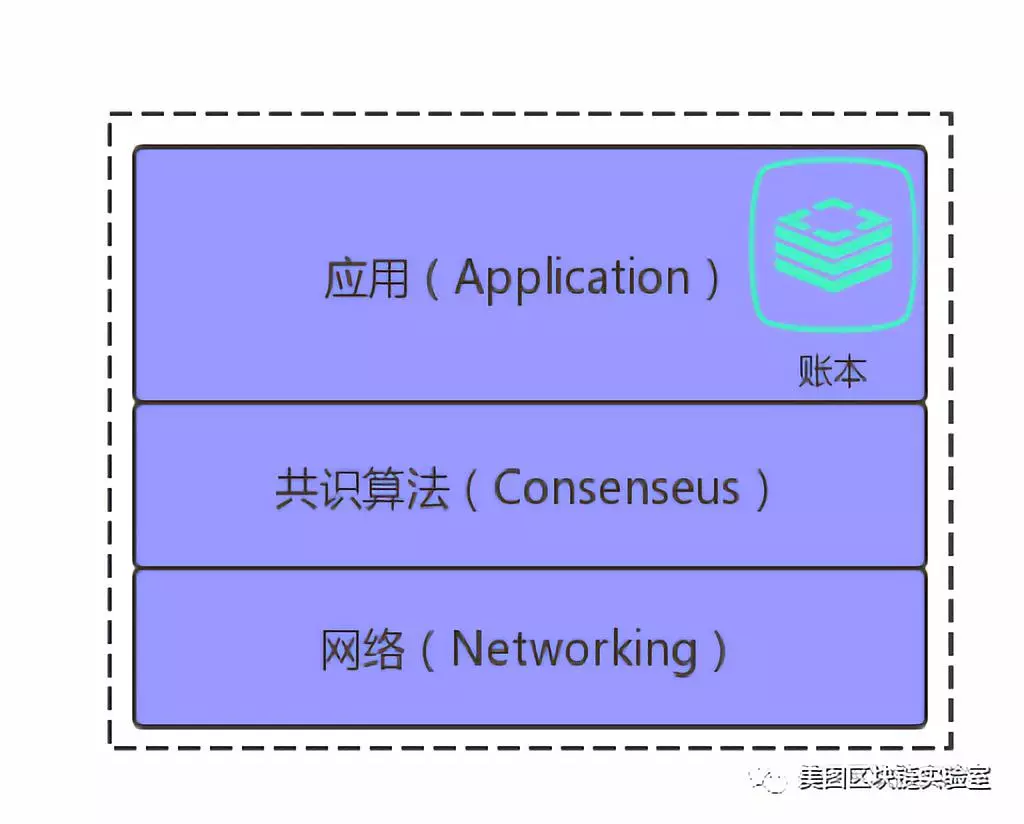
目前大部分的区块链实现都是采用上面的框架,实现成单一的程序,但是这就很容易出现两个问题:
- 代码复用困难,代码库的分支管理变得复杂。
- 限制了应用开发的语言
如何去规避这两个问题呢?Tendermint设计了自己的一套框架,其设计原则是易使用,易理解,高性能,适用于各种分布式应用。它的创新之处在于,将区块链应用(状态)与底层共识进行了分离,将共识引擎和P2P网络层封装组成Tendermint Core。同时提供ABCI接口与应用层进行交互,应用逻辑可以用任何语言编写,应用做的事情实际上就是状态机控制。基于这种架构,应用的开发者可以方便地实现自己的区块链。

Tendermint的框架总体来讲分为ABCI Application以及Tendermint Core两部分,两者通过ABCI连接。下面会对这两部分依次展开介绍
Tendermint核心模块
ABCI Application
开发者定制开发的区块链应用,开发语言不受限制,可以使用任何语言进行开发,但是必须实现为一个ABCI Server,即需要满足以下几点:
- 是一个Socket Server,需支持TSP或GRPC两种方式之一。
- 能够处理ABCI Message。所有的ABCI消息类型都是通过protobuf来定义的,具体的消息格式可参考https://github.com/tendermint/abci/blob/master/types/types.proto
- 实现区块链应用接口(ABCI)。ABCI是Tendermint中定义的一套Application与Tendermint Core之间交互的协议。详细定义如下(版本:0.10.3):

ABCI接口可以分为三类:信息查询、交易校验以及共识相关处理。而Tendermint Core作为ABCI Client在启动时,会与ABCI Server建立三个连接,分别用于这三类接口消息的处理。
在Tendermint Core与Application交互的所有消息类型中,有3种主要的消息类型:
- CheckTx消息用于验证交易。Tendermint Core中的mempool通过此消息校验交易的合法性,通过之后才会将交易广播给其它节点。
- DeliverTx消息是应用的主要工作流程,通过此消息真正执行交易,包括验证交易、更新应用程序的状态。
- Commit消息通知应用程序计算当前的世界状态,并存在下一区块头中。
Tendermint Core
Tendermint共识引擎,包含区块链需要大部分功能实现,主要有:
- 共识算法:拜占庭POS算法。
- P2P:采用gossip算法,默认端口是46656。
- RPC:区块链对外接口,默认端口是46657。支持三种访问方式:URI over HTTP、JSONRPC over HTTP、JSONRPC over websockets。详细的RPC接口定义列表可以参考https://tendermint.github.io/slate
- 其它:交易缓存池、消息队列等。
共识算法
Tendermint是一个易于理解的BFT共识协议。协议遵循一个简单的状态机,如下:
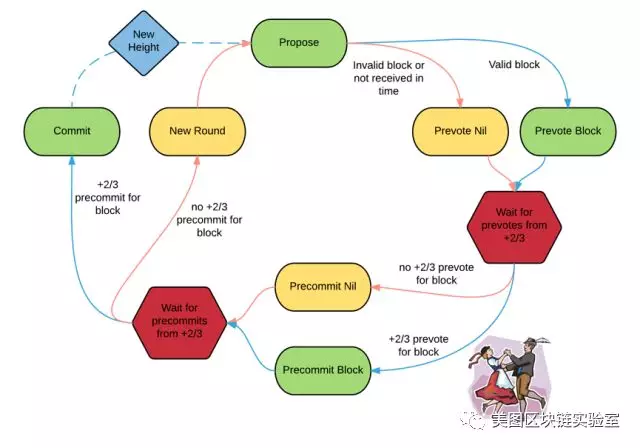
协议中有两个角色:
- 验证人:协议中的角色或者节点,不同的验证者在投票过程中具备不同的权力(vote power)。
- 提议人:由验证人轮流产生。
验证人轮流对交易的区块提议并对提议的区块投票。区块被提交到链上,且每个区块就是一个区块高度。但区块也有可能提交失败,这种情况下协议将选择下一个验证人在相同高度上提议一个新块,重新开始投票。
从图中可以看到,成功提交一个区块,必须经过两阶段的投票,称为pre-vote和pre-commit。当超过 2/3 的验证人在同一轮提议中对同一个块进行了pre-commit投票,那么这个区块才会被提交。
由于离线或者网络延迟等原因,可能造成提议人提议区块失败。这种情况在Tendermint中也是允许的,因此验证人会在进入下一轮提议之前等待一定时间,用于接收提议人提议的区块。
假设少于三分之一的验证人是拜占庭节点,Tendermint能够保证验证人永远不会在同一高度重复提交区块而造成冲突。为了做到这一点,Tendermint 引入了锁定机制,一旦验证人预投票了一个区块,那么该验证人就会被锁定在这个区块。然后:
- 该验证人必须在预提交的区块进行预投票。
- 当前一轮预提议和预投票没成功提交区块时,该验证人就会被解锁,然后进行对新块的下一轮预提交。
可以看到,Tendermint共识算法和PBFT时非常相似的,可以说是PBFT的变种,那我们来比较一下:
相同点:
- 同属BFT体系。
- 抗1/3拜占庭节点攻击。
- 三阶段提交,第一阶段广播交易(区块),后两阶段广播签名(确认)。
- 两者都需要达到法定人数才能提交块。
不同点:
- Tendermint与PBFT的区别主要是在超过1/3节点为拜占庭节点的情况下。当拜占庭节点数量在验证者数量的1/3和2/3之间时,PBFT算法无法提供保证,使得攻击者可以将任意结果返回给客户端。而Tendermint共识模型认为必须超过2/3数量的precommit确认才能提交块。举个例子,如果1/2的验证者是拜占庭节点,Tendermint中这些拜占庭节点能够阻止区块的提交,但他们自己也无法提交恶意块。而在PBFT中拜占庭节点却是可以提交块给客户端。
- 另一个不同点在于拜占庭节点概念不同,PBFT指的是节点数,而Tendermint代表的是节点的权益数,也就是投票权力。
- 最后一点,PBFT需要预设一组固定的验证人,而Tendermint是通过要求超过2/3法定人数的验证人员批准会员变更,从而支持验证人的动态变化。
P2P网络
Tendermint的P2P网络协议借鉴了比特币的对等发现协议,更准确地说,Tendermint是采用了BTCD的P2P地址簿(Address Book)机制。当连接建立后,新节点将自身的Address信息(包含IP、Port、ID等)发送给相邻节点,相邻节点接收到信息后加入到自己的地址薄,再将此条Address信息,转播给它的相邻节点。
此外为了保证节点之间数据传输的安全性,Tendermint采用了基于Station-to-Station协议的认证加密方案,此协议是一种密钥协商方案,基于经典的DH算法,并提供相互密钥和实体认证。大致的流程如下:
- 每一个节点都必须生成一对ED25519密钥对作为自己的ID。
- 当两个节点建立起TCP连接时,两者都会生成一个临时的ED25519密钥对,并把临时公钥发给对方。
- 两个节点分别将自己的私钥和对方的临时公钥相乘,得到共享密钥。这个共享密钥对称加密密钥。
- 将两个临时公钥以一定规则进行排序,并将两个临时公钥拼接起来后使用Ripemd160进行哈希处理,后面填充4个0,这样可以得到一个24字节的随机数。
- 得到的随机数作为加密种子,但为了保证相同的随机数不会被相同的私钥使用两次,我们将随机数最后一个bit置为1,这样就得到了两个随机数,同时约定排序更高的公钥使用反转过的随机数来加密自己的消息,而另外一个用于解密对方节点的消息。
- 使用排序的临时公钥拼接起来,并进行SHA256哈希,得到一个挑战码。
- 每个节点都使用自己的私钥对挑战码进行签名,并将自己的公钥和签名发给其它节点校验。
- 校验通过之后,双方的认证就验证成功了。后续的通信就使用共享密钥和随机数进行加密,保护数据的安全。
应用示例
Tendermint官方项目里内置了ABCI Application的两个简单实现counter以及kvstore。这个两个Demo逻辑非常简单,运行起来也非常简单,以kvstore为例,只需要下面三条简单的指令就可以轻松的跑起来:
- tendermint init
- abci-cli kvstore
- tendermint node
复杂一点,假设想使用Tendermint实现一套类似Ethereum的应用,最终应该是这样:
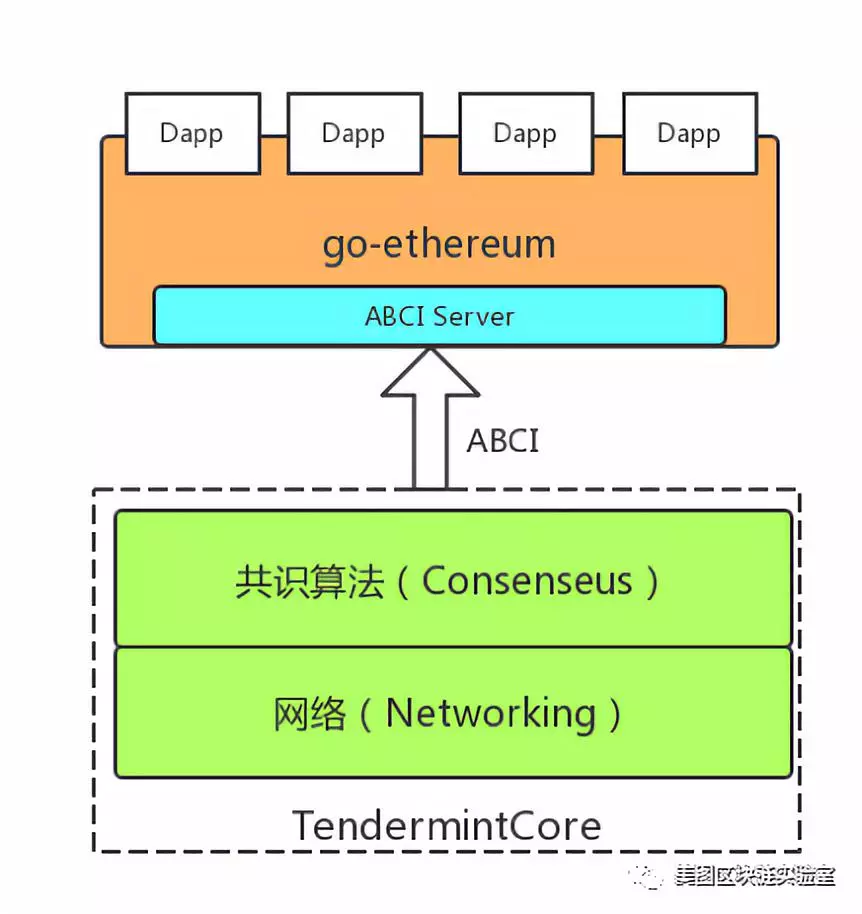
由Tendermint Core负责交易和区块的共享以及共识处理,开发者只需将go-ethereum和ABCI Server集成一个ABCI应用。Ethermint项目就是Tendermint团队开发的一个类似应用,大家可以参考,遗憾的是目前Ethermint目前只支持低版本的abci和go-ethereum。
Tendermint工作流
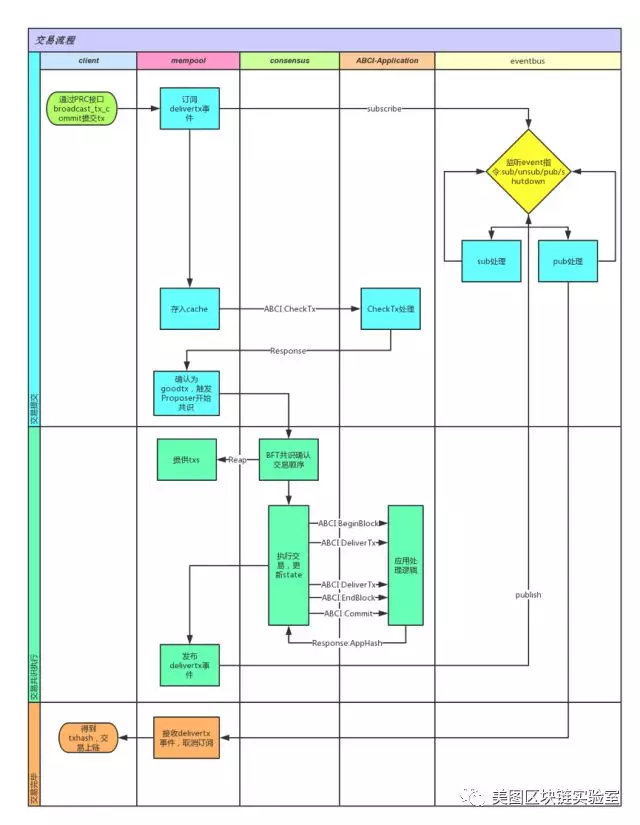
上图简单描述了Tenermint的工作流。大致为:
- client通过RPC接口broadcast_tx_commit提交交易;
- mempool调用ABCI接口CheckTx用于校验交易的有效性,比如交易序号、发送者余额等,同时订阅交易执行后的事件并等待监听。
- 共识从mempool中获取交易开始共识排序,打包区块,确定之后依次调用ABCI相关接口更新当前的世界状态,并触发事件。
- 最终将交易信息返回client。
总结
本文从概念、设计原则以及架构等方面对Tendermint做了详细的介绍,让大家可以直观了解到Tendermint的设计思想和实现原理。了解Tendermint之后,方便大家:
- 可以快速开发出自己的区块链应用而无需关注共识和P2P网络。
- 能够很好的兼容到Cosmos跨链生态中,因为Tendermint是Cosmos的核心技术。
- 开发支持任何编程语言的区块链。